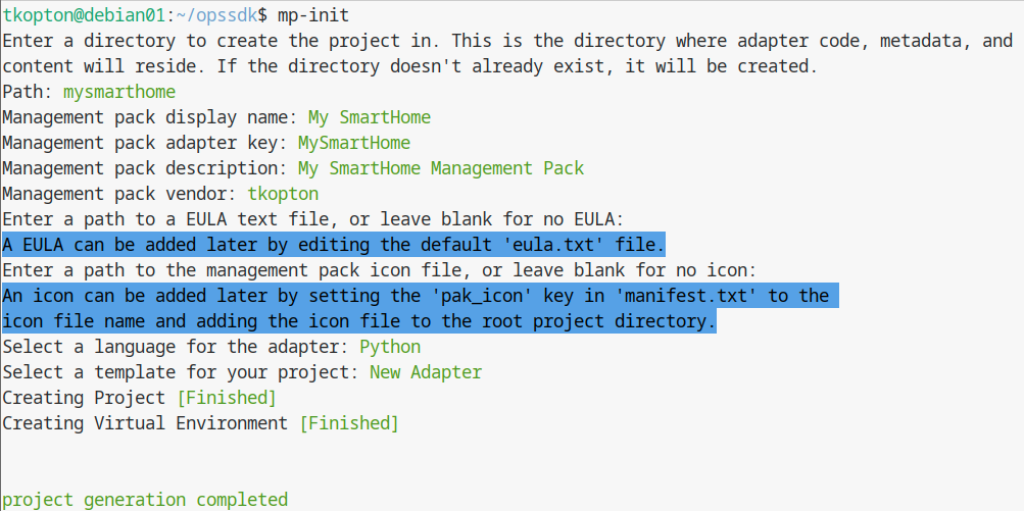
In the first post on the topic of VMware Operations Integration SDK, I showed how I prepared my development environment and how a demo project is created using the triad of mp-init, mp-test, and mp-build.
In this post, we’ll take a closer look at which files a simple, REST API-based project consists of, as well as how the structure of the actual app (Python code) looks like.
Using the example of my SmartHome central unit, I will show how the demo code needs to be adapted to build a simple, functional, and expandable Management Pack.
Project Initialization
As already shown in the first part, a project begins with us calling mp-init and thereby creating the project structure. Of course, we enter appropriate values for names, description, etc. After all, it should become a proper Management Pack.

At this point, we have created our project structure, and we’ll now quickly take a look at it. The next screenshot shows the folder and files two levels down of the project folder creates by mp-init.

The files outlined in red are the ones we will need to modify during the development of the Management Pack. It’s obvious that we will be working with the Python files, but the adapter_requirements.txt will also be adjusted so that we get all the necessary libraries for our own code included. The connections.json contains all the data needed for the development environment to actually communicate with a real endpoint when mp-test is called, in this case with my SmartHome central unit.
Adapter Logic
Broadly speaking, and this is indeed sufficient for a basic framework, we can summarize the necessary work steps in three points:
- Modify the adapter definition to add fields for connecting to the SmartHome endpoint.
- Modify the test method to create a SmartHome connection and run a test query.
- Modify the collect method to collect objects, metrics, properties, and relationships.
Adapter Definition
The adapter definition, typically implemented in the get_adapter_definition() method, which is later on reflected in conf/describe.xml file of the Management Pack, serves several crucial purposes, like:
- It defines the configuration parameters and credentials needed to connect to the target endpoint (e.g., host, port, username, password).
- It specifies the object types and attribute types that will be present in a collection.
In essence, the adapter definition is a crucial step in creating a Management Pack, as it establishes the foundation for how the adapter will interact with both the target system and VMware Aria Operations.
Of course, I can’t present the entire code in one post; that would be beyond the scope. That’s what the official documentation is for, and I will also post my code on GitHub and try to keep it up to date. At least up-to-date enough that one can learn from it. Here, I will only present the essential and abbreviated code snippets. It’s unlikely that anyone would want to exactly replicate my Management Pack; it’s more about the concepts behind it.
At the beginning, I outsourced a few constants; the file can be seen here:
ADAPTER_KIND = "tkSmartHome"
ADAPTER_NAME = "tk-SmartHome"
HOST_IDENTIFIER = "host"
PORT_IDENTIFIER = "port"
USER_CREDENTIAL = "user"
PASSWORD_CREDENTIAL = "password"
Lets start with the get_adapter_definition() method.
Once again, to make absolutely sure that no one tries to copy the code here 1:1. The snippets are heavily abbreviated and show what I consider to be essential.The get_adapter_definition() method defines what a SmartHome Adapter instance will look like. That is, which parameters, both string and number, are queried during configuration to connect to the endpoint, are there default values, what other options could there be, etc. It defines how the authentication should proceed. This is also where all object types with their associated metrics and properties are defined. It’s practically a basic framework of every Management Pack. We don’t need more than this at the beginning.
Please don’t be surprised by the strange method of authentication. The SmartHome system specifically requires a POST request with the user and password in the body and an additional Authorization header, which, when Base64 decoded, is nothing other than the string Basic clientId:clientPass. That’s just how it is 😉
def get_adapter_definition() -> AdapterDefinition: # type: ignore
    definition = AdapterDefinition(ADAPTER_KIND, ADAPTER_NAME)

    definition.define_string_parameter(
        "ID",
        label="ID",
        description="Example identifier. Using a value of 'bad' will cause test connection to fail; any other value will pass.",
        required=True,
    )

    definition.define_int_parameter(
        "container_memory_limit",
        label="Adapter Memory Limit (MB)",
        description="Sets the maximum amount of memory VMware Aria Operations can allocate to the container running this adapter instance.",
        required=True,
        advanced=True,
        default=1024,
    )

    definition.define_string_parameter(
        constants.HOST_IDENTIFIER,
        label="Host",
        description="FQDN or IP of the SmartHome Central Unit.",
        required=True,
        default="192.168.0.116",
    )

    definition.define_int_parameter(
        constants.PORT_IDENTIFIER,
        label="TCP Port",
        description="TCP Port SmartHome is listening on.",
        required=True,
        advanced=True,
        default=8080,
    )

    credential = definition.define_credential_type("smarthome_user", "Credential")
    credential.define_string_parameter(constants.USER_CREDENTIAL, "User Name")
    credential.define_password_parameter(constants.PASSWORD_CREDENTIAL, "Password")

    # Object types definition section

    system = definition.define_object_type("system", "System")
    system.define_string_property("systemid", "SystemID")
    device = definition.define_object_type("device", "Device")
    device.define_string_property("id", "ID")
    device.define_string_property("serialnumber", "Serial Number")
    device.define_string_property("name", "Name")
    device.define_metric("version", "Version")

    return definition
Test Method
Now, let’s inspect the test(adapter_instance: AdapterInstance) method.
The test method is usually relatively simple, as it is primarily used to check the connection to the endpoint. That is, whether the FQDN or IP address is correct, the port is right, the authentication works, etc.
My test method establishes two connections. First, I need to obtain a token, which is required for all other API calls; this is marked in blue. With this token, I can perform the second call, which is the green code.
The details, of course, depend on the endpoint. The SmartHome API provides tokens via auth/token, and the test calls the status REST method.
To make my work easier, I have outsourced the creation of a REST client to a separate class.
def test(adapter_instance: AdapterInstance) -> TestResult:
    result = TestResult()
    host = adapter_instance.get_identifier_value(constants.HOST_IDENTIFIER)
    port = adapter_instance.get_identifier_value(constants.PORT_IDENTIFIER)
    base_url = "http://" + str(host) + ":" + str(port)
    user = adapter_instance.get_credential_value(constants.USER_CREDENTIAL)
    password = adapter_instance.get_credential_value(constants.PASSWORD_CREDENTIAL)
    payload = {
        "username": user,
        "password": password,
        "grant_type": "password"
    }

    headers = {
        'Authorization': 'Basic Y*****=',  # Replace YOUR_ACCESS_TOKEN with your actual access token
        'Content-Type': 'application/json',
        'Accept': '*/*',
        'Accept-Encoding': 'gzip, deflate'
    }
    json_payload = json.dumps(payload)

    client = RestClient(base_url)
    status_code, response_data = client.post("auth/token", headers, json_payload)
    if status_code == 200:
        sh_token = response_data.get("access_token")
    else:
        logger.error("Error:", status_code)

    client = None
    headers = None
    headers = {
        'Authorization': 'Bearer ' + sh_token,
        'Content-Type': 'application/json',
        'Accept': '*/*',
        'Accept-Encoding': 'gzip, deflate'
    }
    client = RestClient(base_url)
    status_code, response_data = client.get("status", headers)

    return result
And here is the code of my RestClient class. As for now, I have defined a get and a post method.
import requests

class RestClient:
    def __init__(self, base_url):
        self.base_url = base_url

    def get(self, endpoint, headers):
        url = f"{self.base_url}/{endpoint}"
        response = requests.get(url, headers=headers)
        status_code = response.status_code

        if response.ok:
            try:
                json_data = response.json()
                return status_code, json_data
            except ValueError:
                return status_code, None
        else:
            return status_code, None

    def post(self, endpoint, headers, payload):
        url = f"{self.base_url}/{endpoint}"
        response = requests.post(url, headers=headers, data=payload)
        status_code = response.status_code

        if response.ok:
            try:
                json_data = response.json()
                return status_code, json_data
            except ValueError:
                return status_code, "VALUE ERROR"
        else:
            return status_code, "ERROR"
Collect Method
The collect(adapter_instance: AdapterInstance) method is the actual heart of the adapter. As the name suggests, this method ensures that we get data from the endpoint and use this data to build our objects and assign metrics and properties to them. In my code, for example, I manually created two instances of the system object type, not based on a response from SmartHome, simply to show how an instance is built and how, for example, a property is assigned a value.
On the other hand, the instances of the device object type are built from the responses of the appropriate REST call. I have outsourced this functionality to a separate DeviceCollector class.
def collect(adapter_instance: AdapterInstance) -> CollectResult:
    with Timer(logger, "Collection"):
        result = CollectResult()
        try:
            host = adapter_instance.get_identifier_value(constants.HOST_IDENTIFIER)
            port = adapter_instance.get_identifier_value(constants.PORT_IDENTIFIER)
            base_url = "http://" + str(host) + ":" + str(port)
            logger.info(base_url)

            user = adapter_instance.get_credential_value(constants.USER_CREDENTIAL)
            password = adapter_instance.get_credential_value(constants.PASSWORD_CREDENTIAL)
            payload = {
                "username": user,
                "password": password,
                "grant_type": "password"
            }

            headers = {
                'Authorization': 'Basic xxxx=',
                # Replace YOUR_ACCESS_TOKEN with your actual access token
                'Content-Type': 'application/json',
                'Accept': '*/*',
                'Accept-Encoding': 'gzip, deflate'
            }

            json_payload = json.dumps(payload)

            client = RestClient(base_url)
            status_code, response_data = client.post("auth/token", headers, json_payload)
            if status_code == 200:
                sh_token = response_data.get("access_token")
            else:
                logger.error("Error:", status_code)

            system01 = result.object(ADAPTER_KIND, "system", "System")
            system01.with_property("systemid", "SH-Manager01")
            system02 = result.object(ADAPTER_KIND, "system", "NewSystem")
            system02.with_property("systemid", "SH-Manager02")

            devicecollector = DeviceCollector(adapter_instance, sh_token, host, result, logger)

            result = devicecollector.collect()

        except Exception as e:
            logger.error("Unexpected collection error")
            logger.exception(e)
            result.with_error("Unexpected collection error: " + repr(e))
        finally:
            # TODO: If any connections are still open, make sure they are closed before returning
            logger.debug(f"Returning collection result {result.get_json()}")
            return result
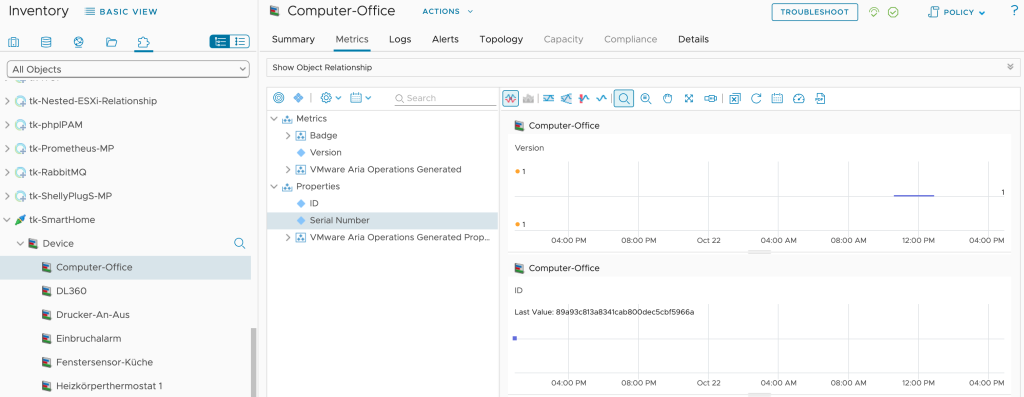
Of course, the code is far from finished. All metrics are still missing, and the object type device is not specific enough; these are just the first simple steps. The following two screenshots show how the result will look later in Aria Operations Inventory.”


The DeviceCollector method is structured very simply. A REST call is executed to get data about all devices, then the received JSON is iterated over, and for each device in the JSON, an instance of the object type ‘device’ is created. Each instance is then assigned a few properties and a metric (yes, I know, it’s not a real property, this is just for demonstration purposes). The whole thing is passed back to collect(), and voila, we’re done.
class DeviceCollector:
    def __init__(self, adapter_instance, token, fqdn, result, logger):
        self.fqdn = fqdn
        self.token = token
        self.result = result
        self.logger = logger
        self.adapter_instance = adapter_instance

    def collect(self):
        host = self.adapter_instance.get_identifier_value(constants.HOST_IDENTIFIER)
        port = self.adapter_instance.get_identifier_value(constants.PORT_IDENTIFIER)
        base_url = "http://" + str(host) + ":" + str(port)
        headers = {
            'Authorization': 'Bearer ' + self.token,
            'Content-Type': 'application/json',
            'Accept': '*/*',
            'Accept-Encoding': 'gzip, deflate'
        }
        client = RestClient(base_url)
        # Make a GET request to the device endpoint
        status_code, response_data = client.get("device", headers)
        if status_code == 200:
            for obj in response_data:
                self.logger.info("Device ID:" + obj["id"])
                self.logger.info("Serial Number:" + obj["serialNumber"])
                self.logger.info("Device Name:" + obj["config"]["name"])
                # creating object and adding it to the result set
                device_obj = self.result.object(ADAPTER_KIND, "device", obj["config"]["name"])
                device_obj.with_property(
                    "id", obj["id"]
                )
                device_obj.with_property(
                    "serialnumber", obj["serialNumber"]
                )
                device_obj.with_metric(
                    "version", obj["version"]
                )
        else:
            self.logger.error("Error:", status_code)

        return self.result
Testing
Now it’s time to test the whole thing. For this purpose, we have our mp-test command, and first, I’m using it to test the connection to my SmartHome central unit. For this, I select the Test Connection option from the mp-test menu.
As can be seen in the following screenshot, the connection works flawlessly, which means that the test method is performing its job as desired.”

The next test checks whether we also receive data and if the collect method creates the instances of the object types along with their metrics and properties as intended. For this, the Collect option is selected from the mp-test menu. The following two screenshots show it; I have shortened the JSON output so that the screenshot doesn’t become too long.

Building
Obviously, everything is working, we’re not getting any error messages, so let’s move on to the last step within the SDK – building the Management Pack, which is the actual .pak file for VMware Aria Operations. For this, we use the mp-build command as seen in the next image.

We now find the finished file in the Docker repository, which was specified when configuring the development environment, or, what is much quicker for us, in the build folder.

Deployment
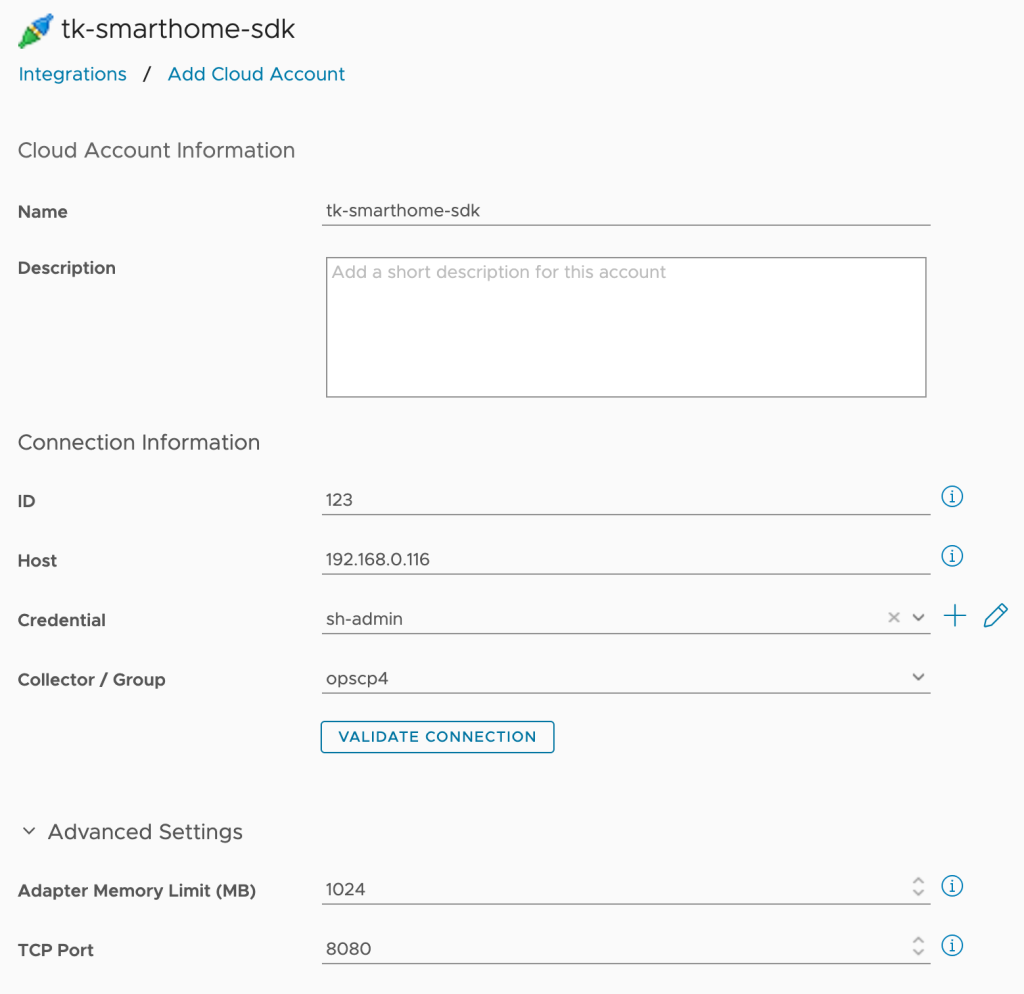
Now we just need to install the Management Pack in the usual way into the Aria Operations Integrations Inventory, as shown in the next image, so that we can immediately create an adapter instance.

In the adapter settings, we can beautifully see the options that were defined in the get_adapter_definition() method.

Outlook
That’s it for now. There are still many open construction sites in my Management Pack, but since I’m not a programmer and have practically no extensive experience with Python, it will take a while before the results are really presentable. Next, I’ll look at how to create relationships in the code.
If you’re more interested in the topic and happen to be visiting VMware Explore Barcelona 2024, come to my session Building Solutions: Step-by-Step Guide with Aria Operations Integration SDK [CODE1376BCN] and ask questions 🙂
Stay safe.
Thomas – https://twitter.com/ThomasKopton
