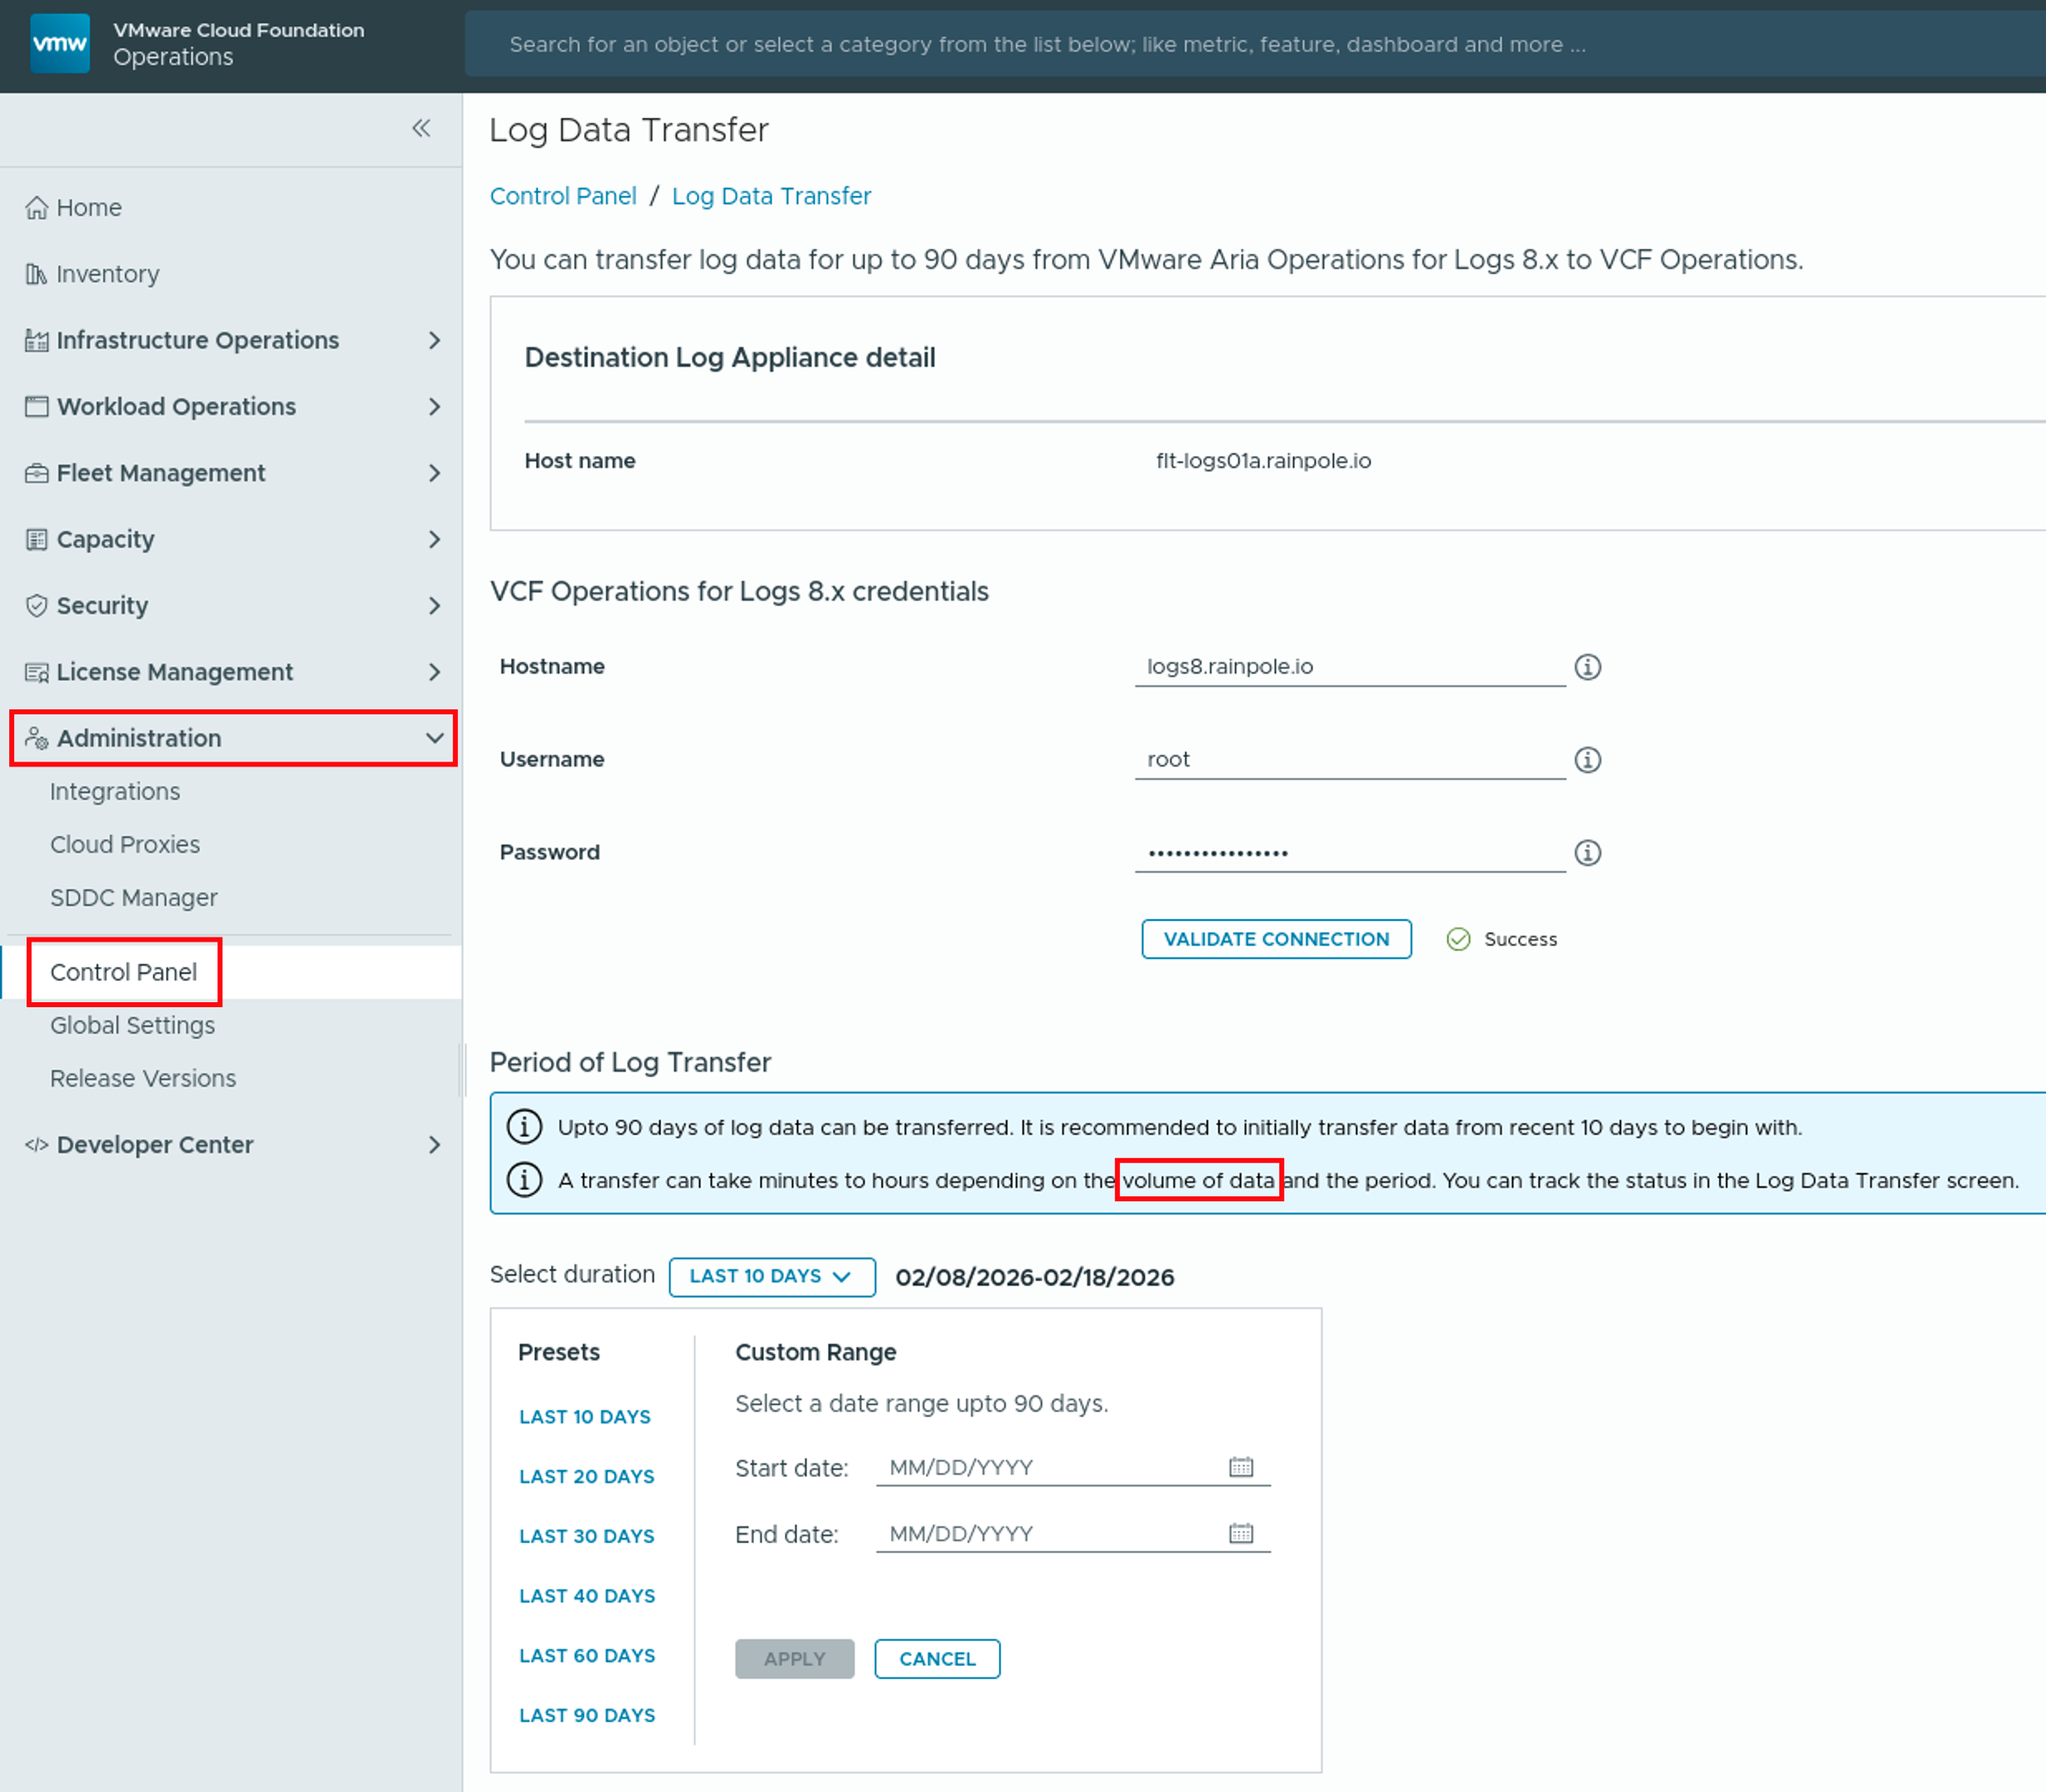
VMware Aria Operations for Logs Alerts as Symptoms in Aria Operations

As is likely known to everyone, the integration between VMware Aria Operations and Aria Operations for Logs involves forwarding alarms generated in Aria Operations for Logs to Aria Operations. If the integration has also established the link between the origin of the log message that triggered the alarm and the object in Aria Operations, the alarm in Aria Operations will be specifically “attached” to the correct object.

As seen in the following two images, the static field vmw_vr_ops_id ensures that the alarm triggered in Aria Operations for Logs appears as a Notification Event on the affected object in Aria Operations. In my case a virtual machine experiencing issues with an application.

Figure 01: Log messages in Aria Operations for Logs triggering a configured alert.
Figure 02: Notification Event in Aria Operations.

This functionality is completely sufficient for many use cases and helps to quickly detect problems and identify their root causes.

However, there are specific use cases that cannot be implemented with it. One such use case, for example, is the requirement to attach an Aria Operations Notification to such alarms, which in turn would trigger actions such as Webhooks. As of today, the configuration of Notifications does not allow Notification Events to be used as Alert Definitions under Category.

So, if we want to use Notifications for alarms coming from Aria Operations for Logs, we need to create an Alert Definition in Aria Operations, and for that, we need a Symptom. The task, therefore, is to build a Symptom from a Notification Event.

In my example, I want to build a Symptom from the Aria Operations for Logs Alarm, which arrives as a Notification Event in Aria Operations, as shown in the following image. As we can see, the name of the alarm in Aria Operations for Logs is tk-FailedESXiLoginAttempt on ${hostname}.

Figure 03: Alert definition in Aria Operations for Logs.

The Symptom in Aria Operations is based on a Message Event and has the Adapter, Object, and Event Types as depicted in the following image.

Figure 04: Message Event based Symptom definition in Aria Operations.

The details of the Symptom are shown in the following image. It is important to use contains as the condition here because Aria Operations for Logs replaces the field ${hostname} with the FQDN corresponding to the affected ESXi system. The string in the Contains condition is VMware Aria Operations for Logs: tk-FailedESXiLoginAttempt.

NOTE: This is the string as it is currently transmitted by Aria Operations for Logs at the time of writing this post.

Figure 05: Condition in the Symptom definition in Aria Operations.

Now, with this Symptom, an Alert Definition can be created in Aria Operations. The next images show the Alert Definition in my example.

Figure 06: Alert definition in Aria Operations.
Figure 07: Details of the Alert definition in Aria Operations.

With that, the Alert Definition can be further customized as usual, for example, by adding a Notification to it.

And this is how it looks in Aria Operations when someone attempts to log in to an ESXi host via SSH with an incorrect password.

Figure 08: Alarm in Aria Operations.

Stay safe.

Thomas – https://twitter.com/ThomasKopton

Aria Operations for Logs – Fields as Part of Alert Title – Quick Tip

As described in the official VMware Aria Operations for Logs (formerly know as vRealize Log Insight) documentation, you can customize alert names by including a field in the format ${field name}.

For example in the following alert definition which will be triggered by VM migration operations the title will contain the name of the user who started the migration process.

Figure 01: Sample alert definition containing a field.

The following screenshot shows the email I have received after starting a VM migration in vCenter. The ${vmw_user} field has been replaced by its value.

Figure 02: Alert via email containing the value of the field.

This kind of adding additional information to the alert title works pretty well in most cases but sometimes you might discover unusual behavior and the configured field name will not be replaced by its actual value.

The reason for this, at least at the time of writing this post, is the way how Aria Operations for Logs processes the static fields. For example let us create our own static fields using Postman and push them via API as meta data together with the log message. The next picture shows a log message with some fields defined in the POST body. Please not the upper and lower case characters in names of the fields.

Figure 03: Sending a log message including static fields via REST API.

NOTE: This is the behavior as for the time of writing this post and using Aria Operations for Logs Version 8.14.1-22806512

The first important fact is that the names of the fields I have defined in the JSON body are all written in lower case after the ingestion in Aria Operations for Logs.

Figure 04: Ingested log message and its fields in the log explorer.

Let’s create an alert based on the myoperation Contains "poweroff" query. In the following picture you can see that the field in the query definition is also provided containing all lower case letters.

Figure 05: Alert definition without any fields in the alert name.

This alert definition works as expected, the next time my Aria Operations for Logs has received such a log message, the alert has been triggered and I have received this email:

Figure 06: Alert received – no issues.

As I would like to see the VM name right in the alert name, I will add the corresponding myvmname field to it:

Figure 07: Alert definition with a field in the alert name – all lower case.

This time I have received an email and to my surprise, the field was not replaced by the actual value.

Figure 08: Alert received – field has not been replaced by its value.

After few tests I have figured out that Aria Operations for Logs expects the field names in the same lower and upper case writing as they were specified in the originating log message to correctly replace them by their values in the title and btw. also in the description. The following picture shows my final alert definition including the fields myVMname in the title and myUsername in the description.

Figure 09: Final alert definition including fields in the alert name and alert description.

This time the received email shows the values instead of the field names.

Figure 10: Alert received – no issues – again.

I hope it helps you create alerts that provide useful information at first glance.

Stay safe.

Thomas – https://twitter.com/ThomasKopton

Energy Data at Datacenter Level using VMware Aria Operations

As you all probably know, VMware Aria Operations is providing several energy consumption and sustainability related data at different levels. From the power usage of a single Virtual Machine up to the aggregated data at the vSphere Cluster (Cluster Compute Resource) level.

What we are missing, at least as of today, are similar aggregated metrics at the Datacenter and Custom Datacenter level.

Fortunately there is an easy way to calculate the missing information. VMware Aria Operations Super Metrics is the recommended way to implement it, as usual in such scenarios where we need to derive data from existing metrics using mathematical formulas.

In this short post I will focus on one specific metric, the general procedure applies to any other metric.

Use Case

As DC manager I want to see the energy consumption of my data centers over the period of last month (or any other configurable time period).

Implementation

To cut the long story short, I will use a Super Metric to calculate the sum of the Sustainability|Power usage (kWh) metric at the Cluster level and make it available at the Datacenter and Custom Datacenter object level. Following picture shows the available metric at the cluster level.

Figure 01: Cluster level power usage metric.

Please note that every data point of this metric shows the power usage over the last 5 minutes. The power usage over the last hour is the sum of 12 data points. For the sfo-w01-cl01 cluster in the previous picture it would be roughly 160W * 12 = 1920Wh = 1,92kWh.

The Super Metric is extremely simple, you see the formatted formula in the following picture alongside with the object types this Super Metric will be assigned to (calculated for), Datacenter and Custom Datacenter, and the Aria Operations Policies where this Super Metric will be activated. As always for Super Metrics, do not forget the last step – activate the new Super Metric in your respective policy.

Figure 02: The new Super Metric for Datacenter and Custom Datacenter object types.

If you prefer to copy and paste the formula, here comes the unformatted formula:

sum(${adaptertype=VMWARE, objecttype=ClusterComputeResource, attribute=sustainability|power_usage, depth=2})

The following picture shows the new Super Metric being calculated every 5 minutes for one of my Datacenter objects.

Figure 03: The new Super Metric calculated for a Datacenter object.

Now we can create a View, as shown in the next picture, with all our Datacenter (and Custom Datacenter) objects and use it in Dashboards or Reports.

Figure 04: Datacenter power usage Aria Operations View .

As always the time range configured in the Aria Operations View can be adjusted to meet the actual requirement.

Stay safe.

Thomas – https://twitter.com/ThomasKopton

Effortless Energy Savings – Air Conditioning Control with VMware Aria Operations

In a series of recent blog posts, I’ve delved into the fascinating realm of VMware Aria Operations, uncovering its remarkable capabilities in analyzing energy consumption, energy costs, and carbon emissions attributed to diverse elements within a Software Defined Data Center (SDDC). Beyond just elucidating these features, I’ve also spotlighted the seamless integration of Aria Operations within SDDC automation, showcasing its user-friendly nature and its pivotal role in streamlining operational processes.

In this blog post, I’ll break down the basics of using VMware Aria Operations to control air conditioning in a closed-loop manner. We’ll explore how VMware Aria Operations handles this process step by step, making it easy to understand and implement. Let’s dive in and demystify the world of air conditioning control with VMware Aria Operations.

NOTE: In this blog post, I want to clarify that what I’m presenting is a Proof of Concept (PoC), not an exhaustive guide on controlling a particular AC device. Plus, since I don’t have an AC device in my basement, I’ll be illustrating the process using a fan. However, keep in mind that the principles discussed here can be applied to any HVAC (Heating, Ventilation, and Air Conditioning) device.

Problem Statement

While advancements in data center design and cooling technologies have undoubtedly contributed to enhanced energy efficiency, it remains prudent to conduct a thorough assessment of cooling systems to identify potential areas for optimization.

A key aspect of enhancing energy efficiency in cooling systems involves consistently fine-tuning the cooling process to accurately match demand, thereby preventing both overheating and excessive cooling. Put simply, excessive cooling leads to energy wastage.

While I won’t delve into the intricate workings of control loops or elaborate on the specifics of PI or PD controllers, it is crucial to emphasize the necessity of a closed control loop, as illustrated in the subsequent diagram.

Figure 01: Closed control loop.

Following components are the single parts of the loop:

  • VMware Aria Operations as the error detector to determine the deviation from the desired state or the threshold and the current stats as well as the controller adjusting the cooling device
  • A controllable fan as the cooling device
  • Server rack as the entity we need to cool
  • Temperature sensor as I have described one of my previous blog posts
Solution

Let’s start with the easy part, the rack. It just a rack with servers and switches, that’s it. One may say that it is not important to measure the temperature within the rack, important is to measure the temperature inside the servers itself, and this is correct. In the end the the question where we measure the temperature is part of the sophisticated logic, but the answer does not change the concept, thus I will stick to the temperature in the rack.

The sensor itself is described here and I have used the VMware Aria Operations Management Pack Builder to create a very simple solution to monitor the temperature and humidity provided by the sensor. The next picture shows the metrics in my Aria Operations instance.

Figure 02: Temperature and humidity monitoring.

My cooling device is a fan attached to a smart plug also described here. Same as for the sensor, these devices provide a REST API and I have created a Management Pack to monitor them, as shown in the next picture.

Figure 03: Smart plug management.

VMware Aria Operations forms the heart or the brain of the solution, it is the error or drift detector and the controller that tries to remediate the drift. Within Aria Operations there are two constructs implementing the detector and the controller respectively:

  • Symptoms and Alerts responsible for the drift detection between the desired and the current state
  • Notifications and Webhooks playing the role of the controller which sends the control signals towards the cooling device

The next picture shows the two Aria Operations Symptom Definitions with my thresholds for the high and low temperature. As you can see, I have decided to use 3 Wait/Cancel Cycles to avoid a too aggressive control pattern.

Figure 04: Symptom definitions.

Both symptoms are used in their respective Aria Operations Alert Definitions as shown in the following picture. Please not that I do not have changed the Wait/Cancel Cycles here, as the three cycles (15 minutes) in the symptoms are sufficient for this PoC.

Figure 05: Alert definitions.

As the temperature in the rack has breached the defined threshold (desired state), Aria Operations has triggered an alert.

Figure 06: Triggered temperature alert.

The last part of the control loop is signaling the cooling device. In this simple proof of concept signaling means switching the fan on and off.

Aria Operations Notifications and Webhooks combined together are implementing this part of the setup. The webhook itself consists of two elements, an Outbound Instance and the Payload Template.

The outbound instance refers to the endpoint we aim to connect with for transmitting the control signal. Following picture shows the configuration of my outbound instance, which is the REST API of the smart plug.

Figure 07: Outbound instance configuration.

The payload template represents the functional signal, encompassing distinct functions: activating the fan and subsequently deactivating it upon the temperature reaching a preconfigured threshold (our desired state), as established within the symptom parameters. The following illustration shows the straightforward configuration of such payload templates within the Aria Operations platform.

Figure 08: Payload templates configuration.

Aria Operations Notifications serve as the cohesive element that integrates all the previously introduced components, thus establishing the control loop. The Define Criteria describe when the notification should be triggered, the Outbound Method is what we control, the endpoint, and the Payload Template specifies what we do.

Figure 09: Notification configuration – the final assembly.

Ultimately, our established closed control loop is operational. Aria Operations continually monitors the temperature, identifies deviations from the target state, and initiates automated measures to remediate any deviations. This approach effectively saves energy, reduces expenses, and minimizes carbon emissions.

Figure 10: Enhancing efficiency – intelligent cooling for energy savings.

As previously indicated, the current post serves as a basic proof of concept. In authentic data center scenarios, Aria Operations would be seamlessly integrated with environmental monitoring and management systems, employing identical principles to achieve sustainability objectives.

Stay safe.

Thomas – https://twitter.com/ThomasKopton

Multiple Metrics with Aria Operations Telegraf Custom Scripts

When using VMware Aria Operations, integrating telegraf can significantly enhance your monitoring capabilities, provide more extensive and customizable data collection, and help ensure the performance, availability, and efficiency of your infrastructure and applications.

Utilizing the telegraf agent you can run custom scripts in the end point VM and collect custom data which can then be consumed as a metric.

One very important constraint is that the script has to delivery exactly one int64 value.

Problem Statement

If you need to return multiple values or even multiple decimals or floating point values you will need to have multiple scripts for every single value and encode and decode any decimals or floating point metrics.

Even if configuring and running multiple scripts is a doable approach sometimes you have one script providing multiple metrics and breaking down such single script into multiple ones is not an option.

Challenge now is: how to put the multiple metrics into one value and how to revert this one value back into multiple metrics. Basically an encode – decode problem statement.

Solution

Let’s start with some basics in math and recall how the decimal system works. For this I will refresh your memories deconstructing a large number into small pieces – 420230133702600. The following picture shows how this number looks like in the decimal system. I have truncated the sum expression for visibility but you get the point, the number is the sum of it positional values multiplied with the corresponding power of 10.

The idea now is very simple. I will encode two values (in my working use case I use two but it works for any number as long as inn the end it fits into int64) into a larger number using the positions within this single number as displayed in the next picture for four independent values: 7, 62, 230, 4200 which will give es one number – 7622304200.

Figure 02: Encoding four numbers into one number.
So how to do that encoding mathematically?

Depending on the length of the single numbers we need to determine the power of 10 at the position where this single number should start within the final value. 4200 starts at 10^0, 230 at 10^4, 62 at 10^7 and 7 at 10^9. The sum is our single value:

4200 * 10^0 + 
230  * 10^4 +
62   * 10^7 +
7    * 10^9 = 4.200 + 2.300.000 + 620.000.000 + 7.000.000.000 = 7622304200
And now, how to decode that number back into single values?

What we have now is one large number with encoded four values, n1, n2, n3, n4.

Figure 03: Encoding four numbers into one number and the resulting sum.

The math goes backwards this time, and we need two additional mathematical expressions:

  • floor() always rounds down and returns the largest integer less than or equal to a given number
  • the modulo (mod, or %) operation returns the remainder or signed remainder of a division

We start with the most left number and divide it by its starting power of 10 and apply the floor() function to the result of the division. The subsequent numbers further to the right need a slightly different approach:

  • divide the single large number modulo by the power of 10 corresponding to the beginning of the previous number to the left
  • divide the result of the previous step by the power of 10 corresponding to the beginning of the actual number we want to extract
  • apply the floor() function to the result of the previous step
n1 = floor(7622304200 / 10^9) = 7
n2 = floor((7622304200 mod 10^9) / 10^7) = 62
n3 = floor((7622304200 mod 10^7) / 10^4) = 230
n4 = floor((7622304200 mod 10^4) / 10^0) = 4200
How to do all of it in Aria Operations and telegraf?

In my easy to follow example I need to get two metrics from a Virtual Machine using telegraf custom script. For simplicity it is CPU usage in % with values between 0.0 and 100.0 and memory usage in MB ranging theoretically from 0 to 1816 according to the configuration of my VM. I know, we have these metrics in Aria Operations OOTB but this is just an example.

First of all we need to agree on a format to encode both metrics as shown in the next picture. As the CPU usage might become 100.0% and we need to get rid of the decimal value, we need to multiply every CPU usage value by 10, thus we need four positions for this metric.

Figure 04: Encoding two numbers into one number and their positions.

The steps are as follows:

  1. Convert the decimal value into integer. It is one figure precision so simply multiply by 10
  2. Convert both values into one value. Again my assumptions:
    • first number will be 0 >= n1 <= 1000, thus four digits
    • Second number will be (due to my config) also 0 >= n2 <= 1000, thus four digits

This is the shell script to calculate both values and encode them into one int64 number.

#!/bin/bash
# This script returns current CPU and memory usage values

cpuUsage=$(top -bn1 | awk '/Cpu/ { print $2}')
memUsage=$(free -m | awk '/Mem/{print $3}')

# echo "CPU Usage: $cpuUsage%"
# echo "Memory Usage: $memUsage MB"

n1=$cpuUsage
n2=$memUsage

# Calculate the sum using bc
sum=$(echo "($n1*10*10^0)+($n2*10^4)" | bc)

# Print the result
# echo "Sum: $sum"

output=${sum%.*}
echo $output

Now we can configure the script as telegraf custom script as show in the next picture where I run my telegraf on a Linux VM.

Figure 05: Configuration of the telegraf custom script.

After few minute you will see the new metric coming in.

Figure 06: Telegraf custom script and ist new metric – the single large number.

As last task we need to extract or decode the single values for CPU and memory usage from this number. Aria Operations Super Metrics are the best way to do this.

The next two pictures show both super metrics. Important to know is, that this are not so called THIS Super Metrics as the metric provided by the custom script is not added to the VM object itself but to the Custom Script object related to the VM, thus the depth=0 in the Super Metric formula.

Figure 07: Super Metric to decode the first number – memory usage.
Figure 08: Super Metric to decode the second number – CPU usage.

You can find the script and the Super Metrics here: https://github.com/tkopton/aria-operations-content/tree/main/telegraf-script-multimetric

The final result is shown in the next picture.

Figure 09: Both Super Metrics and the single large number returned by the custom script.

Stay safe.

Thomas – https://twitter.com/ThomasKopton

Checking SSL/TLS Certificates using Aria Operations – Update

In my article “Checking SSL/TLS Certificate Validity Period using vRealize Operations Application Monitoring Agents” published in 2020, I have described how to check the remaining validity of SSL/TLS certificates using Aria Operations, or to be more specific, using vRealize Operations 8.1 and 8.2 back in the days.

I did not expect this post to be utilized by some many customers to check their SSL/TLS certificates used to secure specifically non-VMware endpoints.

As things might have changed in latest versions of Aria Operations including the VMware Aria Operations SaaS offering, In this blog post I will describe how to check and adjust the configuration if required.

Application Monitoring – Agent Configuration

The first change is, that there is no Application Remote Collector (ARC) Aria Operations. Its functionality is now included in the Aria Operations Cloud Proxy.

A Cloud Proxy instance has to be deployed to the Aria Operations instance regardless the option being used, on-premises or SaaS. The following picture shows the Cloud Proxy in an on-premises Aria Operations instance.

Figure 1: Aria Operations Cloud Proxy.

To deploy and configure the Cloud Proxy please follow the official VMware documentation: https://docs.vmware.com/en/VMware-Aria-Operations/8.12/Getting-Started-Operations/GUID-7C52B725-4675-4A58-A0AF-6246AEFA45CD.html

The installation and configuration of the Aria Operations managed telegraf agent did not change significantly, the screenshots from my old post still apply. VMware documentation describes the installation, configuration and uninstallation process: https://docs.vmware.com/en/VMware-Aria-Operations/8.12/Configuring-Operations/GUID-0C121456-370C-467E-874B-38ACC93E3776.html

Figure 2: Installing Application Monitoring agent.

Once the agent has been installed and is running, the actual configuration of the agent becomes available.

The agent basically:

  • discovers supported applications and can be configured to monitor those applications
  • provide the ability to run remote check, like ICMP or TCP tests
  • provide the ability to run custom scripts locally

The ability to run scripts and report the integer output as metric back to Aria Operations is exactly what we need to run certificate checks.

The actual script is fairly easy and available, together with the Aria Operations dashboard, via VMware Code:

https://code.vmware.com/samples?id=7464

To let the agent run the script and provide a metric, we configure the agent with few options, the process has changed slightly in newer versions and you will find it under the Applications section.

Figure 3: Configure Custom Script.

The script itself expects two parameters, the endpoint to check and the port number.

Figure 5: Custom Script options.

One agent, like for example a designated Linux Virtual Machine, can run multiple instances of the same script with different options or completely different scripts.

All scripts need to be placed in /opt/vmware and the arcuser (as per default configuration) needs the execute permissions.

Dashboard

The running custom scripts provide a metric per script. The values can be used to populate dashboards or views or serve as metrics for symptoms and alert definitions.

Figure 5: Custom Scripts as metrics.

After downloading and importing the Dashboard into Aria Operations, please do not forget to reconfigure the Scoreboard widget. You will need to remove my custom script metrics and add yours, as shown here.

Figure 6: Scoreboard widget configuration.

A nice option is, to retain one of the examples as with one click apply the custom settings to all your custom script metrics as shown in the following picture, obviously you will need to change the Box Label. For some reason it does not copy the unit, it has to be specified on every new metric manually.

Figure 7: Scoreboard widget configuration – applying custom settings to all metrics.

The dashboard showing is very simple but with the color coding if the widget it is easy to spot endpoints with expiring SSL/TLS certificates and take appropriate actions.

Figure 8: SSL/TLS Certificate Validity dashboard

Of course you can adjust the widget settings to reflect your color coding.

Stay safe.

Thomas – https://twitter.com/ThomasKopt

Fixing “Virtual Machine Power Metrics Display in mW” using Aria Operations

In the VMware Aria Operations 8.6 (previously known as vRealize Operations), VMware introduced pioneering sustainability dashboards designed to display the amount of carbon emissions conserved through compute virtualization. Additionally, these dashboards offer insights into reducing the carbon footprint by identifying and optimizing idle workloads.

This progress was taken even further with the introduction of Sustainability v2.0 in the Aria Operations Cloud update released in October 2022 as well as in the Aria Operations 8.12 on-premises edition. Sustainability v2.0 is centered around three key themes:

  1. Assessing the Current Carbon Footprint
  2. Monitoring Carbon Emissions with a Green Score
  3. Providing Actionable Recommendations for Enhancing the Green Score.

When working with Virtual Machine power related metrics you need to be careful in case your VMs are running on certain ESXi 7.0 versions.

VMware has released a KB describing the issue: https://kb.vmware.com/s/article/92639

This issue has been resolved in ESXi 7.0 Update 3l.

Quick Solution in Aria Operations

The issue can be very easily fixed in Aria Operations using two simple Super Metrics. The first one is correcting the Power|Power (Watt) metric:

${this, metric=power|power_average} / 1000

And the second Super Metric fixes the Power|Total Energy (Wh) metric:

Figure 01: Super Metric fixing the power usage metric.
${this, metric=power|energy_summation_sum} / 1000
Figure 03: Super Metric fixing the energy consumption metric.
Applying the Super Metric – Automatically

Super Metrics are activated on certain objects in Aria Operations using Policies. The most common construct which is being used to group objects and apply a Policy to them is the Custom Group.

In this case I am using two Custom Groups. The first one contains all ESXi Host System objects with version affected by the issue described in the KB. The second Custom Group contains all Virtual Machine objects running on Host Systems belonging to the first group.

To create the first group and its member criteria I have used this overview of ESXi version numbers: https://kb.vmware.com/s/article/2143832.

The following picture shows how to define the membership criteria. And now you may see the problem. It will be a lot of clicking to include all 23 versions. But there is an easier way to do that. Simply create the Custom Group with two criteria as show below.

Figure 04: Custom Group containing the affected ESXi servers.

In the next step export the Custom Group into a file, open this JSON file with your favorite editor and just copy and paste the membership criteria, it is an array, and adjust the version number.

Figure 05: Custom Group as code – membership criteria array.

Save the file and import it into Aria Operations overwriting the existing Custom Group.

Figure 06: Importing the modified Custom Group.

Now this Custom Group contains all affected ESXi servers and we can proceed with the VM group. The membership criteria is simple as shown in the next picture.

Figure 07: Custom Group containing the affected VMs (running on affected ESXi servers).

You can download the Custom Group definition here and adjust the name, description and the policy to meet your requirements.

With this relatively simply approach Aria Operations provides correct VM level power and energy metrics.

Figure 08: Fixed metrics.

Happy dashboarding!

Stay safe.

Thomas – https://twitter.com/ThomasKopton

VMware Aria Operations – Custom Energy Consumption Dashboards

In today’s global landscape, sustainability has become an imperative priority for organizations worldwide. Executives at every level are fully dedicated to reducing their carbon footprint across all aspects of their operations and seeking innovative ways to achieve their environmental objectives.

VMware plays a pivotal role in assisting customers in making significant advancements towards reducing energy costs and carbon emissions associated with their digital infrastructure. VMware solutions not only provide responsive scalability and simplified management but, most importantly, offer a pathway to achieve decarbonization.

With the introduction of VMware Aria Operations 8.6 (formerly known as vRealize Operations), groundbreaking sustainability dashboards found their way into the product. These dashboards are designed to highlight the carbon emissions saved through compute virtualization while also offering optimization strategies to reduce carbon footprints by identifying idle workloads.

In this post I describe how to create additional custom dashboards in VMware Aria Operations with focus on:

  • current power usage
  • energy consumption
  • energy costs
  • carbon emissions
Use Case

My use case is to get a quick overview of the mentioned energy related data at all levels of the virtual infrastructure, Datacenters, Clusters, Hosts, Virtual Machines. I would like to see that information for the current month – Month to Date (MTD) time frame – beginning of the month up to now.

Solution

The fundamental parts of my dashboards are Aria Operations Views as they provide an easy way to transform the collected data – in my case I need the sum() transformation to summarize values over a period of time.

Figure 01: View – Transformation options.

The next crucial part is the Time Settings option. This option provides a wide range of settings related to the time range applied to the selected metrics or properties. The following picture shows the settings needed to specify the MTD time range.

Figure 02: View – Time Settings options.

The second important construct in Aria Operations are Custom Groups. Custom Groups are not only ideal for dynamically grouping objects using certain criteria, it is also a perfect way to add additional properties to all objects within a group.

I am using the Custom Group construct to add Energy Rate and CO2perkWh values to ESXi Host Systems running in a certain locations. The next picture shows the Custom Property option within Custom Group configuration.

Figure 03: Custom Groups – assigning custom properties option.

As already described in one of my previous blog posts, VMware Aria Operations collects all relevant power and energy related metrics, some of them need to be activated in the respective policy. The metrics used in this scenario are:

Cluster Compute Resource: Power|Power (Watt)
Host System: Power|Total Energy (Wh)
Host System: Power|Power (Watt)
Virtual Machine: Power|Total Energy (Wh)
Virtual Machine: Power|Power (Watt)

There are literally thousands of metrics and properties and still sometimes a specific metric is missing. The first step is always to check the Aria Operations policy for disabled metrics and if there is still something missing –> Super Metrics to the rescue!

Figure 04: Activating metrics in the policy.

I am using Super Metrics in my scenario to:

  • calculate the Energy Costs metric (at the Host System level) based on Host System: Power|Total Energy (Wh) and the Energy Rate custom property (adjusted to Wh value)
  • calculate the Carbon emissions metric (at the Host System level) based on Host System: Power|Total Energy (Wh) and the tk-CO2perkWh custom property
  • calculate the sum of Energy Costs on all relevant levels
  • calculate sum of Carbon Emissions on all relevant levels
  • calculate sum of Energy Consumption on all relevant levels

The next picture show as an example the tk-EnergyCosts Super Metric.

Figure 05: Super Metric example.

With all this pre-work (described on GitHub) I have created following dashboards to vizualize the energy related information from the initial use case.

The first dashboard shows the current (or last available) power usage metrics. The navigation through this dashboard is described in the first widget.

Figure 06: Current power usage dashboard.

The second dashboard focuses on energy consumption since the beginning of the month. As described in the “Info and Navigation” widget, the configuration of the buckets can be changed in the corresponding view to better meet the actual values in your environment. This applies to all dashboards and views.

Figure 07: Energy consumption dashboard.

The third dashboard shows the energy costs since the beginning of the month. As mentioned before, the energy rate value can be easily configured via Custom Groups.

Figure 08: Energy costs dashboard.

The fourth and last dashboard vizualizes the carbon emissions since the beginning of the month. Similar to the energy rate, the CO2 per kWh value can be also configured via Custom Groups.

Figure 09: Carbon emissions dashboard.

The content can be downloaded directly from my GitHub repo or via VMware Code.

The following picture shows the relations between the various custom content objects.

Figure 10: Custom content objects.

Happy dashboarding!

Stay safe.

Thomas – https://twitter.com/ThomasKopton

Energy Consumption Data in VMware Aria Operations for Applications (FKA Tanzu Observability, FKA Wavefront)

My last posts focused on sustainability and how VMware Aria Operations can help get more insights into energy consumption, infrastructure efficiency and how to improve operations and make the virtual infrastructure more sustainable.

In this post I will describe how I used an old Raspberry Pi, a DHT22 sensors, few Shelly Plug S smart plugs and VMware Aria Operations for Applications (FKA Tanzu Observability, FKA Wavefront) to get environment, power usage, energy consumption, energy costs and carbon emissions insights of my various devices.

Hardware

An old Raspberry Pi Model B Rev 2 on my desk was waiting for a new usage purpose and I thought it would be a good idea measure the temperature and humidity in my server rack, simply to see if I need any additional cooling. In my case it is rather a proof of concept but in real data centers this information can easily help adjust the cooling system and save energy.

The DHT22 sensor and how to attach it to the Pi is very well described here:

https://pimylifeup.com/raspberry-pi-humidity-sensor-dht22

I am already getting power usage data from my HPE servers via vSphere and for example VMware Aria Operations, power consumption of all other devices was however a blind spot. A very convenient, providing a well documented API, and not extremely expensive way to get that information (and enable home automation) are the Shelly Smart Devices. For this use case I have ordered few of the Smart Plug and Switch devices.

https://www.shelly.cloud/de-ch/products/product-overview/1xplugs/shelly-plug-s-5-pack

Software

To process the DHT22 temperature and humidity data I have forked:

https://github.com/adafruit/Adafruit_Python_DHT

And did some modifications to better meet my requirements:

https://github.com/tkopton/raspberry-pi-dht22-rest-api

I know, I need to switch to CircuitPython libraries, this is in my backlog;-)

The small REST server is providing the data I need:

{
    "sensors": [
        {
            "humidity": 60.0,
            "id": 1,
            "name": "Rack01-Bottom",
            "temperature": 19.5,
            "timestamp": "2023-05-09T14:05:12.970183"
        },
        {
            "humidity": 53.599998474121094,
            "id": 2,
            "name": "Rack02-Top",
            "temperature": 22.299999237060547,
            "timestamp": "2023-05-09T14:05:12.970183"
        }
    ]
}

The Shelly devices provide a REST API (and MQTT, but this is something for another blog post) OOTB. The JSON responses include all the needed data for my use cases.

{
    "meters": [
        {
            "power": 559.12,
            "overpower": 0.00,
            "is_valid": true,
            "timestamp": 1683640714,
            "counters": [
                574.193,
                599.288,
                597.426
            ],
            "total": 1728563
        }
    ]
}

To get all these metrics into Aria Operations for Applications I am using a Wavefront Proxy running in my lab and the Telegraf agent configured with the HTTP Plugin.

The high-level setup is fairly simple:

Figure 01: Wavefront-Proxy setup. (Source: https://docs.wavefront.com/proxies.html)

The Telegraf HTTP plugin is extremely easy to configure, few lines of config are sufficient to get all the data in. The first example shows the configuration for my Pi+DHT22 sensor and the second one for two Shelly devices (plug and switch):

[[inputs.http]]
  urls = [
    "http://192.168.0.151:5000/api/v1/sensors"
  ]
  method = "GET"

  timeout = "10s"
  data_format = "json"
  json_string_fields = ["name"]
[[inputs.http]]
  urls = [
    "http://192.168.0.23/status/0"
  ]
  method = "GET"
  username = "admin"
  password = "secret"
  timeout = "10s"
  data_format = "json"
  name_override = "shellyplug_lroom_tv"

[[inputs.http]]
  urls = [
    "http://192.168.0.17/status/0"
  ]
  method = "GET"
  username = "admin"
  password = "secret"
  timeout = "10s"
  data_format = "json"
  name_override = "shellyplug_basement_rack"

[[inputs.http]]
  urls = [
    "http://192.168.0.24/rpc"
  ]
  method = "POST"
  body = '''
  {"id":1,"method":"Switch.GetStatus","params":{"id":0}}
  '''
  timeout = "10s"
  data_format = "json"
  name_override = "shellyswitch_kitchen_light_top"

To calculate the carbon emissions we need to correct kgCO2 per kWh energy factor.

I am retrieving this real-time value (30-days trial) from:

https://app.electricitymaps.com/map

This is the config and after the trial I will switch to another source:

[[inputs.http]]
  urls = [
    "https://api-access.electricitymaps.com/$myID/carbon-intensity/latest?zone=DE"
  ]

  interval = "60m"
  method = "GET"
  headers = {"X-BLOBR-KEY" = "secret"}
  timeout = "10s"
  data_format = "json"
  name_override = "ElectricityMap_DE"
Outcome

Now it’s time to get insights from the data🙂

As I am still learning the WQL (Wavefront Query Language), these examples might not be perfect but they serve my use cases:

  • I want to know the power usage of my devices
  • I want to know the projected energy consumption of my devices over month, year etc.
  • I want to know the projected energy costs of my devices over month, year etc.
  • I want to know the projected carbon emissions indirectly induced by my devices over month, year etc.

The next two pictures show the configuration of two widgets as an example.

Figure 02: Carbon emissions widget – WQL example.
Figure 03: Carbon emissions Top-N widget – WQL example.

The following pictures show the dashboards I have created in Aria Operations for Applications to vizualize the energy related data.

Figure 04: Power usage dashboard.
Figure 05: Energy consumption dashboard.
Figure 06: Energy costs dashboard.
Figure 07: Carbon emissions dashboard.

In the following blog post I will describe how I implemented the same use cases in VMware Aria Operations focusing on the vSphere virtual infrastructure.

Stay safe.

Thomas – https://twitter.com/ThomasKopton

VMware Aria Operations Near Real-Time Monitoring Option and Power Metrics

One of the advantaged of VMware Aria Operations Cloud over the on-premises option is the availability of Near Real-Time Monitoring for the most important vSphere metrics. This is especially very helpful when troubleshooting short-lived issues.

However, this option brings with it a small challenge, especially if some of such near real-time metrics are later used as the basis for Super Metrics or in automation workflows.

So what is the challenge?

How 5-minutes collection cycle works in VMware Aria Operations

VMware Aria Operations is configured to collect data every 5 minutes form its source as per default. Basically the collector process wakes up every 5 minutes and gets last 15 samples, each of 20 seconds interval, from the source like for example from vCenter server. The next picture shows the 15 samples, and 15 x 20 seconds are 5 minutes – the default collection cycle

Figure 01: 5 minutes collection cycles details.

These fifteen 20 seconds samples are average and ONE value is saved in the FSDB (File System Database) of Aria Operations. Since few versions of Aria Operations you can also configure the policy to save also the (one and only one) max (Peak) value out of the 20 samples in addition to the averaged value. The next two pictures show the policy setting for one of such metrics (not all have this capability) and how it looks like in the metrics view.

Figure 02: Peak value activated in the policy.
Figure 03: Averaged and Peak value in the metrics chart.

Near Real-Time Option in VMware Aria Operations Cloud

One of the options available only in the Cloud version is Near Real-Time Monitoring for (selected) vCenter Adapter metrics. With this option activated, Aria Operations stores not only the averaged value but also all fifteen 20 seconds samples (with a three day history for this near real-time time series data).

The next two pictures show the difference between the 5-minutes default collection and the near real-time activated (the small blue clock icon).

Figure 04: Default 5-minutes metric collection.
Figure 05: Near real-time metric collection.

The Challenge

When Near Real-Time Monitoring is activated Super Metrics (as at the time of writing this blog post) will use the 20 seconds near real-time values in their formulas. This is for the majority of metrics absolutely OK but one needs to be careful with metrics representing a sum or product over time, like for example the Power|Total Energy (Wh) metric, which represents the energy consumption for a time period – 5 minutes per default or 20 seconds with activated Near Real-Time Monitoring. You can see the difference in the value in the previous screenshots – ca. 23Wh for 5 minutes vs. ca. 1.6Wh for 20 seconds, the math works 1.6 * 15 = 24.

Possible Solutions

If this metric is used as basis for further calculations in Super Metrics, the formula might need some adjustments. Like in the following example which extrapolates the value to calculate expected monthly usage.

Figure 06: Adjusted Super Metrics for non-near-real-time and near real-time activated.

Another option is to check if there is any other metric, which might be used in Super Metrics and are deactivated in the Policy as per default. Like for example the Power(W) metric as depicted in the next figure.

Figure 07: Metric states in the policy.

In the next picture you can see the impact the choice of the right formula and values makes.

Figure 08: Right Super Metric for the right use case.

Stay tuned for more Sustainability related post.

Stay safe.

Thomas – https://twitter.com/ThomasKopto