Introduction
As organizations modernize their Private Clouds with VMware Cloud Foundation 9, the logging infrastructure undergoes a significant evolution. Transitioning from VMware Aria Operations for Logs 8.18.x (formerly vRealize Log Insight) to the new VCF Operations for Logs 9 is designed as a side-by-side migration requiring a fresh deployment.
While there is a fully supported method to transfer up to 90 days of historical log data to the new instance, ensuring operational continuity requires a strategy for your custom logic. Beyond just log data, your environment relies on years of tailored content—such as Dashboards, Alert Definitions, and Extracted Fields—as well as specific configuration settings that tune the system to your environment.
Since these artifacts are not automatically carried over during the deployment, preserving them requires a targeted approach. In this post, I will outline how to leverage the native tools and features within Aria Operations for Logs and VCF Operations for Logs 9 to effectively migrate your critical content and essential configuration settings to the new VCF 9 platform.
Content Export using Custom Content Packs
One of the most efficient ways to migrate bulk content is to treat your custom work as if it were a third-party application. In Aria Operations for Logs, Content Packs are essentially containers designed to package logic and visualizations for portability. While we typically associate them with vendors (e.g., the vSphere Content Pack), you can create your own private Content Packs to bundle your environment’s custom artifacts into a single, portable .vlcp file.
This method is ideal because it maintains the relationships between objects. for example, if you add a Dashboard to a Content Pack, the system is generally smart enough to prompt you to include the dependencies (like the Queries or Widgets used in that Dashboard).
What Can Be Included?
When you create a custom Content Pack for migration, you can include the following objects:
- Dashboards: Your custom operational views.
- Alert Definitions: All custom alarms and notification triggers.
- Queries: Saved searches and favorite queries.
- Extracted Fields: Regex or delimiter-based field definitions you created to parse your specific logs.
- Agent Groups: Configurations for the Log Insight Agents (li-agent) running on your VMs.
Note: Content Packs do not include system configuration settings (like SMTP setup, Authentication providers, or VIPs) or User/Role assignments. Those must be handled separately.
Creating and Exporting a Migration Content Pack
Follow these steps in your source environment (Aria Operations for Logs 8.18.x) to package your content.
Create the Custom Content Pack
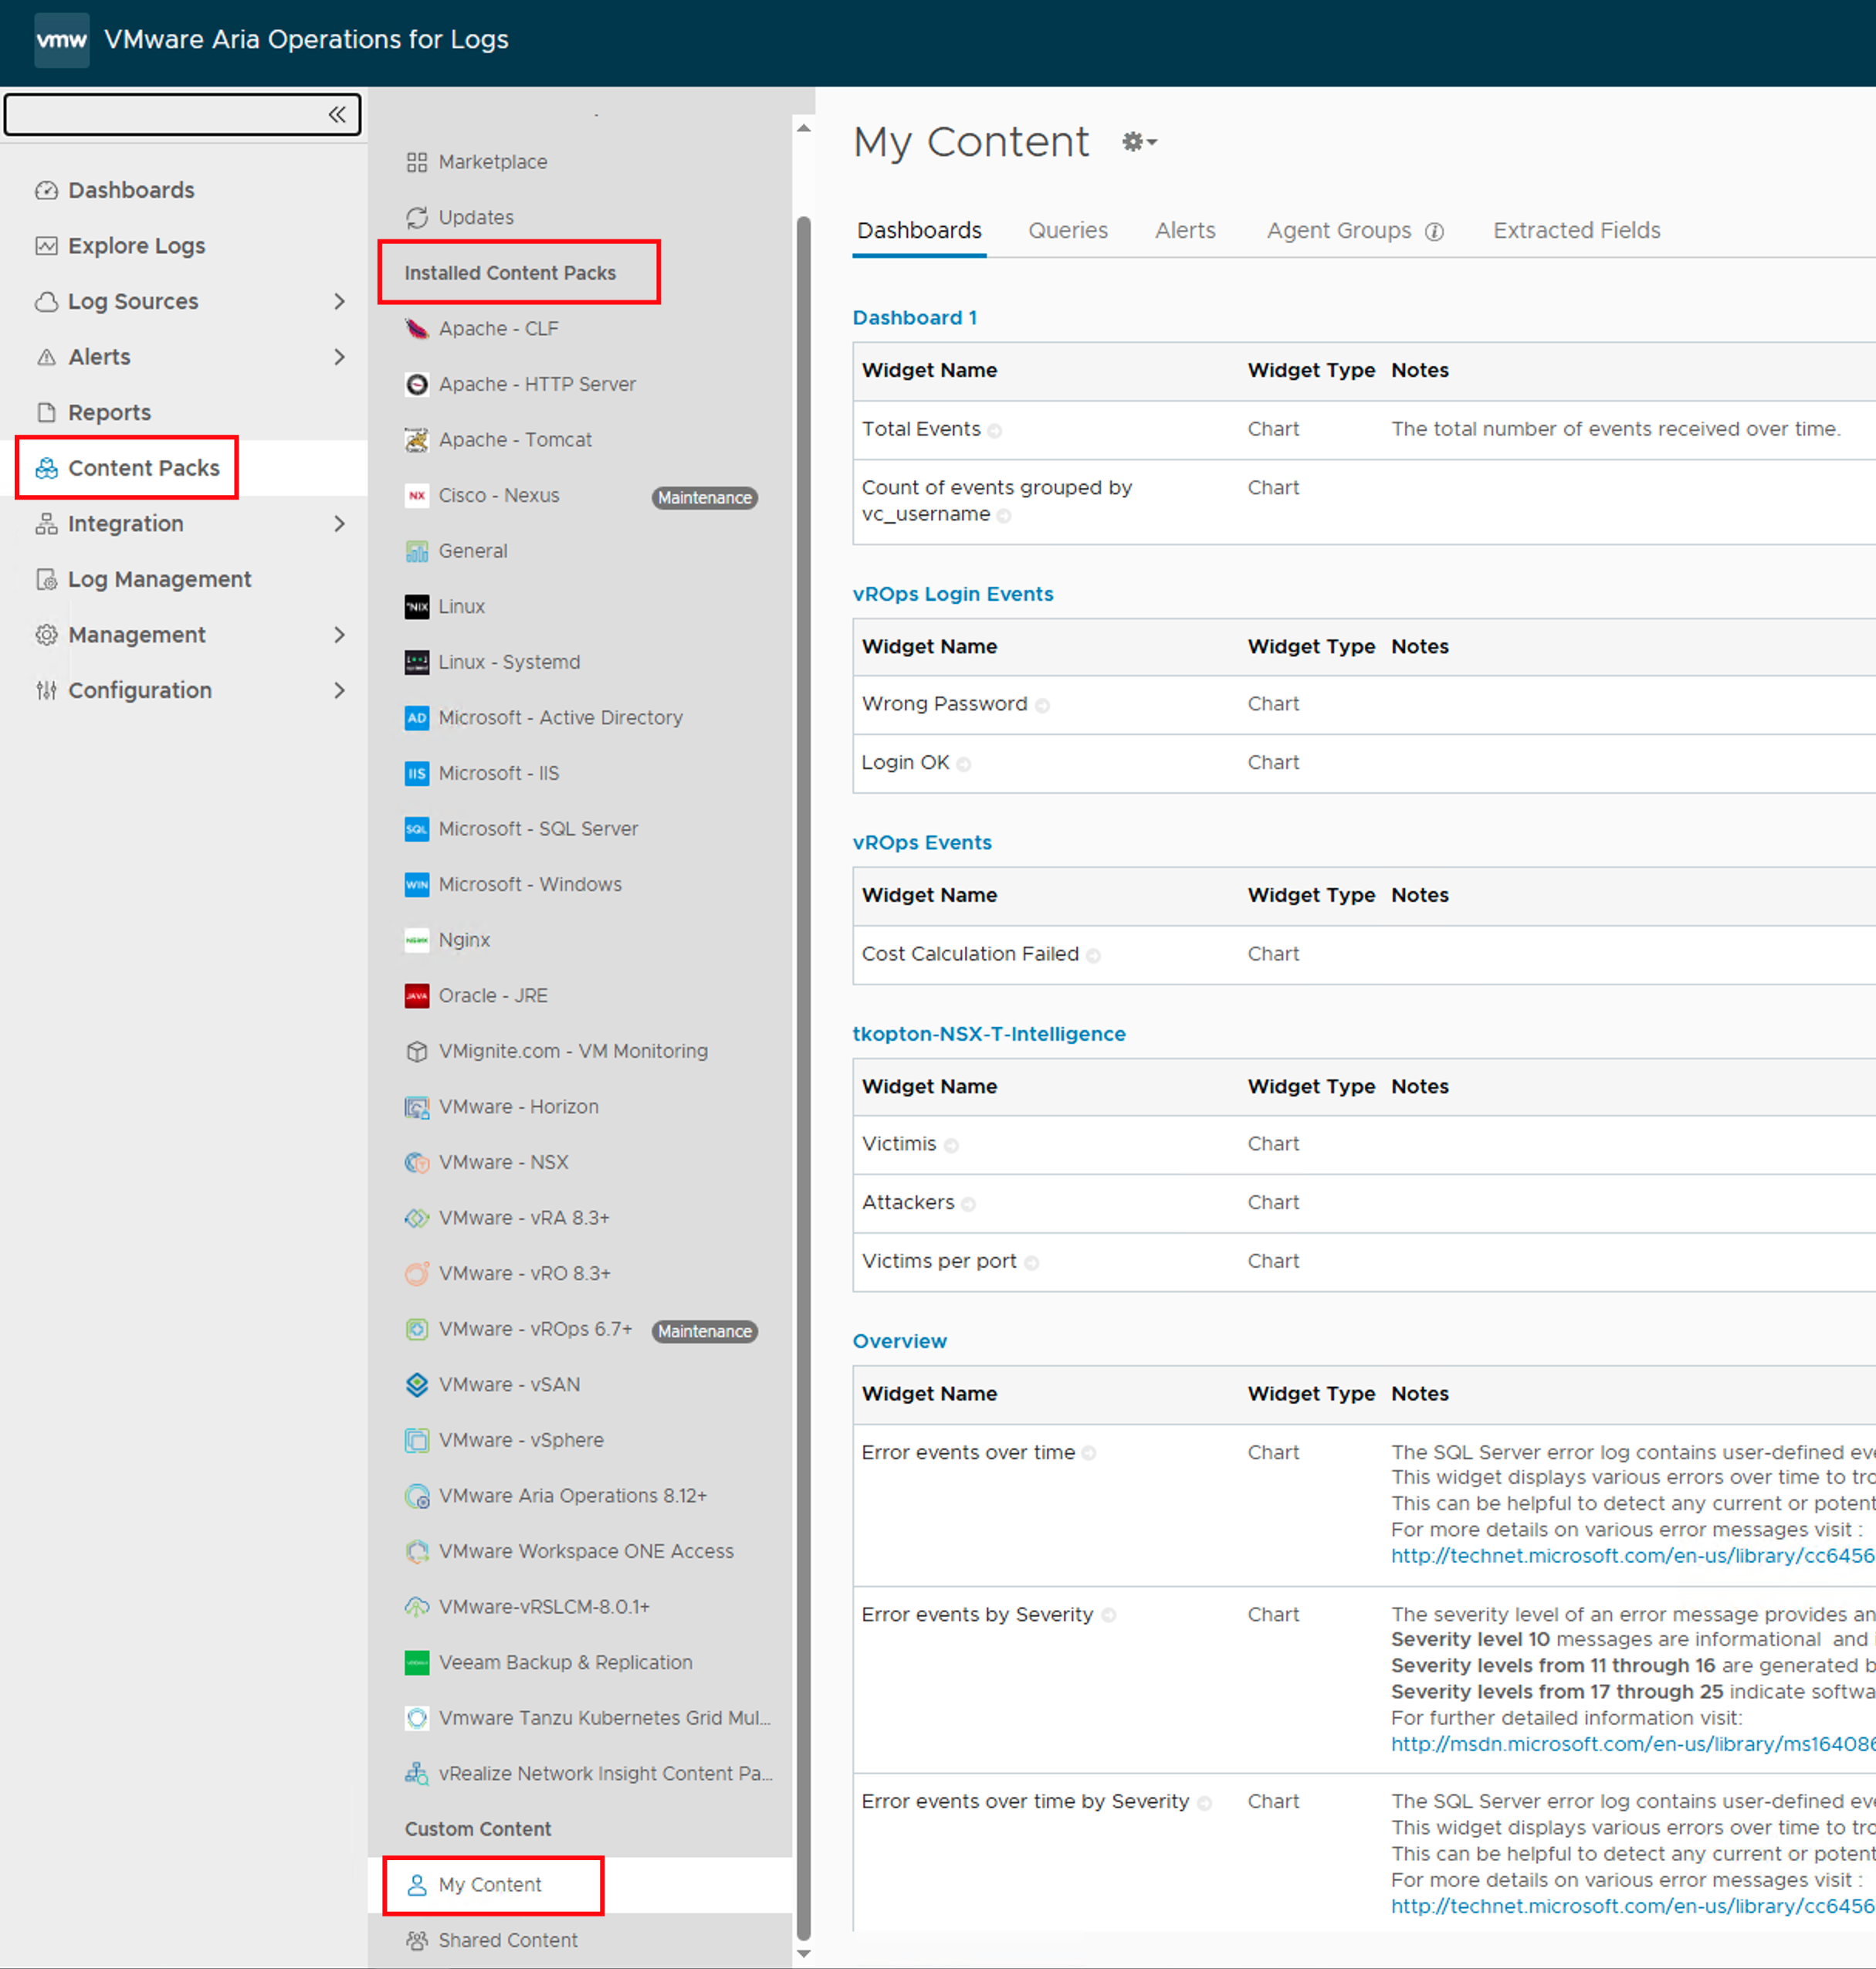
- Navigate to the Content Packs tab in the main menu.
- In the left-hand pane, under Custom Content select My Content or Shared Content depending where you have placed your content. Note: The procedure needs to be applied to both sections if both include custom content.

- Select the Export menu item.
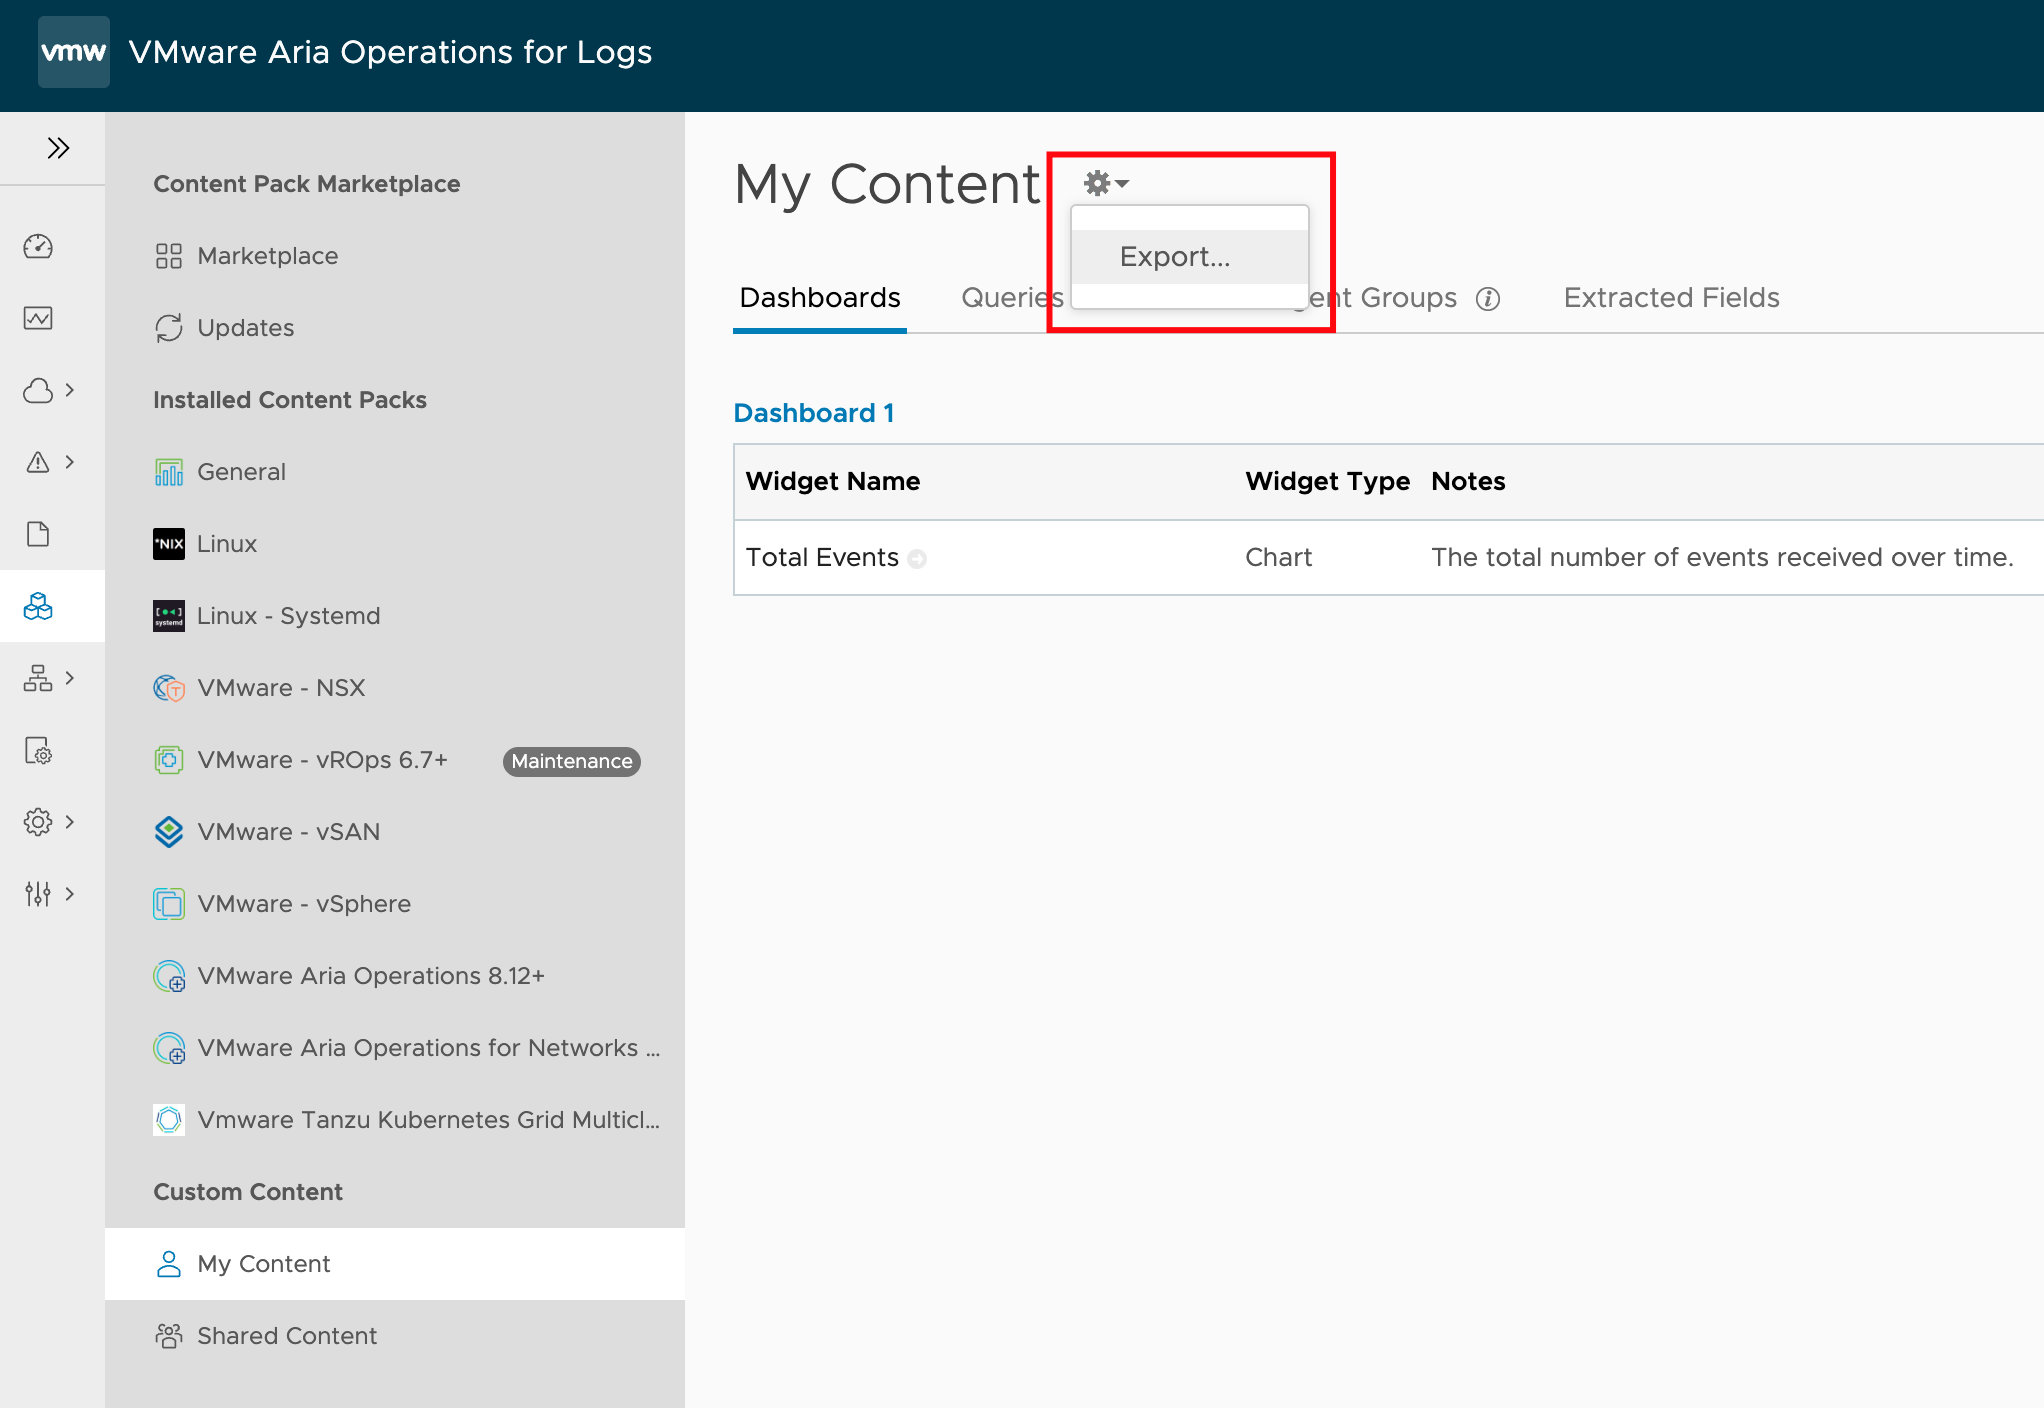
- Select the items you want to add to the content pack and export. Enter the required information like Name, Version and Namespace. Click Export.
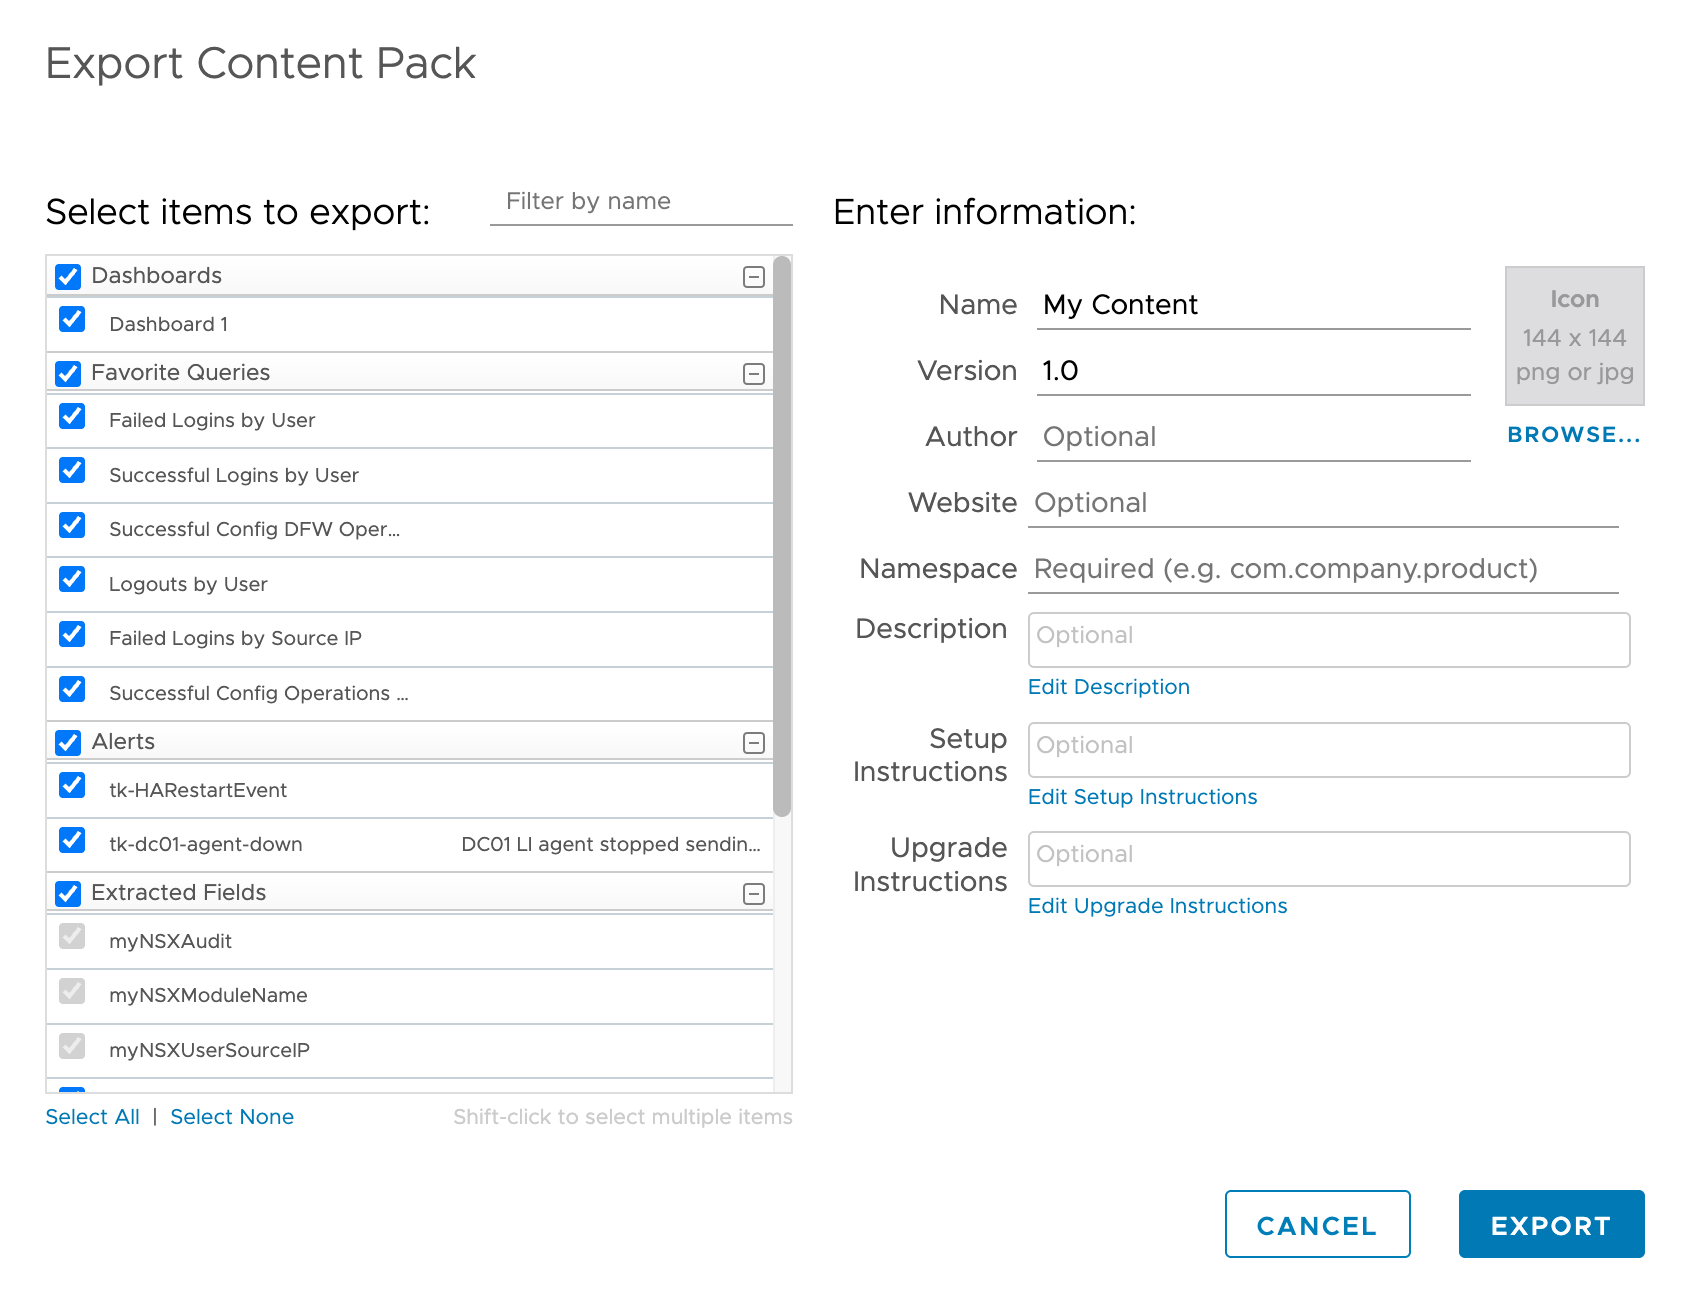
You now have a single file containing the “brain” of your logging environment, ready to be imported directly into VCF Operations for Logs 9 via the Import Content Pack workflow.
Importing Content into VCF Operations for Logs 9
With your .vlcp export file in hand and your new VCF Operations for Logs 9 instance deployed, it is time to restore your operational brain.
While the UI in VCF Operations for Logs 9 has been refreshed, the mechanism for importing content remains consistent with previous versions. However, you must make a strategic decision during the import process: Do you want this content to be a static “Golden Standard” or do you want it to be fully editable?
Importing the Migration Content Pack
- Log in to your new VCF Operations for Logs 9 web interface as an Administrator.
- Navigate to the Content Packs tab from the main menu.
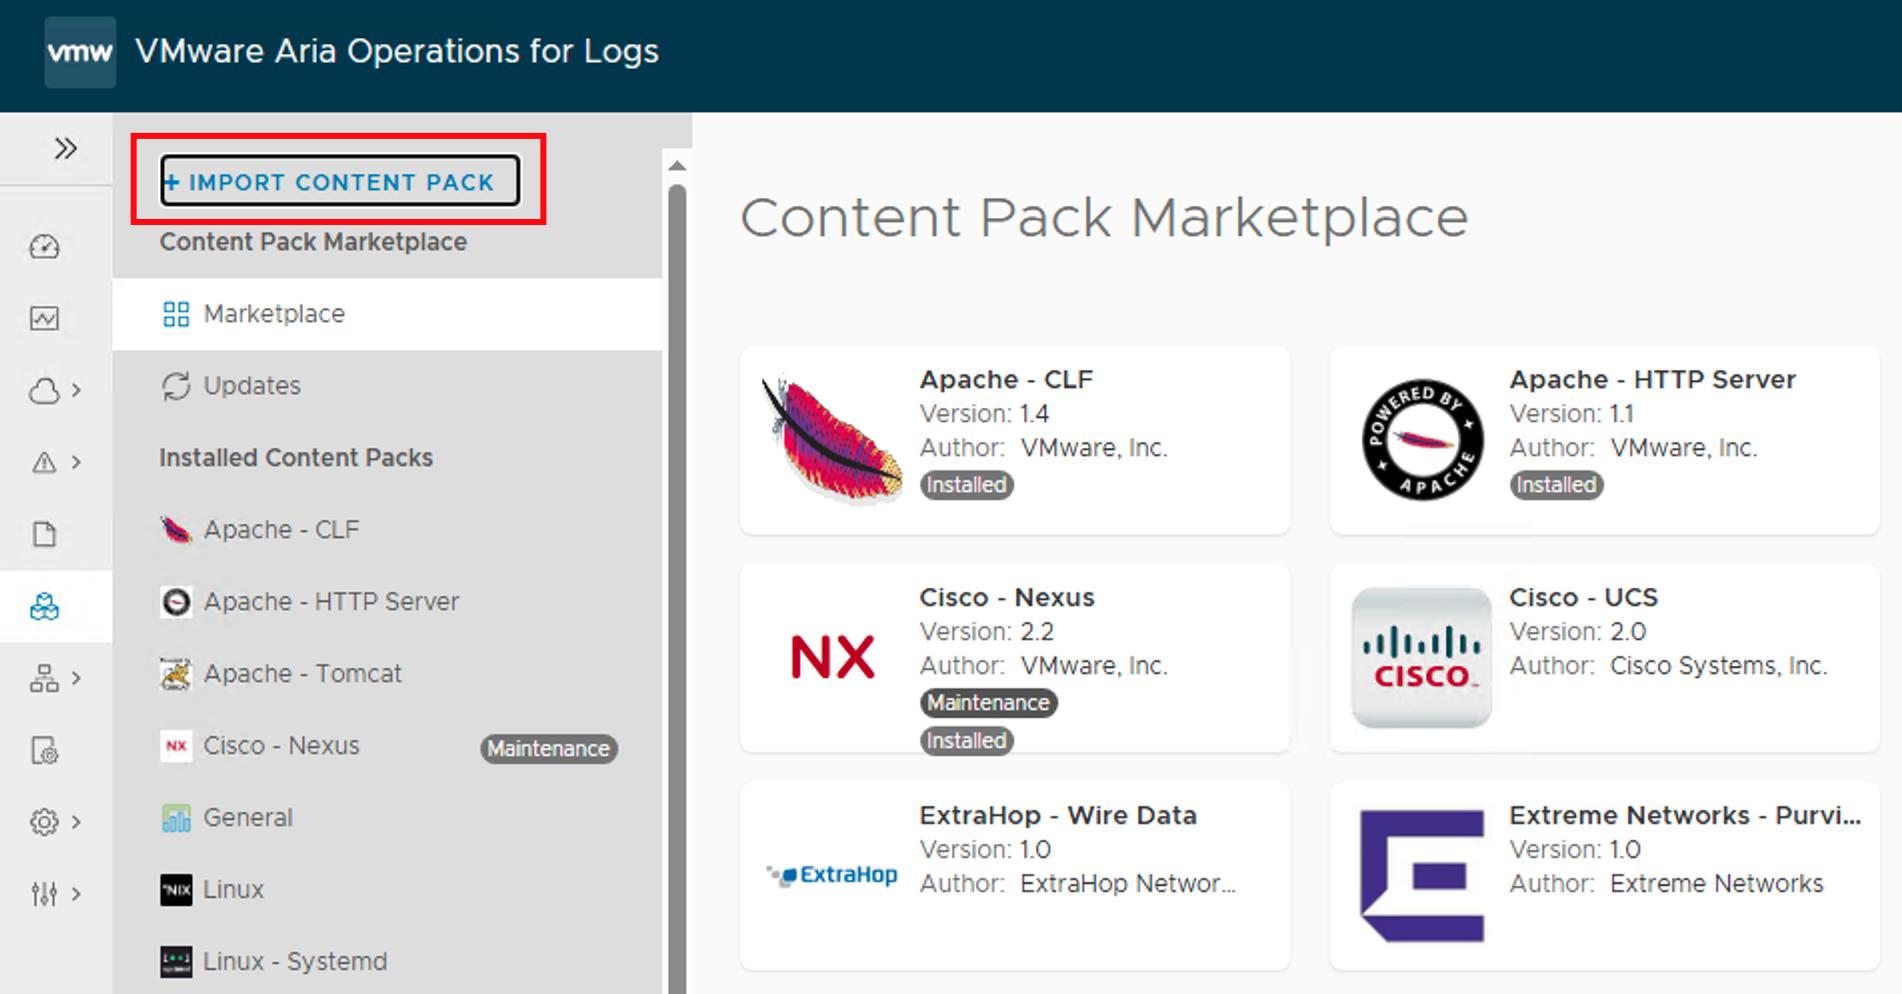
- In the left-hand navigation pane click the Import Content Pack button.
- A file select dialog window will appear. Locate and select the
.vlcpfile you exported from the old environment (e.g.,Migration_Export_8.18.vlcp). - Critical Step: You will be presented with an import dialog offering two distinct modes. Choose carefully:
- Option A: Install as Content Pack
- Behavior: This imports the content as a read-only “installed” pack, visible to all users immediately.
- Pros: It acts like a sealed backup. Users cannot accidentally break the dashboards or alerts. It preserves the “system” feel of the content.
- Cons: You cannot edit the content directly. To make changes later, you must clone the widget/dashboard to “My Content,” edit it, and repackage it.
- Best for: Finalized production dashboards, standard alerts, and compliance rules.
- Option B: Import into My Content
- Behavior: This extracts every dashboard, alert, and query from the pack and places them directly into your personal “My Content” folder.
- Pros: Fully editable immediately. Great for testing or if you plan to refactor the content significantly in the new version.
- Cons: It is only visible to you initially. You will need to manually share dashboards or move them to “Shared Content” for other teams to see them.
- Best for: Draft content or items you know need immediate updating (e.g., changing deprecated query syntax).
- Option A: Install as Content Pack

- Click Import.
- Review the import summary and uncheck content you do not want to import.
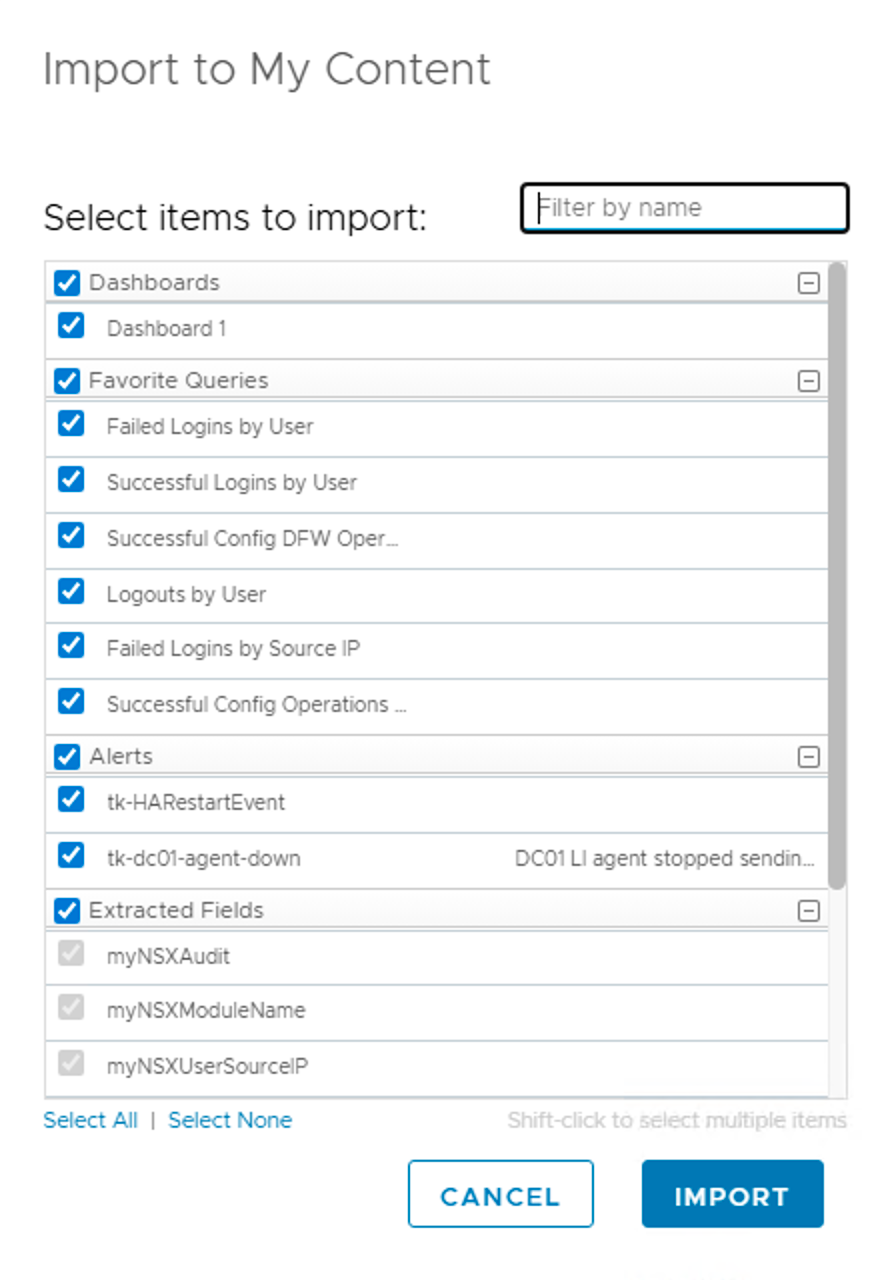
- Click Import.
Review
After the importing process has been finished we will find the content under My Content or as an Immutable Content Pack in the Content Packs section.
Recreating System Configuration & Settings
While Content Packs are excellent for migrating the logic of your operations (alerts, dashboards, queries), they do not capture the infrastructure settings of the cluster itself. Things like SMTP servers, authentication providers, and log forwarder settings are specific to the deployment instance and must be handled separately.
Fortunately, both Aria Operations for Logs 8.18.x and VCF Operations Logs 9 offer a well-documented REST API. The next screenshot shows a quick overview of all features and setting available via the REST API.
Config Extraction via REST API
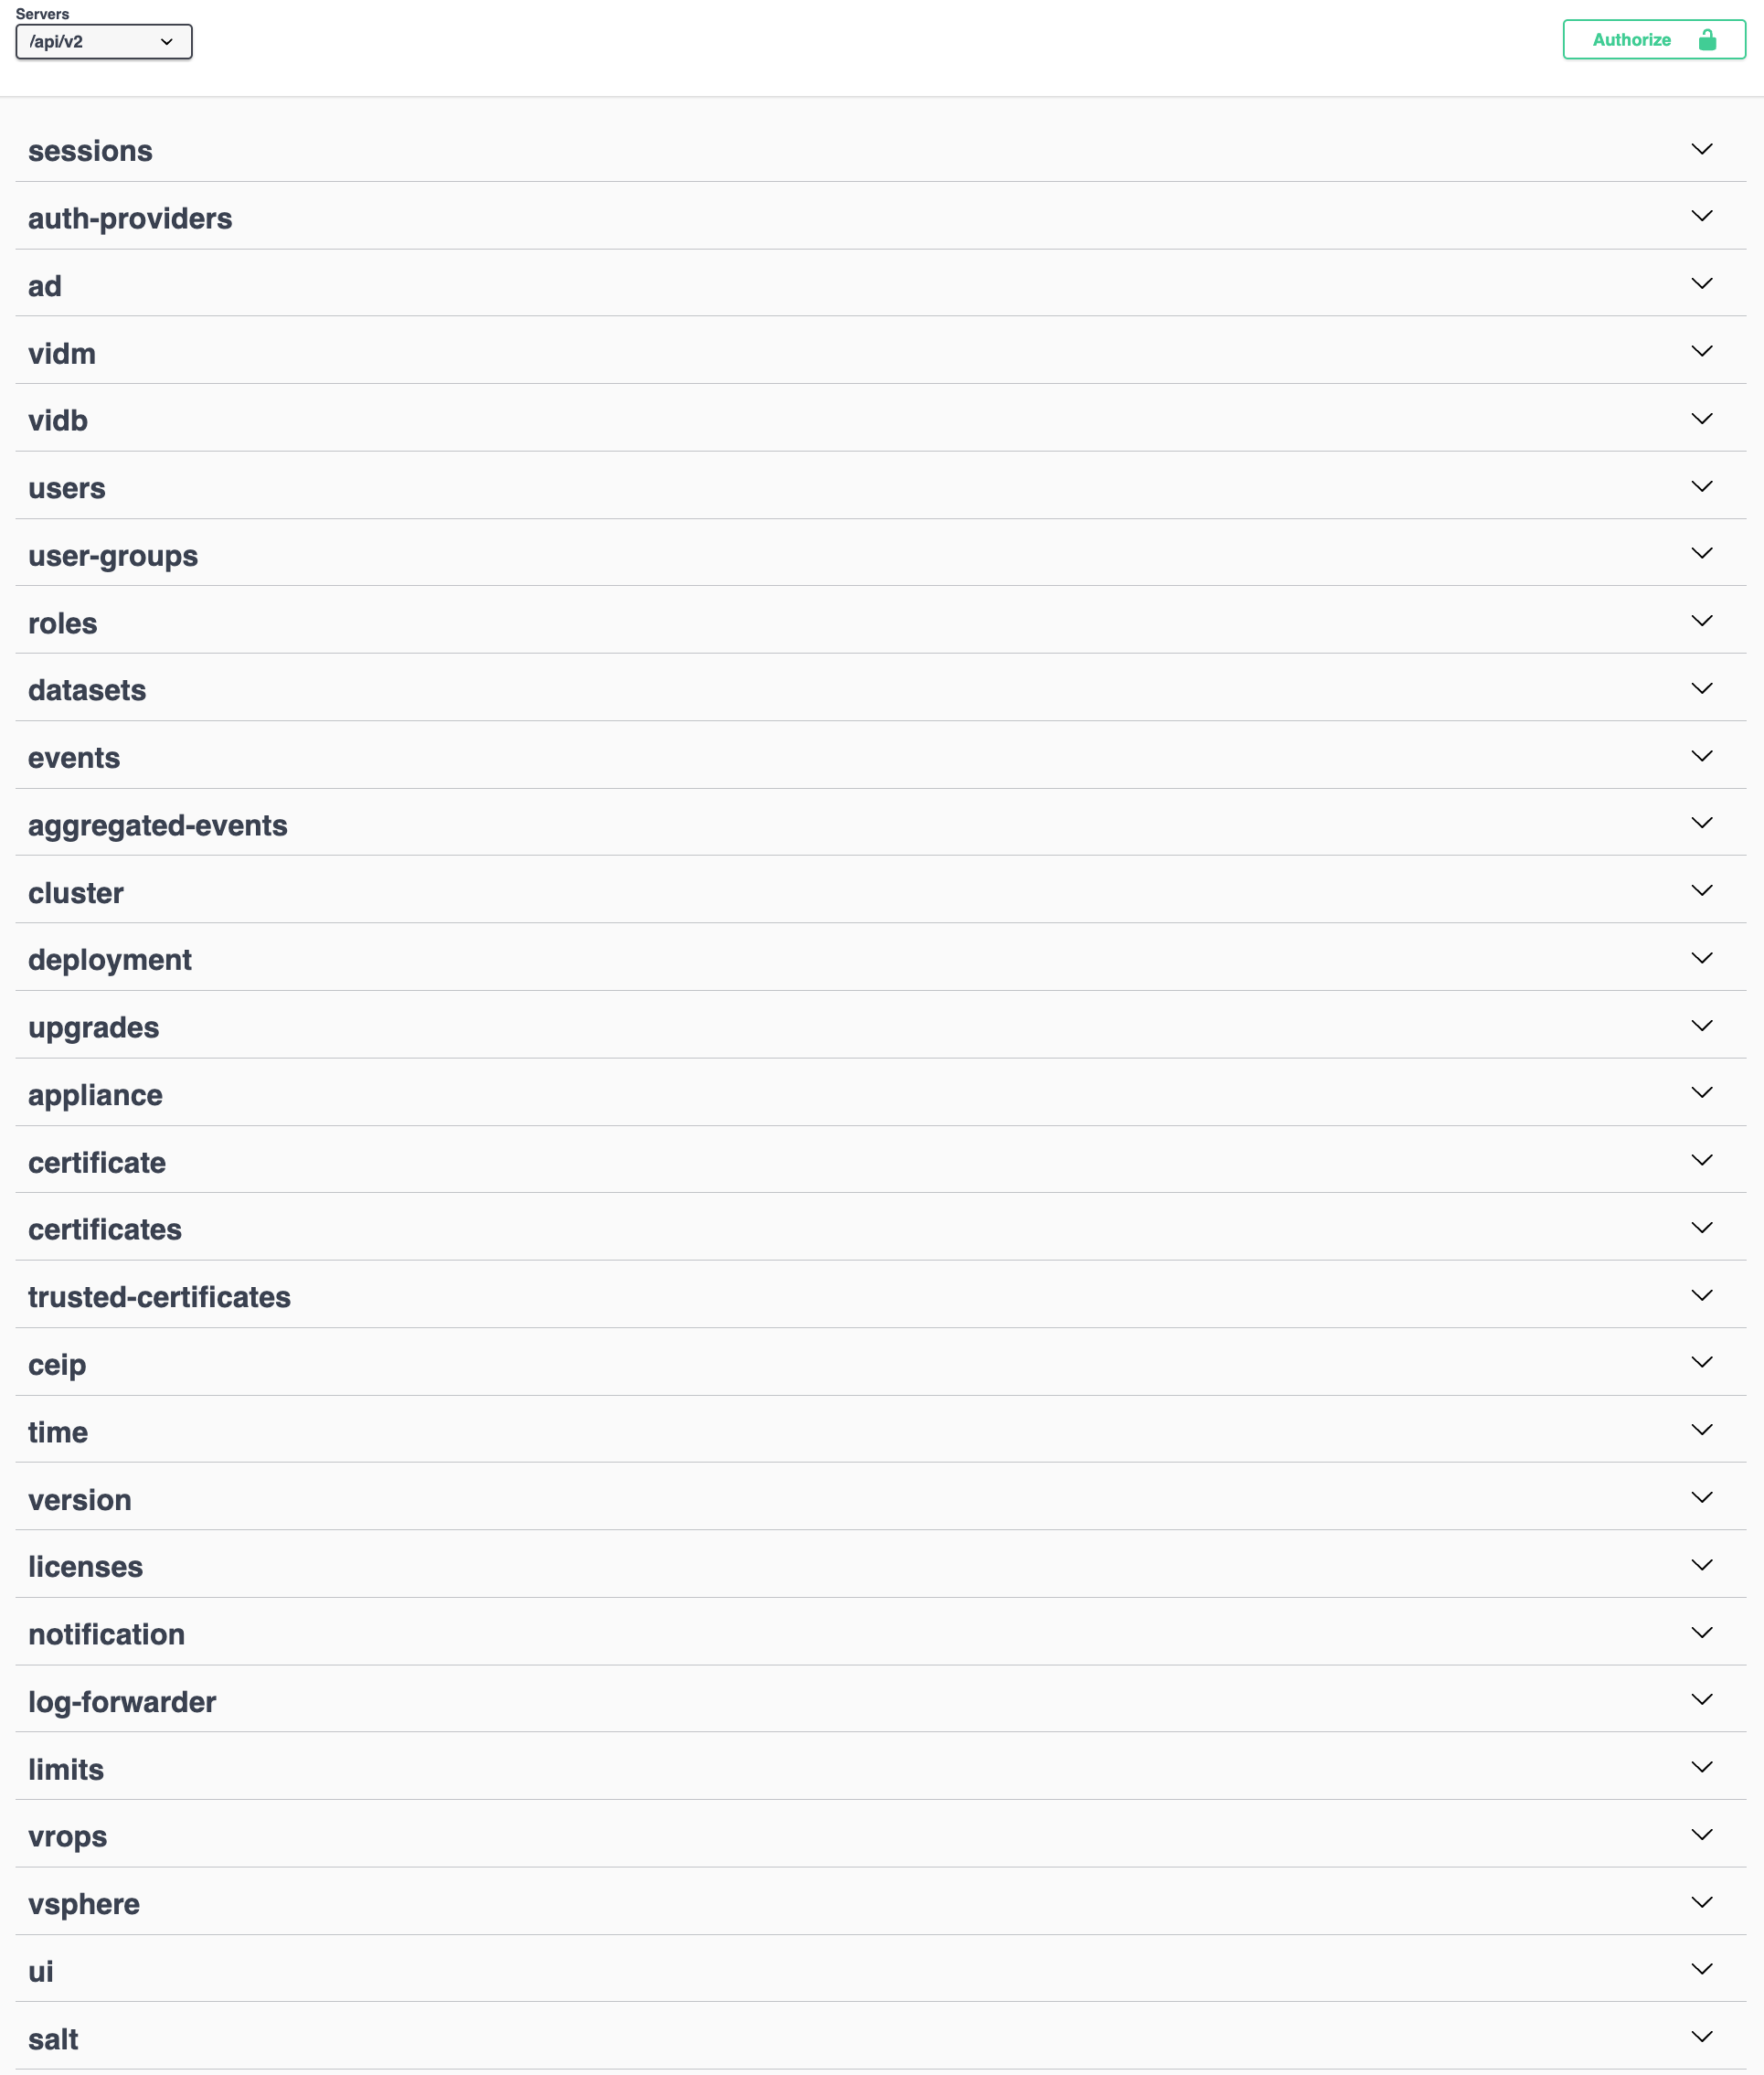
You do not need a complex development environment to do this. You can easily utilize standard API clients like Postman, or even better, leverage the interactive Swagger documentation built directly into every appliance.
Using the Integrated Swagger UI
Every node in your cluster hosts its own interactive API documentation. This is often the quickest way to “GET” a configuration from the old system and “POST” it to the new one without installing external tools.
- Access the UI: Navigate to
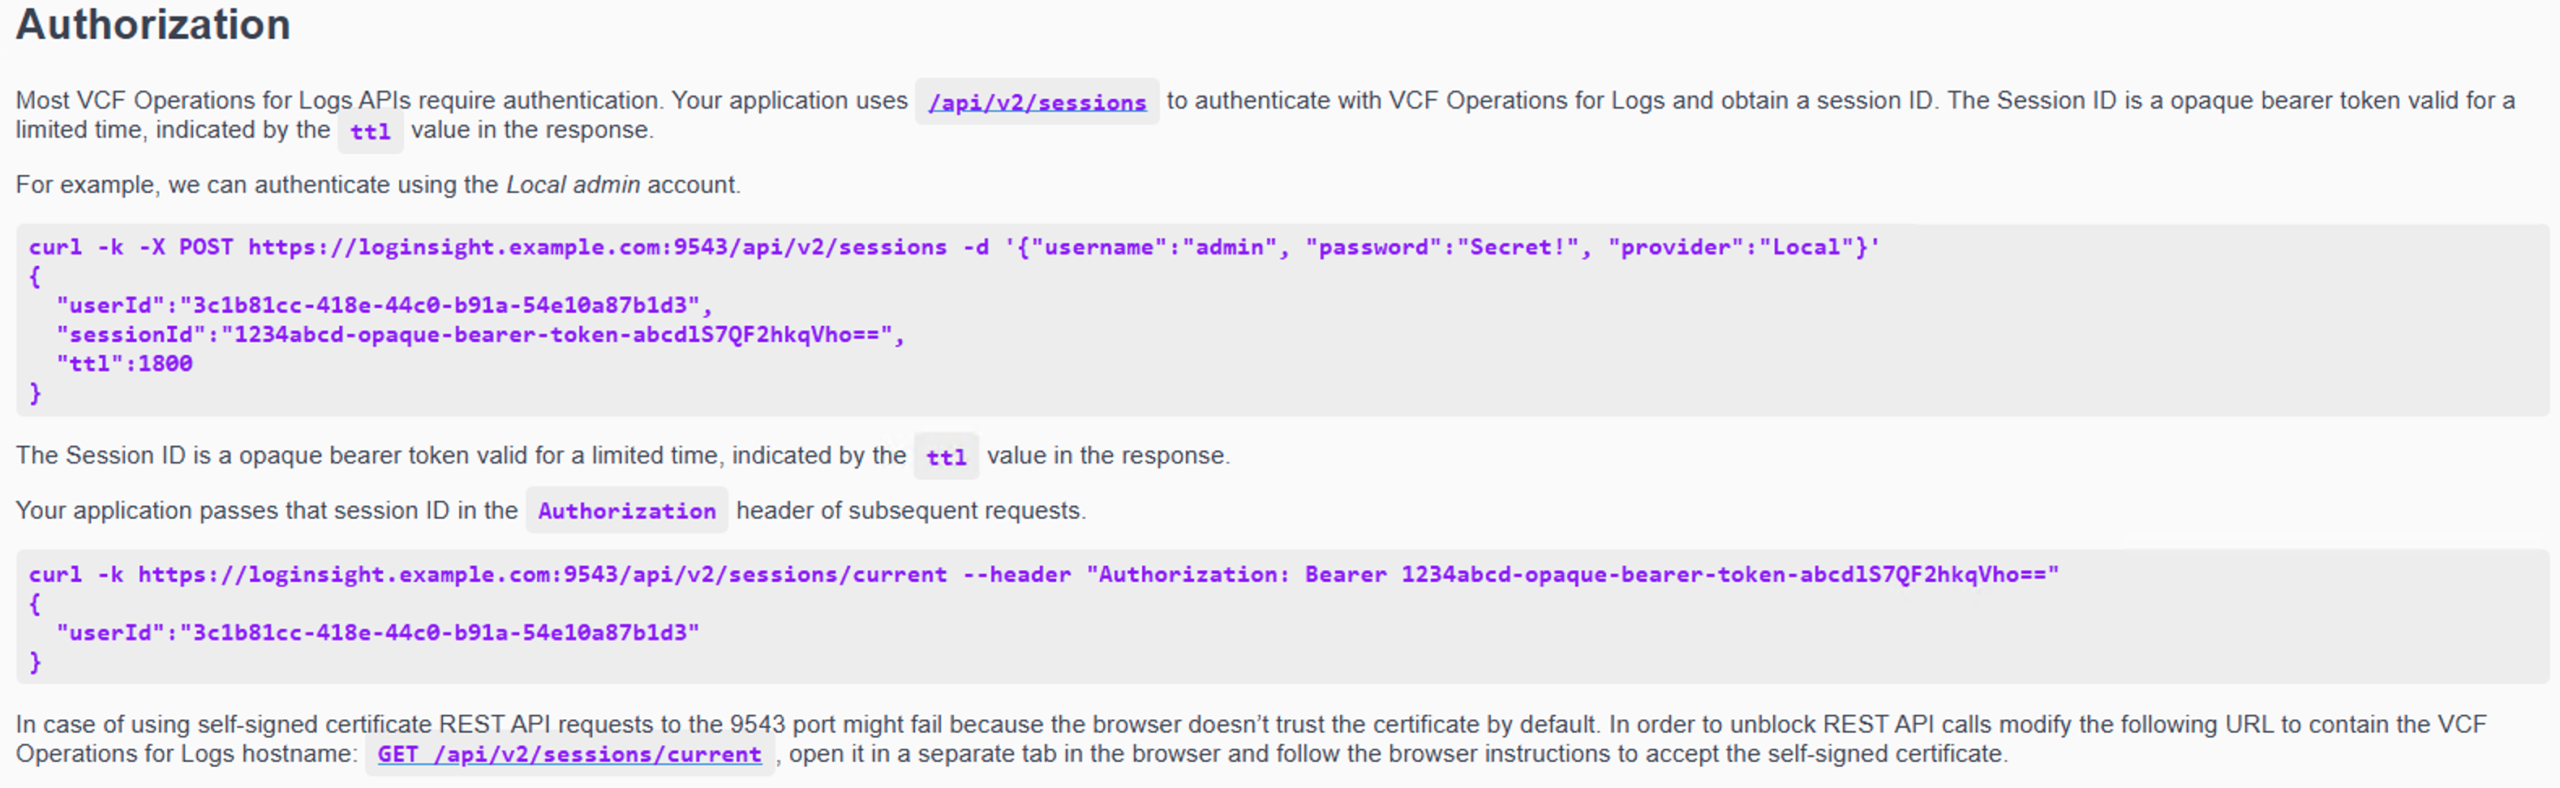
https://<your-logs-fqdn>/rest-apion both your Source (8.18) and Target (VCF 9) appliances. - Authorize: Use curl or Postman to retrieve a token (
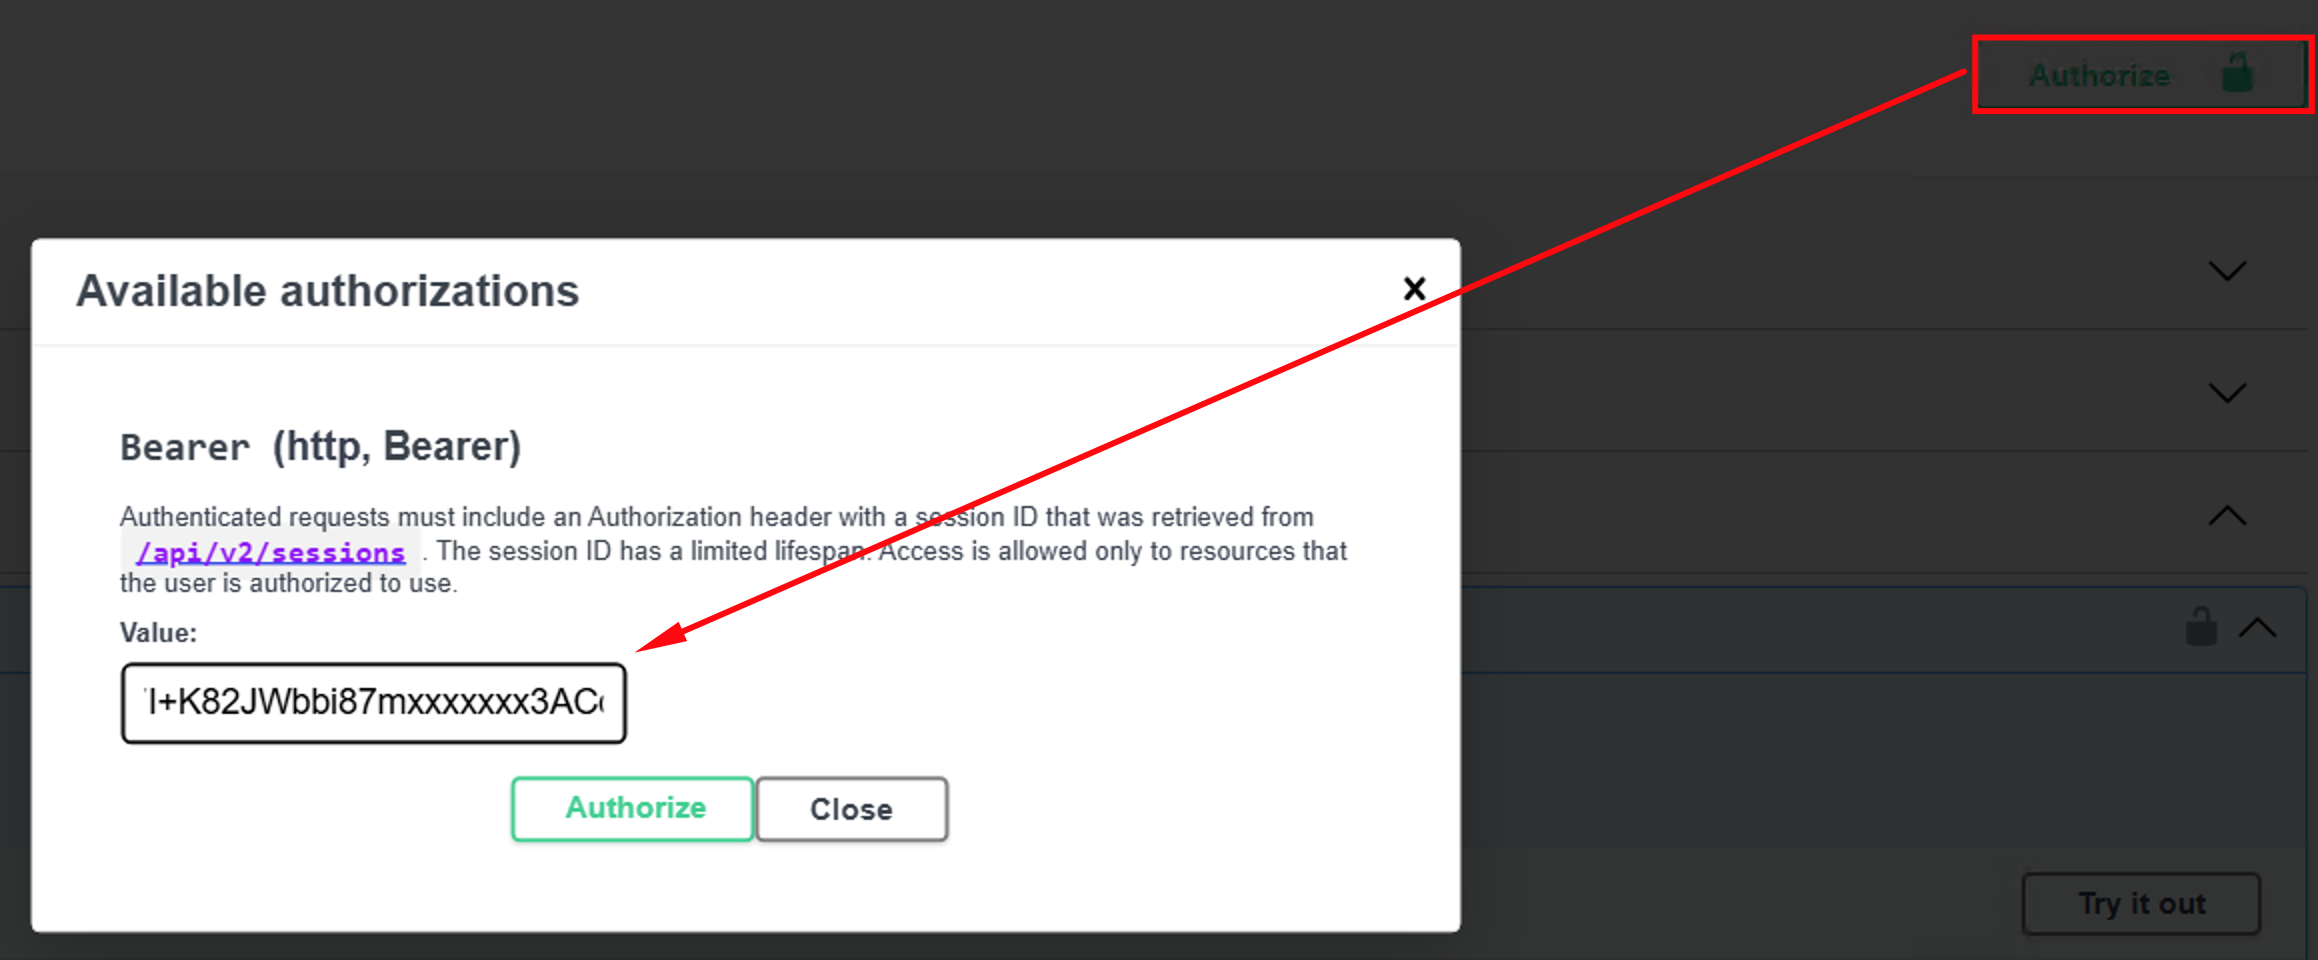
sessionID) which we use in subsequent REST calls for authentication as depicted in the next figure.
The next picture shows the curl command to obtain the access token.
The authorization using the retrieved token starts by clicking on the corresponding button in the UI and submitting the access token in the Bearer input field as value as shown in the next screenshot.
Naturally, we cannot cover every single REST call in this blog post. Instead, we will look at two example configuration areas that are frequently used and typically remain largely unchanged after migrating to VCF Operations Logs 9:
- Log Forwarding Settings
- vCenter Endpoints
vCenter Endpoints
Configured connections to individual vCenter instances are practically the primary source of log messages in a VCF environment, making them arguably the most critical configuration we need to migrate.
While a manual approach works fine for just one or two instances, what happens when you have 10 or more? This becomes especially tricky if they have varying settings, such as different protocols or complex tagging configurations.
This is where the API comes to the rescue—potentially paired with a bit of scripting if you want to handle the entire process in one go. So, let’s first take a look at how we can extract this information from the Aria Operations for Logs 8.18.x system.
A simple GET request to https://$logsfqdn:9543/api/v2/vsphere—please note the specific TCP port where the API is reachable—is all we need to retrieve information about the configured vSphere endpoints.

Here is what the response looks like in my small test environment:
{
  "vCenterServers": [
    {
      "hostname": "sfo-w01-vc01.sfo.rainpole.io",
      "username": "svc-li-vc-62bae1d2-ac78-44fa-8879-aa32a46901ca-6bb04a14ab1343da-1@sfo-w01.local",
      "esxiHostsConfigured": true,
      "passwordSet": true,
      "syslogProtocol": "UDP",
      "target": "10.11.10.11",
      "vsphereEventsEnabled": true,
      "configureNewEsxiHostsAutomatically": true,
      "collectionStatus": "Collecting",
      "uuid": "c2abe088-c034-4345-9134-e9c22fbbeca2",
      "userTags": ""
    },
    {
      "hostname": "sfo-m01-vc01.sfo.rainpole.io",
      "username": "svc-li-vc-246df477-85ab-4aae-80eb-a7408871c240-6bb04a14ab1343da-1@vsphere.local",
      "esxiHostsConfigured": true,
      "passwordSet": true,
      "syslogProtocol": "UDP",
      "target": "10.11.10.11",
      "vsphereEventsEnabled": true,
      "configureNewEsxiHostsAutomatically": true,
      "collectionStatus": "Collecting",
      "uuid": "3574844a-1a38-45f0-8fff-cef58bd3f084",
      "userTags": ""
    }
  ]
}
To apply this configuration to the target system, we utilize the well-documented POST REST call shown in the screenshot below.
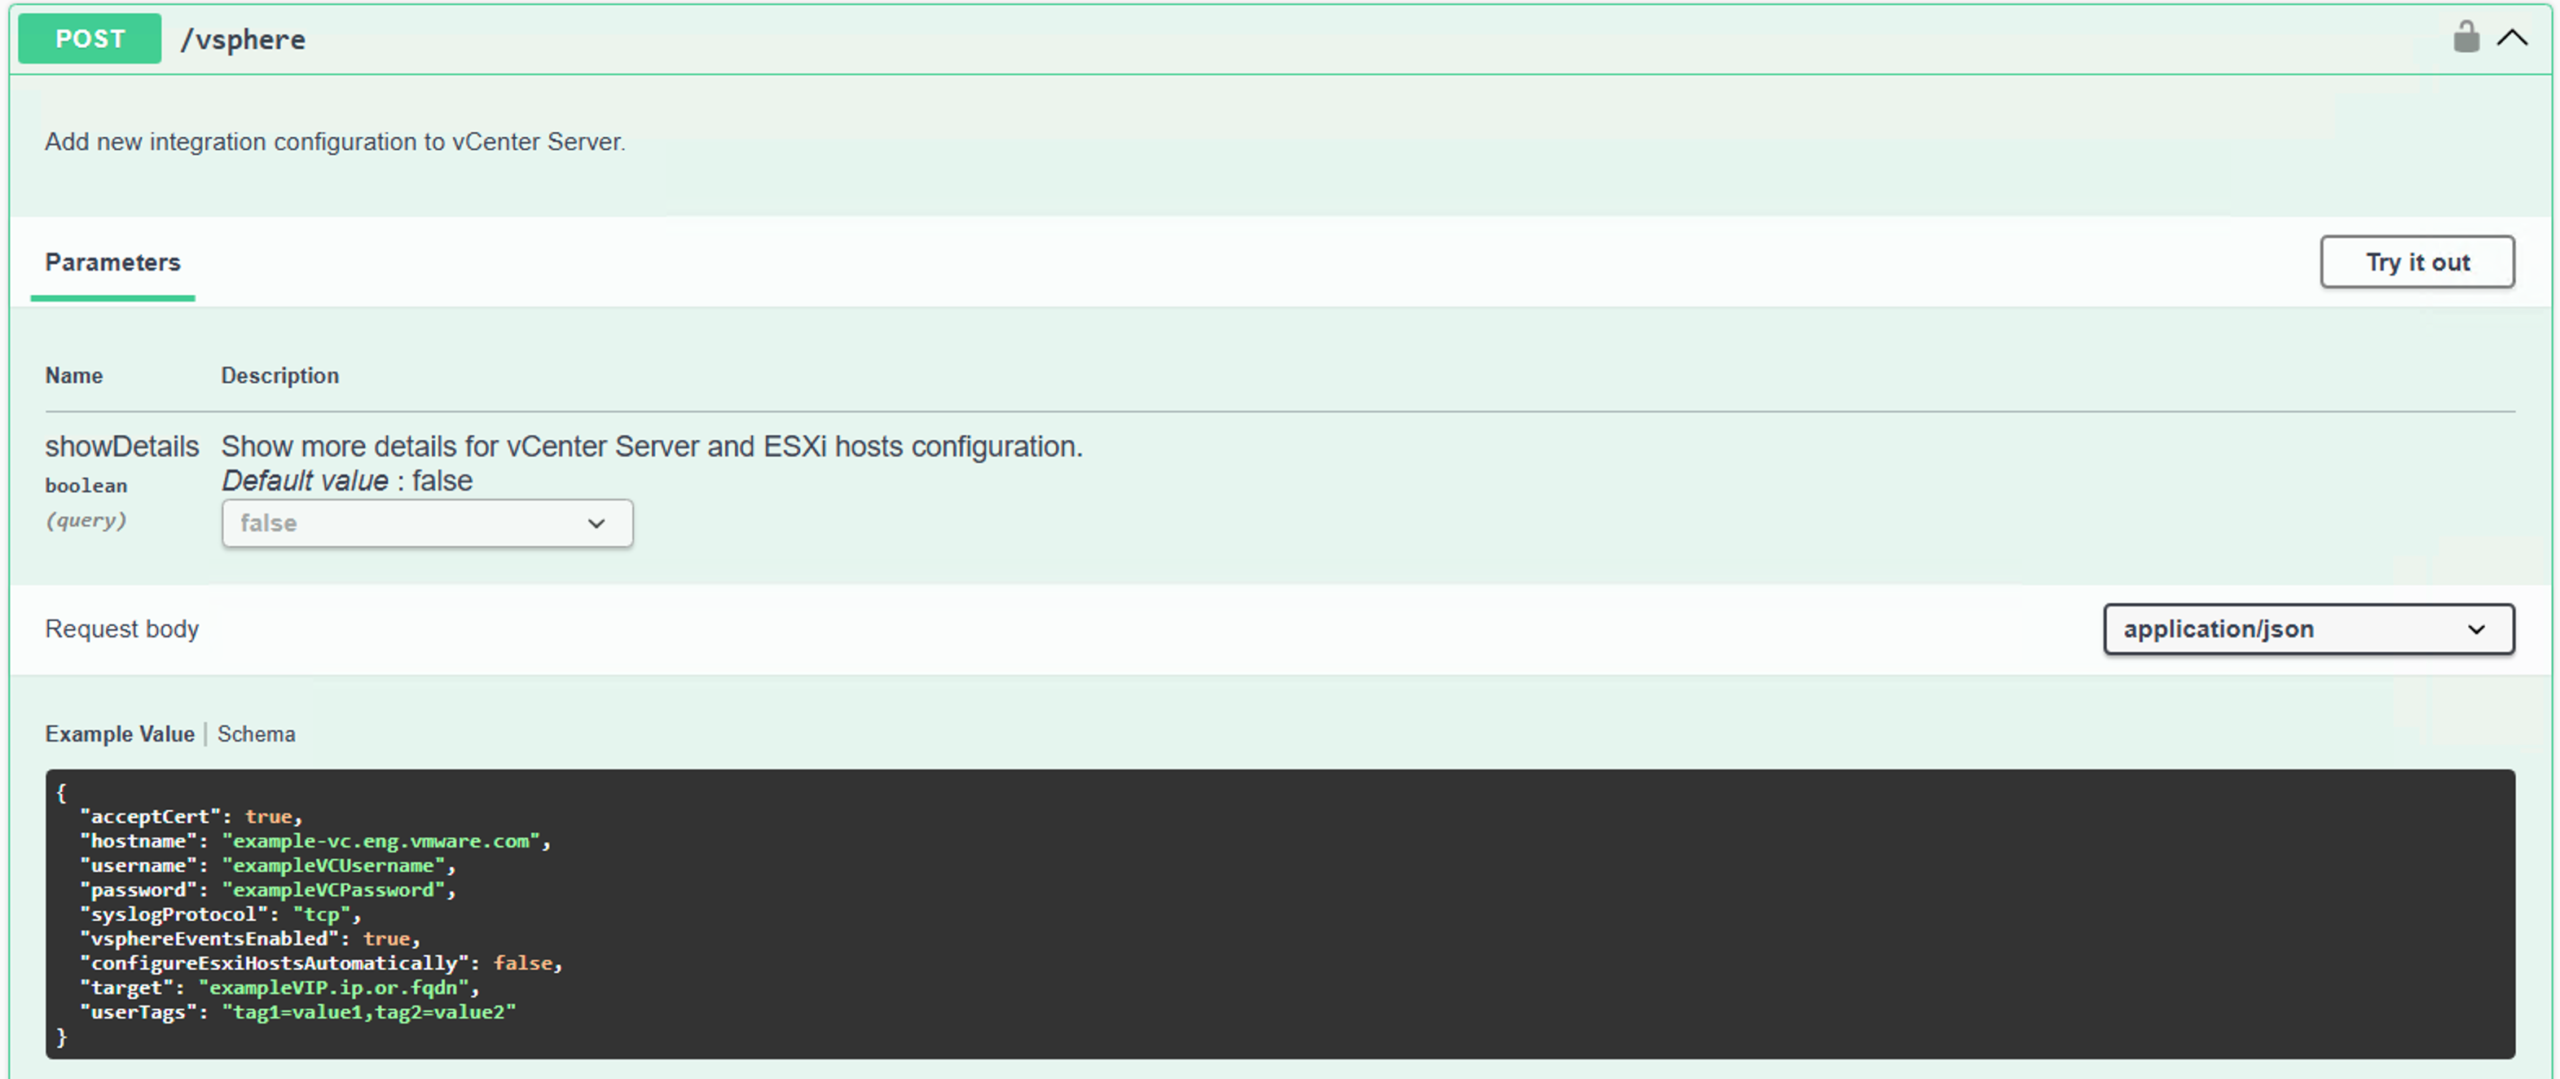
This POST command requires a JSON body with a specific structure, and this is where the GET response comes into play—though we need to modify it slightly. This is the stage where automation would be a huge time-saver if we were dealing with a large number of endpoints; otherwise, copy & paste combined with a little manual tweaking works just fine.
This is the JSON Body schema and one of the vSphere endpoints we received in the response in comparison.
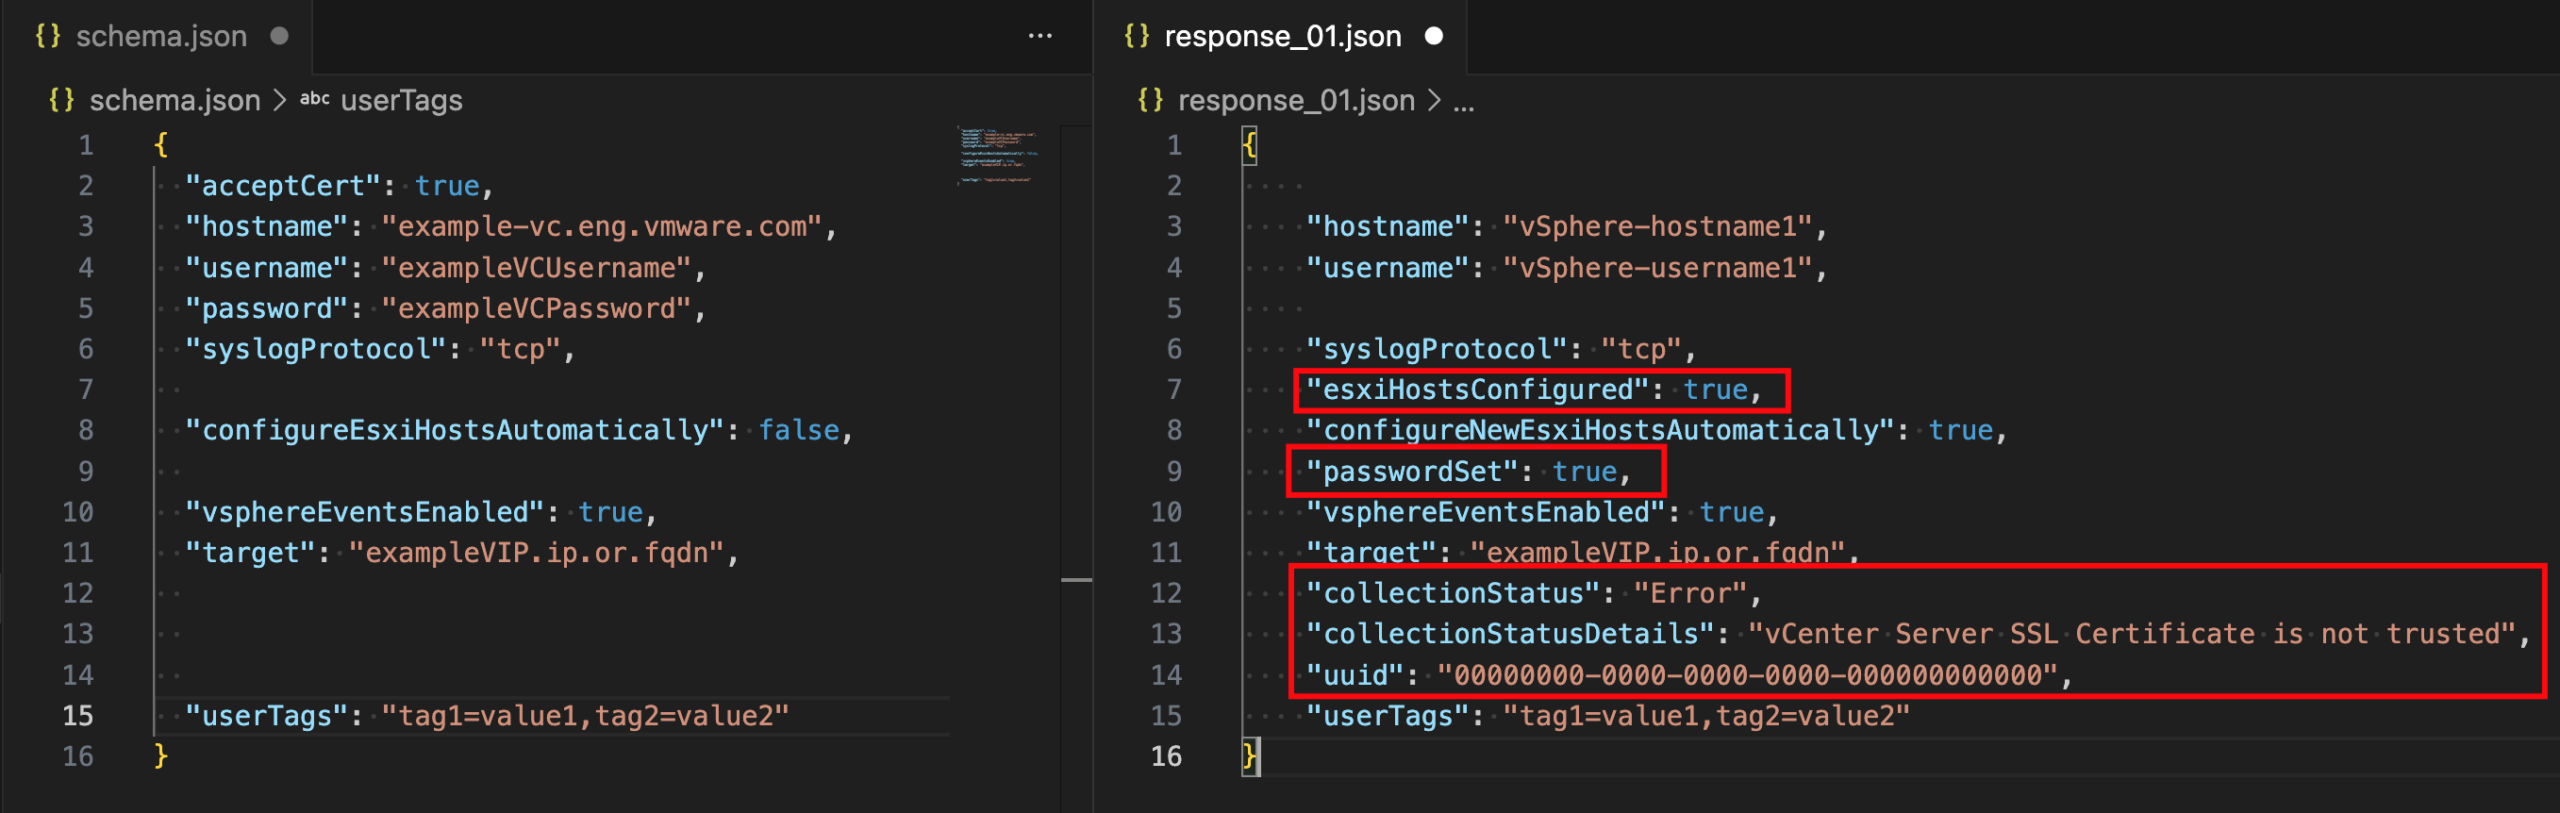
Since we have status data in the response that we do not need for the POST JSON, the actual JSON body is pretty simple. Please note, that we have to submit one POST call per vCenter instance. Target is the new VCF Operations for Logs 9 IP or VIP.
First vCenter instance:
 {
      "acceptCert": true,
      "hostname": "vcenter-mgmt.vcf.sddc.lab",
      "username": "administrator@vsphere.local",
      "password": "mysecretpw",
      "syslogProtocol": "UDP",
      "target": "10.11.10.11",
      "vsphereEventsEnabled": true,
      "configureNewEsxiHostsAutomatically": true,
      "userTags": "vcfcomponent=mgmt-vcenter"
 }
Second vCenter instance:
{
      "acceptCert": true,
      "hostname": "vcenter-wld.vcf.sddc.lab",
      "username": "administrator@vsphere.local",
      "password": "mysecretpw",
      "syslogProtocol": "UDP",
      "target": "10.11.10.11",
      "vsphereEventsEnabled": true,
      "configureNewEsxiHostsAutomatically": true,
      "userTags": "vcfcomponent=wld-vcenter"
}
Now we can use the POST call to configure the vCenter endpoints. The result is shown in the next picture.

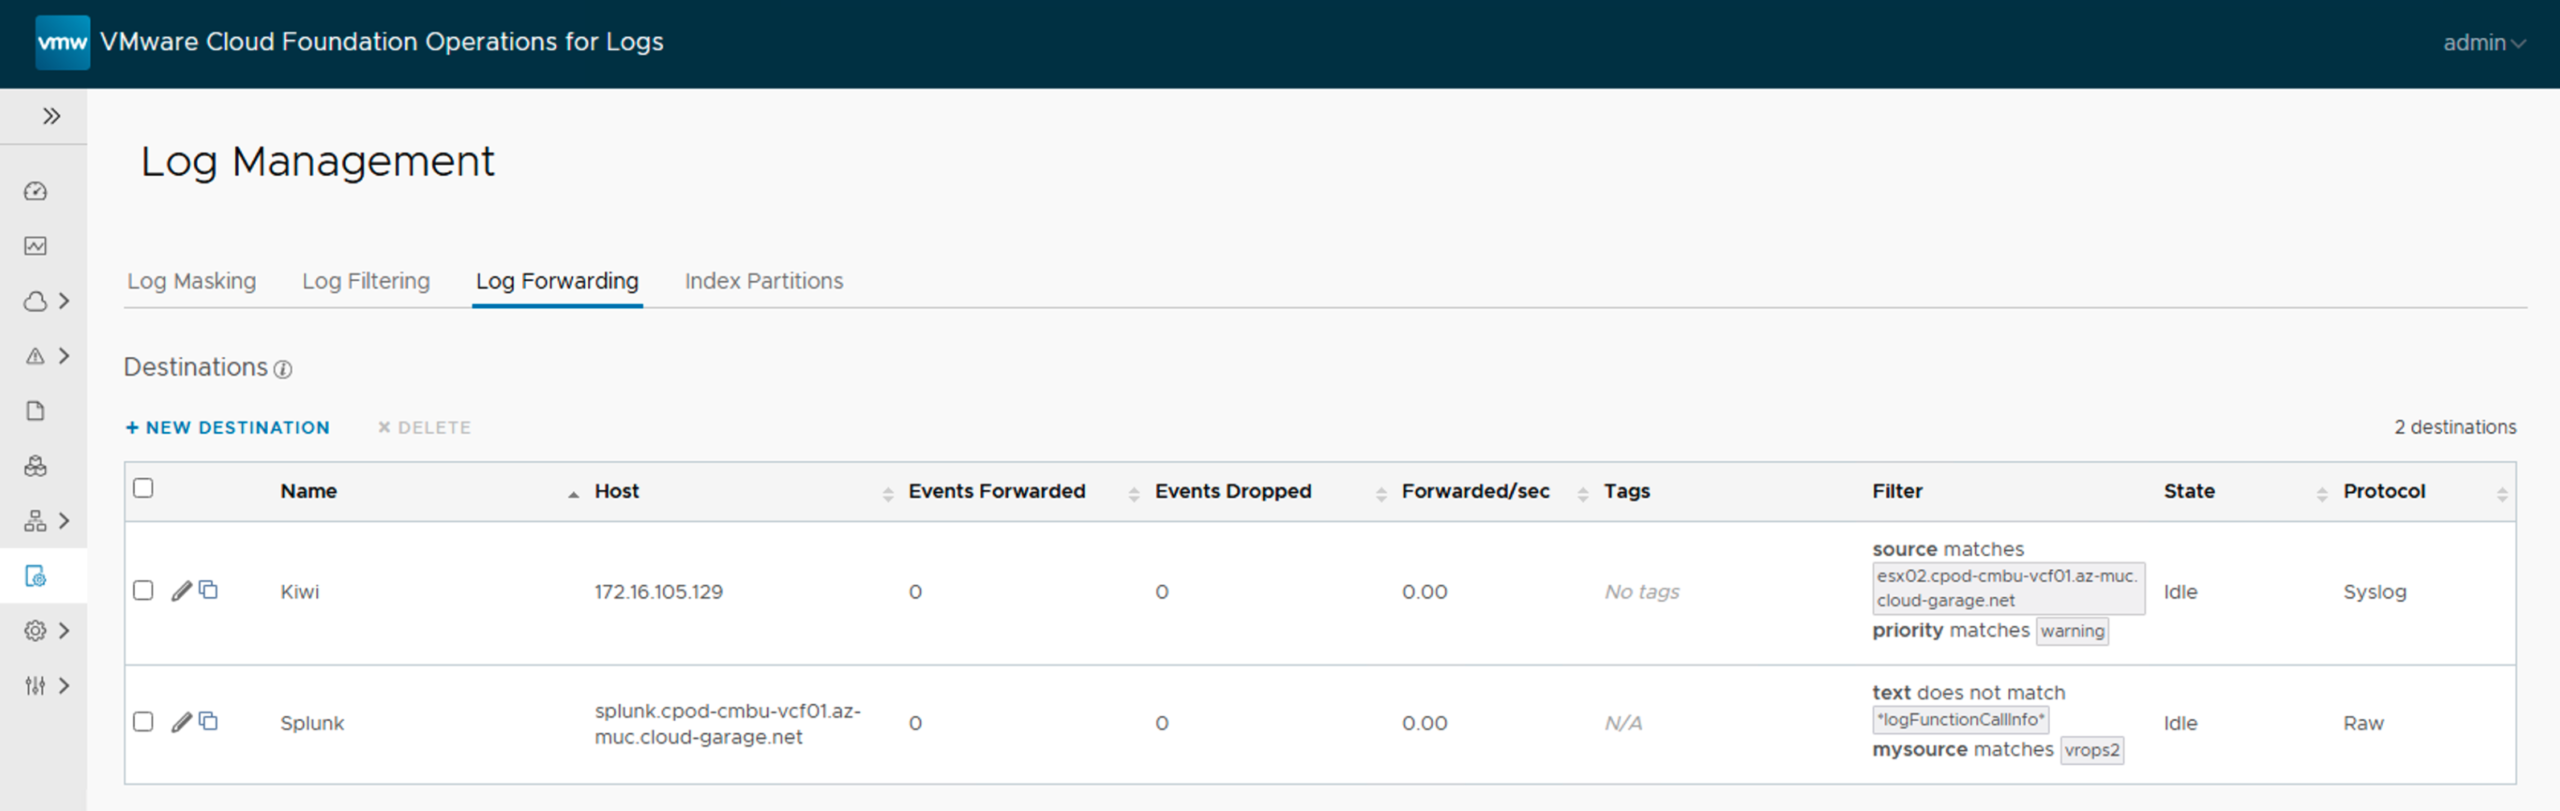
Log Forwarding Settings
Another frequently used configuration that often requires a significant amount of ‘fine-tuning’ (specifically regarding filter settings) is Log Forwarding. If you only have a single destination with a simple configuration, the process is straightforward, and we can easily apply the settings manually in the new system.
However, as soon as there are multiple destinations and/or the settings become complex—especially the filters—using the REST API guarantees that we don’t forget anything or make any transcription errors.
Once again, we are dealing with a GET and a POST. Let’s look at the GET request first and examine the response it returns.
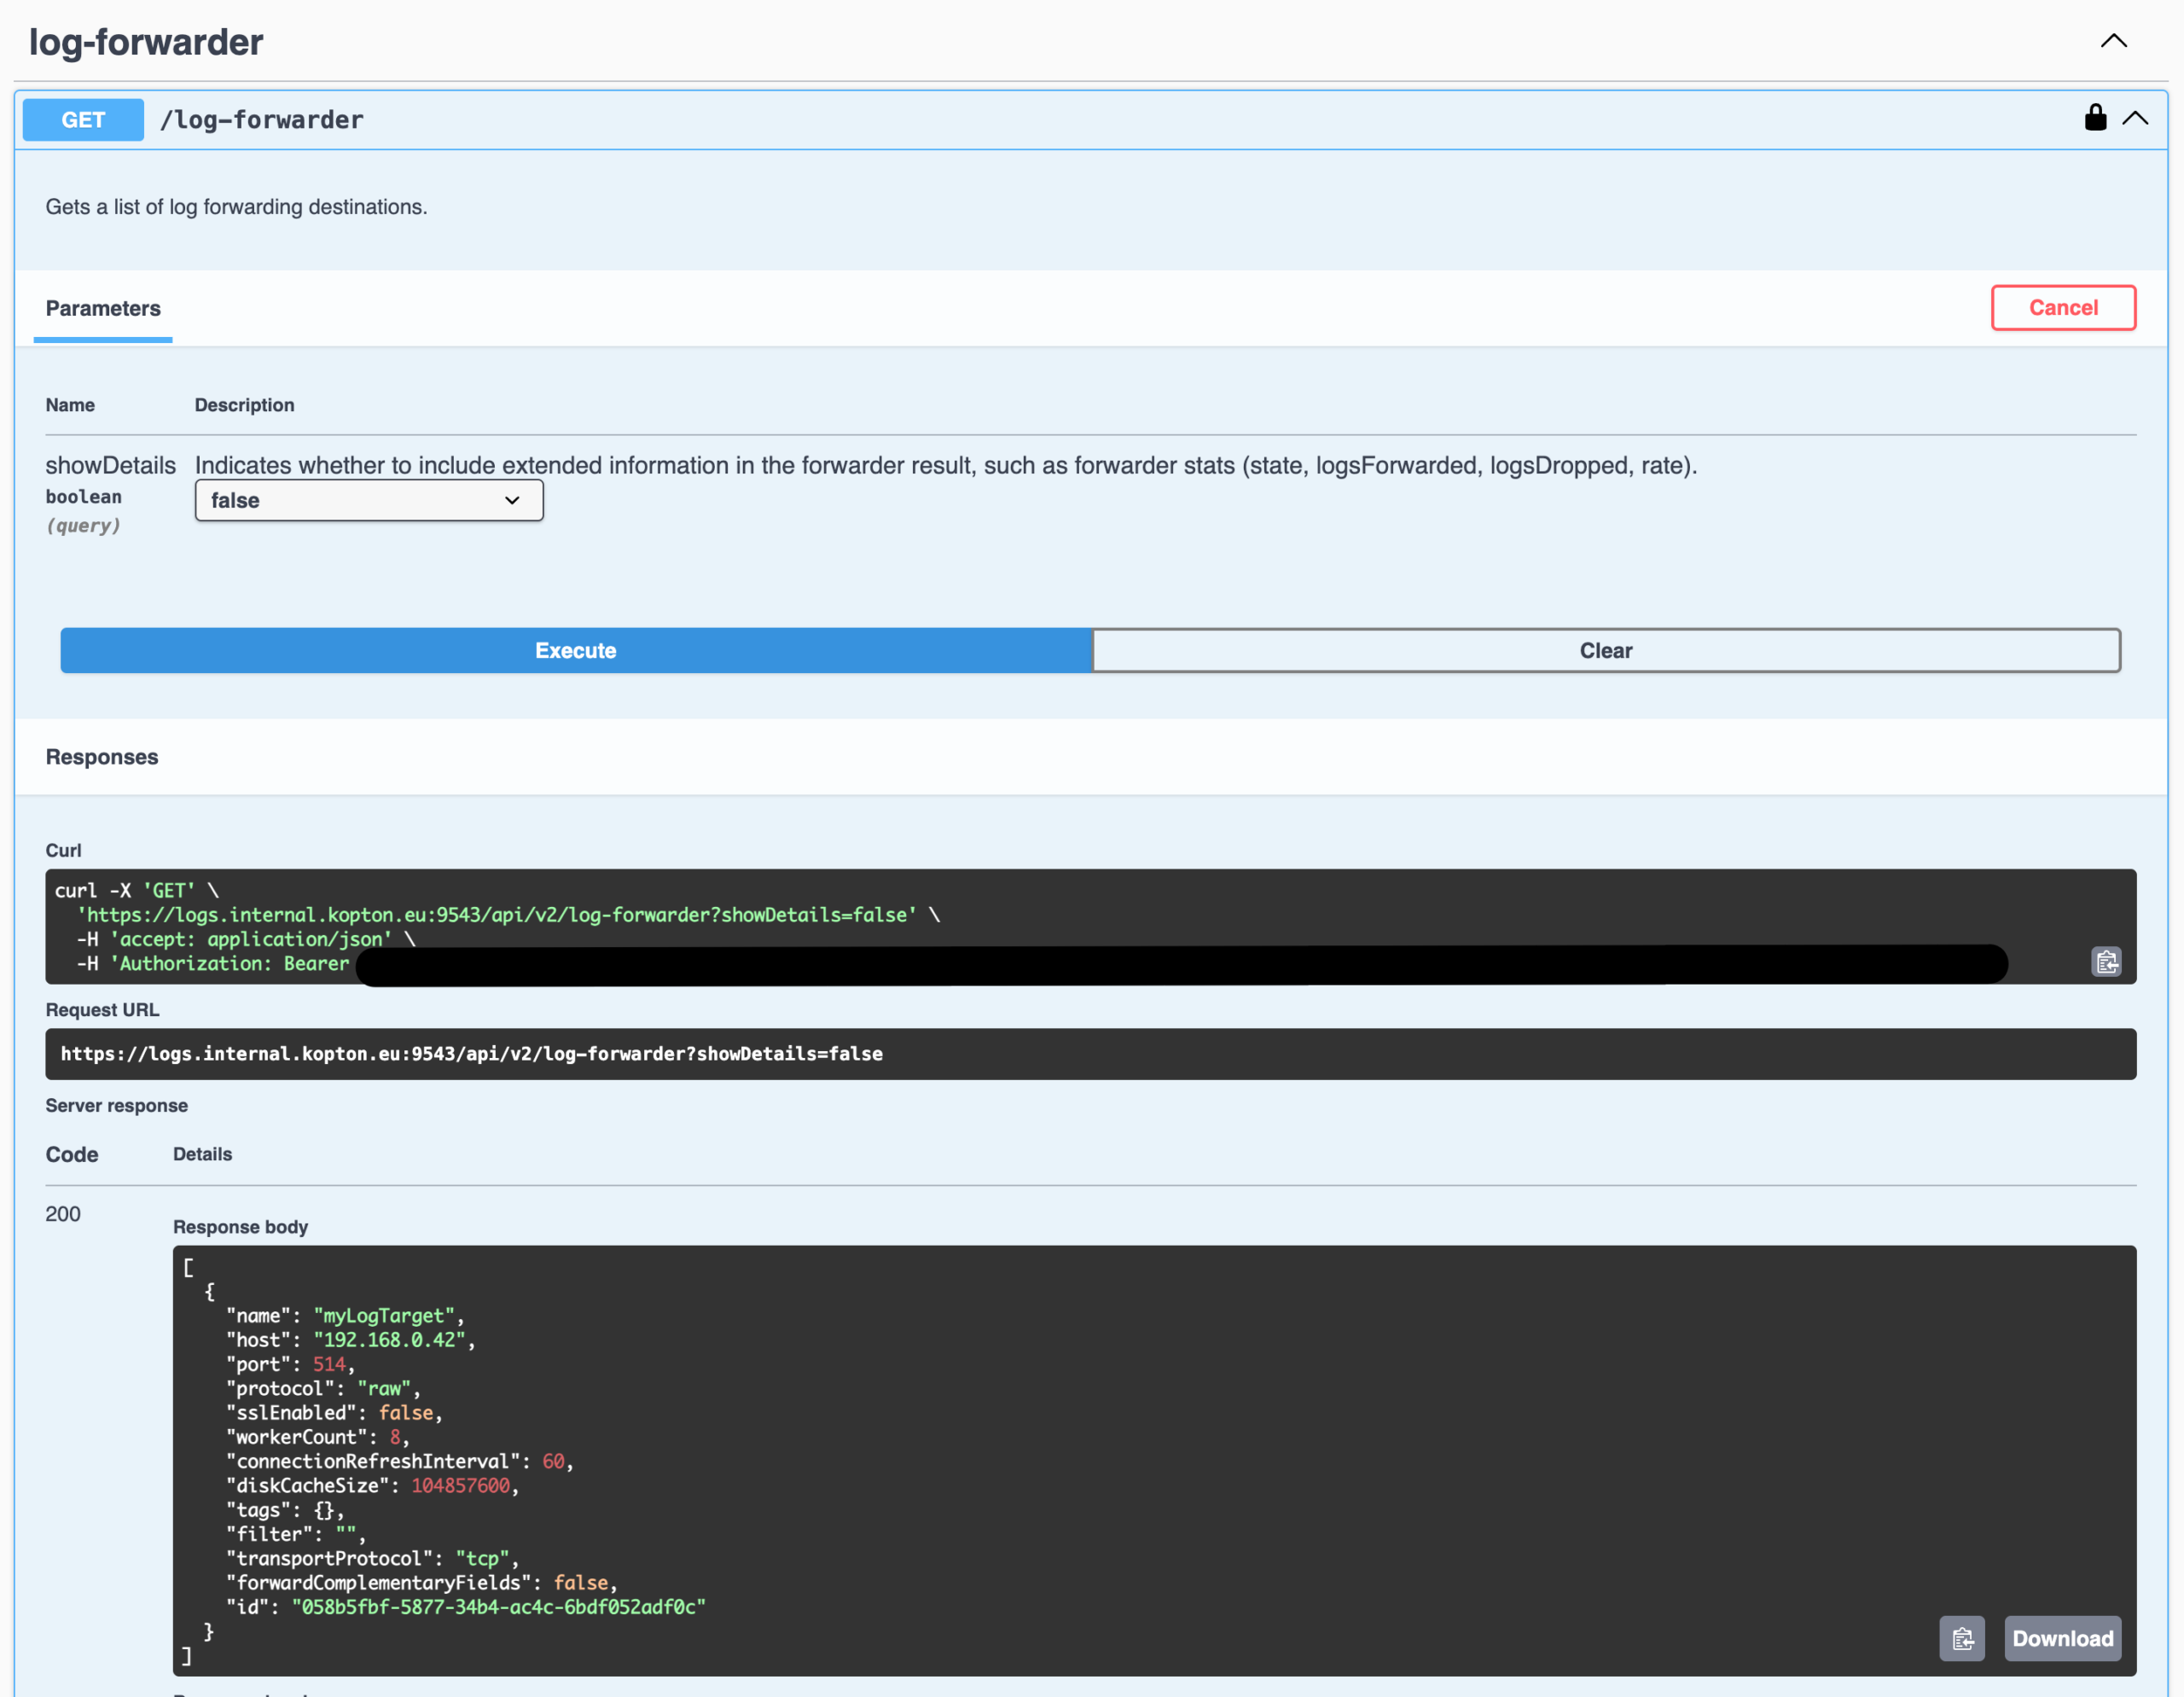
And this is the GET response in my lab:
[
  {
    "name": "Splunk",
    "host": "splunk.cpod-cmbu-vcf01.az-muc.cloud-garage.net",
    "port": 514,
    "protocol": "raw",
    "sslEnabled": false,
    "workerCount": 8,
    "connectionRefreshInterval": 60,
    "diskCacheSize": 104857600,
    "tags": {
      "mysource": "vrops"
    },
    "filter": "(not (text=~\"*logFunctionCallInfo*\")) and (mysource=~\"vrops2\")",
    "transportProtocol": "udp",
    "forwardComplementaryFields": false,
    "id": "2f9304fe-9b42-3489-9074-05bef9a0bb9f"
  },
  {
    "name": "Kiwi",
    "host": "172.16.105.129",
    "port": 514,
    "protocol": "syslog",
    "sslEnabled": false,
    "workerCount": 8,
    "connectionRefreshInterval": 60,
    "diskCacheSize": 104857600,
    "tags": {},
    "filter": "(__li_source_path=~\"esx02.cpod-cmbu-vcf01.az-muc.cloud-garage.net\") and (priority=~\"warning\")",
    "transportProtocol": "udp",
    "forwardComplementaryFields": false,
    "id": "b6ef9705-b1e5-3b64-bedc-23e7f81318ed"
  }
]
Now lets inspect the POST command and check how we can transform our response to fit into what the POST call expects as JSON body.
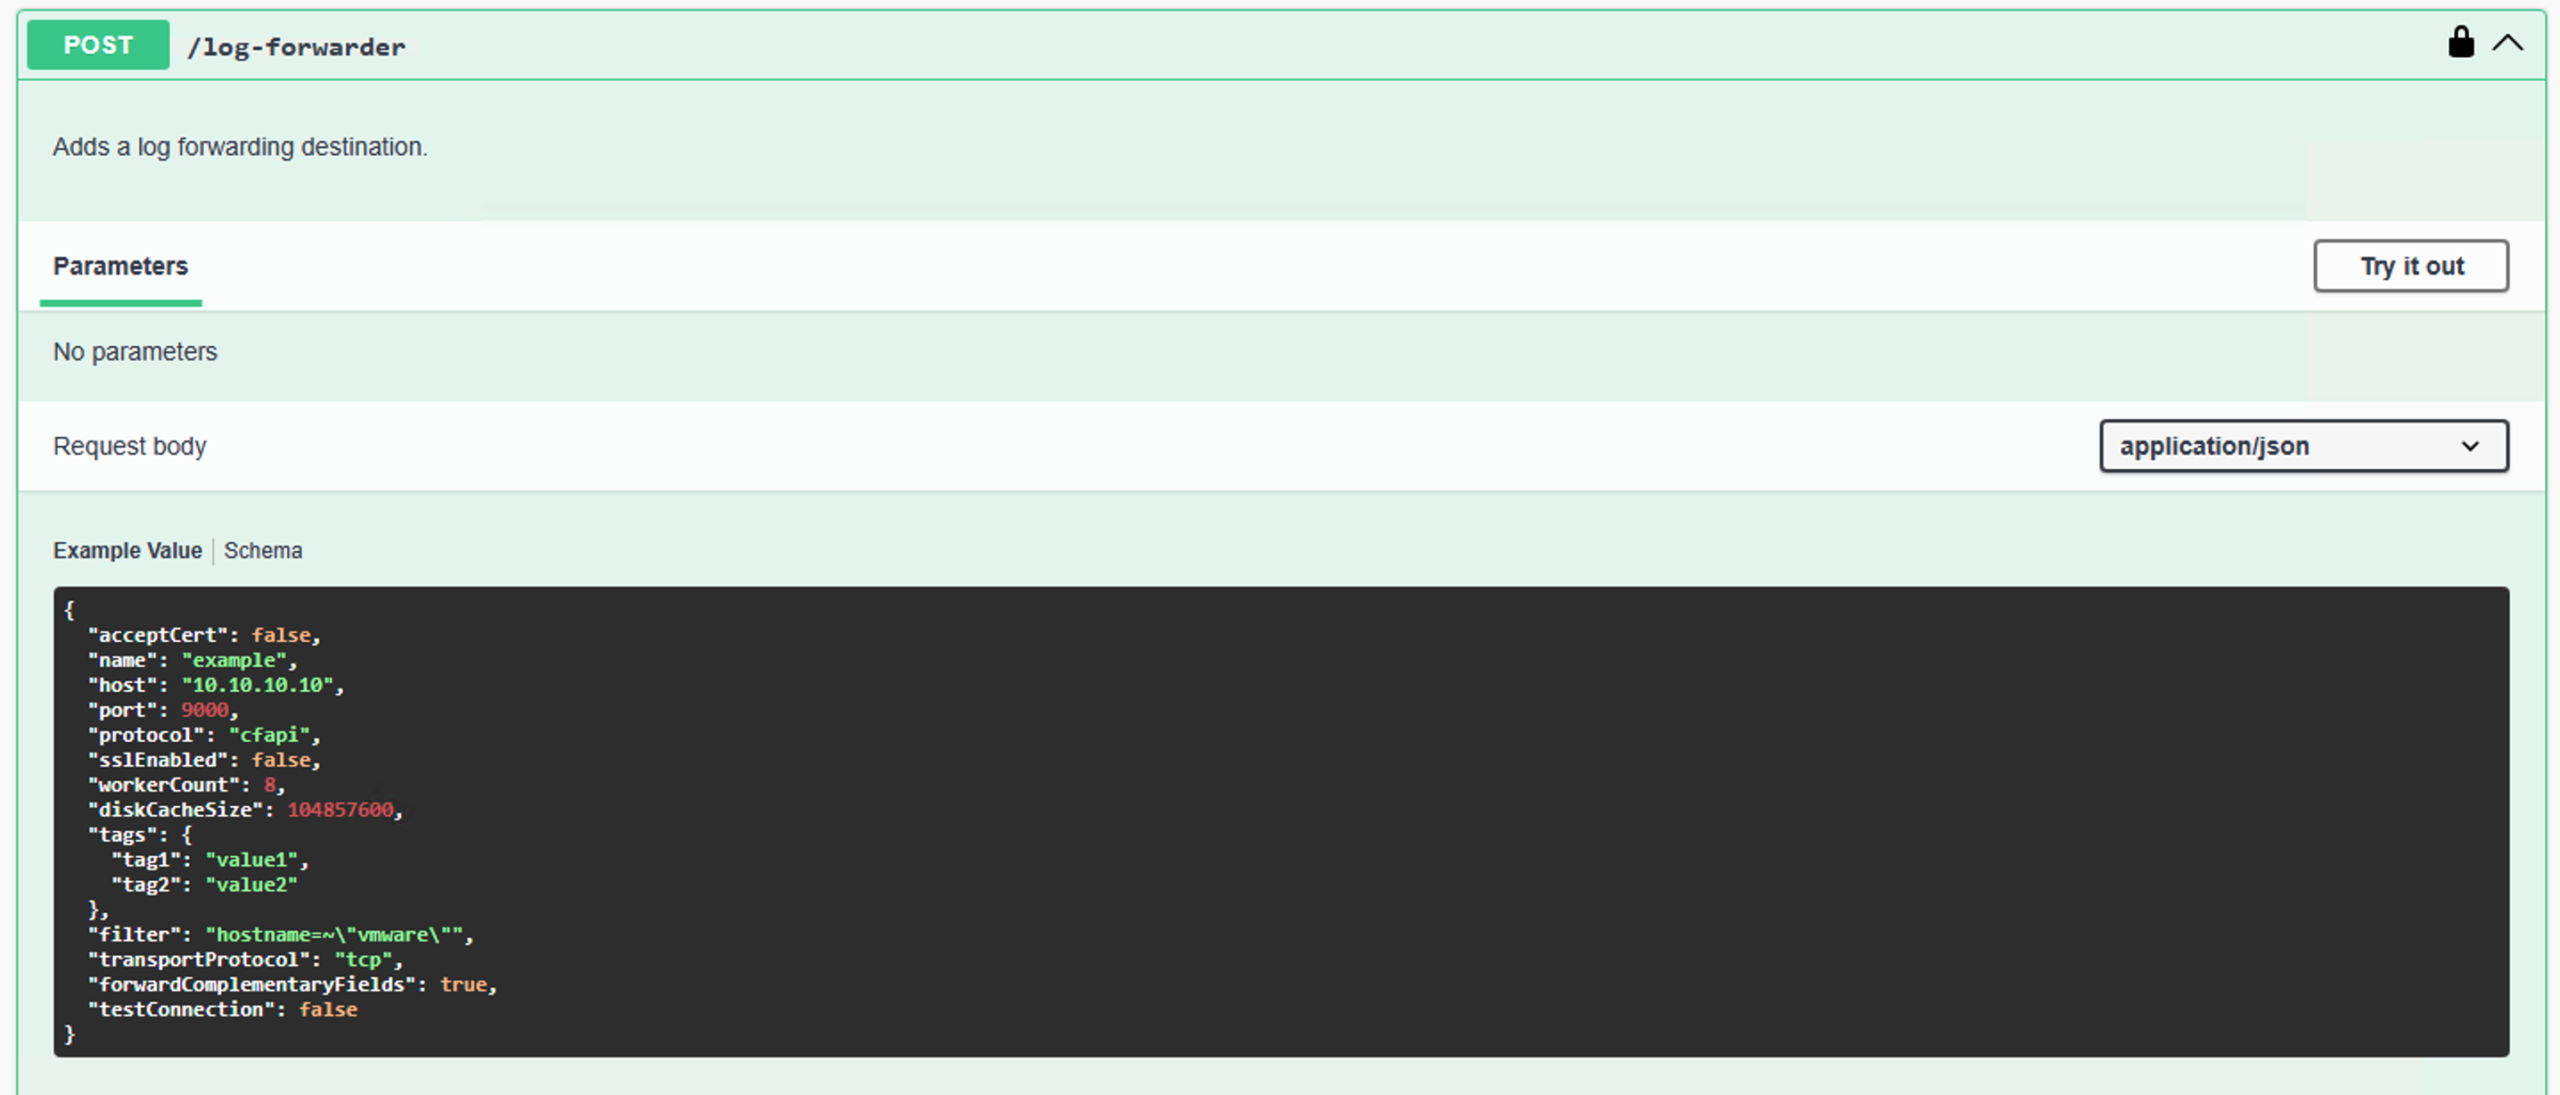
Just as we did with the vCenter endpoints, we need to reorder, add, or omit a few details. Ultimately, however, constructing the correct body is very straightforward.
The next two code blocks show the two inputs that will be sent to the target log system sequentially.
  {
    "acceptCert": false,
    "name": "Splunk",
    "host": "splunk.cpod-cmbu-vcf01.az-muc.cloud-garage.net",
    "port": 514,
    "protocol": "raw",
    "sslEnabled": false,
    "workerCount": 8,
    "diskCacheSize": 104857600,
    "tags": {
      "mysource": "vrops"
    },
    "filter": "(not (text=~\"*logFunctionCallInfo*\")) and (mysource=~\"vrops2\")",
    "transportProtocol": "udp",
    "forwardComplementaryFields": false
  }
{
"acceptCert": false,
"name": "Kiwi",
"host": "172.16.105.129",
"port": 514,
"protocol": "syslog",
"sslEnabled": false,
"workerCount": 8,
"diskCacheSize": 104857600,
"tags": {},
"filter": "(__li_source_path=~\"esx02.cpod-cmbu-vcf01.az-muc.cloud-garage.net\") and (priority=~\"warning\")",
"transportProtocol": "udp",
"forwardComplementaryFields": false
}Finally, the successful import via REST looks as shown in the last screenshot.
Stay safe and happy labbing.
Thomas