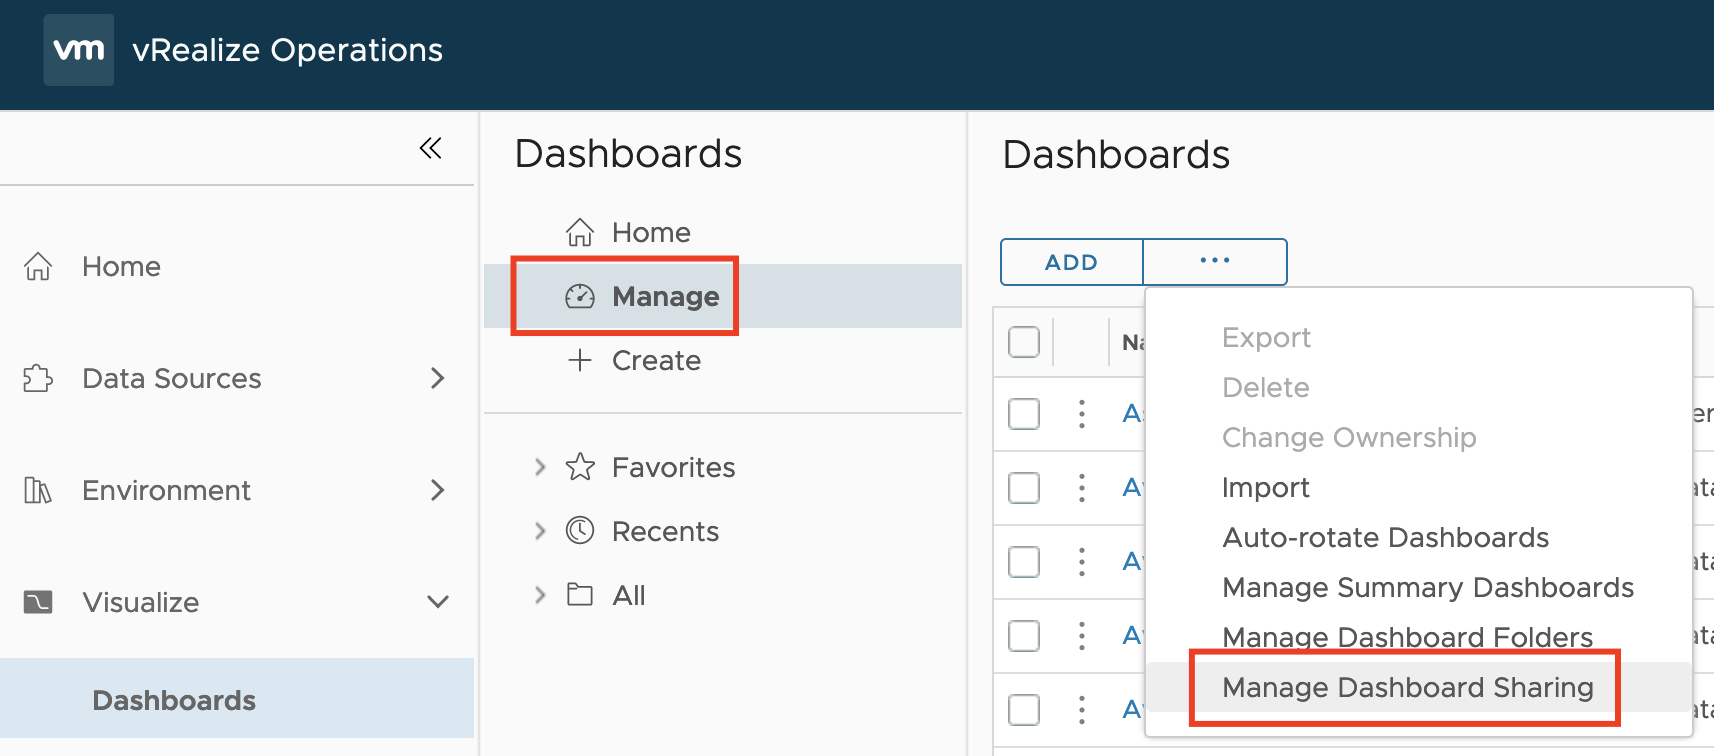
vCenter Events as vRealize Operations Alerts using vRealize Log Insight

As you probably know vRealize Operations provides several symptom definitions based on message events as part of the vCenter Solution content OOTB. You can see some of them in the next picture.

Figure 1: vCenter adapter message event symptoms.

These events are used in alert definitions to raise vReaalize Operations alarms any time one of those events is triggered in any of the managed vCenter instances.

If you take a look into vCenter events in the Monitoring tab or check the available events as presented by the VMware Event Broker Appliance (VEBA) integration, you will see that there are tons of other events you may want to use to raise alerts.

Figure 2: vCenter events in VEBA plugin.

Unfortunately, this is not always as easy as creating a new message event symptom definition in vROps. Not every event is intercepted by vRealize Operations.

Now, you could of course use VEBA to run functions triggered by such events and let the functions raise alerts, create tickets, etc. This is definitely a great option and how to do that using VEBA functions and vROps is something I am planning to describe in an upcoming blog post. But there are also other ways to achieve that.

If you run vRealize Log Insight integrated with vRealize Operations in your environment, and this is a highly recommended setup, you have another, very easy option, to raise alerts on any available vCenter event, as long as that event is logged by the vCenter instance. That should be the case for all or at least the majority of the events.

In the next picture, you see all the various events I have received in my vRLI coming from vCenter in the last 48 hours. For a better visibility, I have excluded all events generated by vim.event.eventex.

Figure 3: vCenter events in vRealize Log Insight.

To search, filter, and display such events using their type I have created the following extracted field in vRLI:

Figure 4: vRealize Log Insight extracted field for vCenter events.

This extracted field makes it now easy to create alert definitions in vRLI.

Let us assume our use case is: “I need an alert every time any vSphere cluster configuration has been changed.

The corresponding event in vCenter is created by vim.event.ClusterReconfiguredEvent and send to vRLI as a log message

And this is the corresponding log message in vRLI after I have changed the DRS configuration of one of my clusters.

Figure 5: ClusterReconfiguredEvent message in vRLI.

To get such events as an alarm in vRealize Operations in general we need two things:

  • vRealize Operations integration in vRealize Log Insight. With that integration vRLI is capable of mapping vCenter objects that are sources of messages to their objects in vROps. With this feature vRLI alarms can be forwarded to vROps and attached to exactly that object which is the original source of the message received by vRLI.
  • Alarm definition in vRealize Log Inisght that will be triggered every time an event of type vim.event.ClusterReconfiguredEvent has been received and this alarm will be forwarded to vROps. For this alert definitions we will use the extracted field described in figure 4.

But there is still a little more work we need to do to implement a solution that really fulfills our requirement: get an alert every time a cluster configuration change happened.

Let us assume the following situation. Someone is changing the configuration of one or several clusters very frequently. Our vRLI alert definition looks like shown in the next picture.

Figure 6: First alert definition in vRealize Log Insight.

And if we now run a query on this alert definition we will see that vRLI is properly triggering the alarms. In the picture, we see the three alarms raised because of three changes during 10 minutes.

Figure 7: Event messages triggering alarms in vRLI.

The problem with the vROps integration is, that the first alarm will be properly forwarded to vROps and will raise an alarm on the vCenter instance but any subsequent alarm coming in will not be reflected in vROps as long as the first alarm is still in the “open” state. We see the first alarm in vROps in the next figure.

Figure 8: First alarm in vRealize Operations.

This behavior is due to the same notification event text for every alarm. In that case, vROps just assumes that the next occurrence is reporting the same issue thus there is no need to raise another, duplicate alarm. In our case the notification event text is the name of the alarm as defined in the vRLI alert definition: tkopton-ClusterConfigChanged.

To change this behavior we need to include unique information for every alarm in the alarm name.

What we can do is customize the alert name by including a field or an extracted field in the format ${field-name}.

The challenge is to find such unique information in the event log message. Let’s see what we have. This is a sample event message as received in vRLI:

2021-11-14T10:18:06.795866+00:00 vcenter01 vpxd 7888 - -  Event [9150192] [1-1] [2021-11-14T10:18:06.795507Z] [vim.event.ClusterReconfiguredEvent] [info] [VSPHERE.LOCAL\Administrator] [Datacenter-01] [9150191] [Reconfigured cluster CL01 in datacenter Datacenter-01 
 
 Modified: 
 
configurationEx.drsConfig.enableVmBehaviorOverrides: false -> true; 

configurationEx.proactiveDrsConfig.enabled: false -> true; 

 Added: 
 
 Deleted: 
 
]

It looks like every event has a unique event ID – the key property as described in the vSphere API documentation. I have created an extracted field for the event ID:

Figure 9: vRLI extracted field for vCenter EventID.

This extracted field can be now used as part of the name in the alert definition, which will make every occurrence unique in vROps. In the next picture, you can see the modified alert definition in vRLI.

Figure 10: Final alert definition in vRealize Log Insight.

Let’s do some vSphere cluster reconfigurations.

Figure 11: New event messages triggering alarms in vRLI.

And this is how it looks like in vROps after vRLI forwarded these alarms to vRealize Operations. First, we check the symptoms, see the next picture.

Figure 12: Notification event symptoms in vRealize Operations.

And here we see the corresponding alarms in vROps.

Figure 13: New alarms in vRealize Operations.

With these alarms, you could now create vROps notifications, start webhook triggered actions, parse the content and automate the remediation. Yes, especially around the alert name in vRLI using the extracted field we still have some room for improvement but the approach described here is sufficient for many use cases I have worked with.

Have fun implementing your use cases.

Stay safe.

Thomas – https://twitter.com/ThomasKopton

vRealize Operations AMQP Integration using Webhooks

With the version 8.4 vRealize Operations introduced the Webhook Outbound Plugin feature. This new Webhook outbound plugin works without any additional software, the Webhook Shim server becomes obsolet.

In this post, I will explain how to integrate vRealize Operations with an AMQP system. For this exercise, I have deployed a RabbitMQ server but the concept should be the same for any AMQP implementation.

AMQP Basic Concept

Without going into details of AMQP the very basic concept is to provide a queue for producers and consumers. The producers can put items into the queue and consumers can pick up these items and do whatever they are supposed to do with those items.

Items may be e.g. messages, therefore Advanced Message Queuing Protocol or AMQP. One of the most known implementations of AMQP is RabbitMQ.

Figure 1: Basic AMQP concept

In the context of vRealize Operations, we could consider vROps the producer and triggered alerts the items we could put into a queue to let consumers retrieve the items and do some work.

RabbitMQ Exchange and Queue

As first step I have configured my RabbitMQ instance with three queues:

  • vrli.alert.open – for vRealize Log Insight alerts
  • vrops.alert.open – for new vROps alerts
  • vrops.alert.close -for canceled vROps alerts

As shown in the next picture all three queues are using the amq.direct exchange.

Figure 2: RabbitMQ queue and exchange concept

The actual binding between exchange and queue is based on a routing key, as shown in the next picture for the vrops.alert.open queue.

Figure 3: Exchange-queue binding example

This routing key will be used later on in the payload to route the message to the right queue.

Webhook Outbound Plugin

The new Webhook Outbound Plugin provides a generic way to integrate (almost) any REST API endpoint without the need for a webhook shim server.

The configuration, as with any outbound plugin, requires the creation of an instance. The config of the instance for RaabbitMQ integration is displayed in the following picture. If you are using other exchanges, hosts, etc. in your RAbbitMQ instance you will need to adjust the URL accordingly.

Figure 4: Webhook Outbound Plugin instance configuration for RabbitMQ

NOTE: The test will fail as the test routine does not provide the payload as expected by the publish REST API method. You still need to provide working credentials, ignore the test error message and save the instance.

Payload Template

Payload Templates are the next building block in the concept. Using the new Payload Templates, you can configure the desired outbound payload granularly down to a single metric level. The following picture shows an example of the payload configuration used for the message reflecting a new open alert in vRealize Operations.

Figure 5: Payload template for vROps open alert

Important are especially the “routing key” and the “payload” parts. The first one ensures that the message will be published to the right queue and the payload is what the consumer is expecting. In my use case, it is just an example containing only a portion of available data.

Both payload template examples, one for new (open) alerts and one for canceled (close) alerts are available on the VMware Code page:

VMware Code – Sample Exchange

Notification

The last step is to create appropriate vRealize Operations Alert Notifications which will be triggered as soon as specified criteria are met and configure the outbound instance and the payload for RabbitMQ as shown in the next picture.

Figure 6: Notification settings

And this is the result, messages published to all three queues.

Figure 7: Queues with messages

An example message looks like this one.

Figure 8: vROps open alert message

The missing part now is the consumers. It could be a vRealize Orchestrator workflow subscribed to a queue or any other consumer processing AMQP messages. Maybe something for a next blog post?

Stay safe.

Thomas – https://twitter.com/ThomasKopton

Monitoring vSphere HA and Admission Control Settings using vRealize Operations

vSphere High Availability (vSphere HA) and Admission Control ensure that sufficient resources are reserved for virtual machine recovery when a host fails. Usually, my customers are running their vSphere clusters in either N+1 or N*2 configurations reflected corresponding Admission Control settings

In one of my previous blog posts, I have described how vRealize Operations helps with capacity management for N+1 and N*2 configured clusters.

In this post, I will describe how vRealize Operations helps to monitor the vSphere infrastructure to find any deviations from the desired HA and Admission Control state.

The dashboard and all needed components can be, as always, found on code.vmware.com:

https://code.vmware.com/samples?id=7508

Motivation

Even if you are responsible for a very small environment, just few ESXi clusters, do you have a complete, reliable and current overview of the HA and Admission Control settings on every cluster? Do you know any possible deviations from your desired state?

A few simple vROps Super Metrics, Views, and one Dashboard can help you maintain exactly the state of your vSphere Environment that will ensure sufficient resources for virtual machine recovery when a host or multiple hosts fail(s).

How the Dashboard works

The dashboard will help you answer a few simple questions:

  • Is HA enabled on my ESXi clusters?
  • What Admission Control Policy is configured?
  • What is the current amount (in %) of reserved CPU and memory resources on every single cluster?
  • Does the current amount (in %) of reserved CPU and memory resources configured through Admission Controlequal the desired amount as intended by the selected capacity model for the cluster, N+1 or N*2?

The base indicator to differentiate between different models is a vSphere tag. To make the vROps views work right after importing them, correct tags need to be assigned to the clusters.

Figure 1: vSphere Tags

These tags are used as filters in the N+1 and N*2 centric views.

Figure 2: Filter for N+1 centric View

For N+1 clusters we need to calculate the desired value for reserved CPU and memory resources and compare that value with the current value calculated by vSphere. To take any ESXi hosts in maintenance I have also added additional information regarding the count of ESXi hosts in maintenance and the count of hosts contributing to the current pool of compute resources.

Figure 3: vROps Super Metrics

To make this dashboard work in your environment you need to set the vSphere tags appropriately. Of course, you can use your own tags and adjust the filters in the views accordingly.

Do not forget to enable the imported Super Metrics in your policies.

Stay safe.

Thomas – https://twitter.com/ThomasKopton

Custom Compliance Management using vRealize Operations

As you probably know vRealize Operations provides several Compliance Packs basically out-of-the-box (“natively”). A simple click on “ACTIVATE” in the “Repository” tab installs all needed components of the Compliance Pack and allows the corresponding regulatory benchmarks to be executed.

Regulatory benchmarks provide solutions for industry standard regulatory compliance requirements to enforce and report on the compliance of your vSphere objects. You can install compliance packs for the following regulatory standards.

In the following picture, you can see the currently available six Compliance Packs.

Figure 1: Native Compliance Packs

But what if regarding compliance you have different requirements than what is provided by the available Packs? What are the components and the method to create customized or completely new compliance benchmarks?

In this blog post, I will give you a short overview of what vRealize Operations elements comprise a Compliance Pack and how to put everything together to create your very own custom compliance benchmark.

Components of a Compliance Management Pack

The mandatory parts of a Compliance Pack which are implementing the actual checks are:

  • symptom definitions
  • alert definitions
  • policy (activates the needed metrics, properties, symptom, and alert definitions)

In addition to these components, the available Compliance Packs provide a report template that consists of views as well as recommendations which are part of the alert definitions. The following picture shows the Compliance Pack for CIS as an example.

Figure 2: Content of a Compliance Pack

The Method

The general workflow from the certain requirement, “what to check”, to the Compliance Pack is always the same. The following diagram shows the single steps. As you see, you are not limited to metrics and properties vRealize Operations provide through the various Management Packs, you can add your own custom metrics and symptoms and make them part of your custom benchmark.

Figure 3: Compliance Pack workflow

In general this is what you need to do:

  1. Find the appropriate metric or property to check a certain aspect of your custom compliance
  2. Create a symptom definition containing that metric or property
  3. Create one or multiple alert definitions (e.g. one per vROps object type) and include all previously created symptom definitions as “ANY” set of definitions
  4. Create or adjust a vROps policy to enable all needed metrics and properties (if disabled)

As always, you may review the native Compliance Packs to see some examples. In the following picture, you can see the alert definitions for different object types as defined in the Compliance Pack for CIS.

Figure 4: Alert definitions in the Compliance Pack for CIS

NOTE: It is required to set the “Alert Subtype” to “Compliance” to allow the alert definition to be part of a custom compliance benchmark.

The alert definition consists of all relevant symptom definitions for the certain object type, as shown in the next picture.

Figure 5: Alert definition example

Final Step – Custom Compliance

The last and easiest step is to add the alert definitions to the new Custom Compliance and enable the alert definitions in a vROps policy.

Figure 6: Create a new custom benchmark
Figure 7: Add alert definitions
Figure 8: Select the policy

Finally vRealize Operations will check the compliance of your environment and present the results in the compliance widget.

Figure 9: Results of a compliance check

Now, let’s go and create your own customized compliance benchmark.

Stay safe.

Thomas – https://twitter.com/ThomasKopton

Capacity Management for n+1 and n*2 Clusters using vRealize Operations

When it comes to capacity management in vSphere environments using vRealize Operations customers are frequently asking for guidelines how to setup vROps to properly manage n+1 and n*2 ESXi clusters.

Just as a short reminder, n+1 in context of a ESXi cluster means that we are tolerating (and are hopefully prepared for) the failure of exactly one host. If we need to cope with the failure of 50% of all hosts in a cluster, like two fault domains, we often use the n*2 term.

In general we have two options to make vRealize Operations aware of the failure strategy for the ESXi clusters:

  • the “out-of-the-box” and very easy approach using vSphere HA and Admission Control
  • the vROps, and almost same easy, way using vRealize Operations Policies

vSphere HA and Admission Control

If configured Admission Control automatically calculates the reserved CPU and Memory failover capacity. In the first example my cluster is configured to tolerate failure of one host, which makes it 25% for my 4-hosts cluster.

Figure 1: vSphere and HA settings – n+1 cluster

vRealize Operations is collecting this information and accordingly calculating the remaining capacity. In the following picture you can see vROps recognizing the configured HA buffer of 25%.

Figure 2: vROps HA buffer for n+1 cluster

If we now change the Admission Control settings to n*2, in my case two ESXi host, vSphere is calculating the new required CPU and Memory buffer. We could also set the buffer manually in to 50% or whatever value is required.

Figure 3: vSphere and HA settings – n*1 cluster

After a collection cycle, vRealize Operations retrieves the new settings and starts calculating capacity related metrics using the adjusted values for available CPU and Memory capacity.

Figure 4: vROps HA – available capacity reflecting new HA settings

The “Capacity Remaining” decreases following the new available capacity and the widget shows the new buffer values in %.

Figure 5: vROps HA buffer for n*1 cluster

vRealize Operations Capacity Buffer and Policies

Sometimes the vSphere HA Admission Control is not being used and customers need another solution for their capacity management requirements.

This is where vROps Policies and Capacity Buffer settings helps manage vSphere resources.

vRealize Operations applies various settings to groups of object using vROps Policies. One section of a policy are Capacity Settings.

Figure 6: vROps Capacity Settings via Policy

Within the Capacity Settings you can define a buffer for CPU, Memory and Disk Space to reduce the available capacity of a vSphere cluster or a group of clusters. You can set the values for both capacity models, Demand and Allocation, separately.

Figure 7: vROps Capacity Settings – Buffer

In my example, I have disabled Admission Control in vCenter and set buffers in vROps.

Figure 8: vROps capacity remaining using buffer setting via policy

vRealize Operations is now using the new values for available resources to calculate cluster capacity metrics.

Btw. Custom Groups are the vROps way to group similar cluster together and treat all of them the same way.

Stay safe.

Thomas – https://twitter.com/ThomasKopton

Checking SSL/TLS Certificate Validity Period using vRealize Operations Application Monitoring Agents

In my 2019 article “Checking SSL/TLS Certificate Validity Period using vRealize Operations and End Point Operations Agent” on VMware Cloud Management Blog (https://blogs.vmware.com/management/2019/05/checking-ssl-tls-certificate-validity-period-using-vrealize-operations-and-end-point-operations-agent.html) I have described how to check the remaining validity of SSL/TLS certificates.

The method back then was to utilize the End Point Operations Agents.

Since vRealize Operations 7.5 new Application Monitoring capabilities have been introduced including a new Telegraf-based agent.

In this blog post I will describe how to use the new agent to implement an easy solution to continuously check the validity of SSL/TLS certificates. The remaining days until expiration will be displayed as a simple dashboards in vROps.

Application Monitoring – Agent Configuration

After deploying the Application Remote Collector (ARC) vRealize Operations is ready to install agents on monitored virtual machines.

Figure 1: Installing Application Monitoring agent

Once the agent has been installed and is running, the actual configuration of the agent becomes available.

The agent is basically doing two jobs. The agent:

  • discovers supported applications and can be configured to monitor those applications
  • provide the ability to run remote check, like ICMP or TCP tests
  • provide the ability to run custom scripts locally

The ability to run scripts and report the integer output as metric back to vROps is exactly what we need to run certificate checks.

The actual script is fairly easy and available, together with the vROps dashboard, via VMware Code:

https://code.vmware.com/samples?id=7464

To let the agent run the script and provide a metric, we configure the agent with few options.

Figure 2: Configure Custom Script

The script itself expects two parameters, the endpoint to check and the port number.

Figure 3: Custom Script options

One agent can run multiple instances of the same script with different options or completely different scripts.

All scripts need to be placed in /opt/vmware and the arcuser (as per default configuration) needs the execute permissions.

Dashboard

The running custom scripts provide a metric per script. The values can be used to populate dashboards or views or serve as metrics for symptoms and alert definitions.

Figure 4: Custom Scripts as metrics

The dashboard showing is very simple but with the color coding if the widget it is easy to spot endpoints with expiring SSL/TLS certificates and take appropriate actions.

Figure 5: SSL/TLS Certificate Validity dashboard

You will need to adjust the widget settings to include your metrics.

Figure 6: Widget configuration

Stay safe.

Thomas – https://twitter.com/ThomasKopton

vRealize Operations Content Management – CD Pipeline – Part 1

vRealize Operations provide a wide range of content OOB. It gives the Ops teams a variety of dashboards, view, alerts etc. to run and manage their environments.

Sooner or later, in most cases rather sooner than later, vROps users will create their own content. It might be completely new dashboards or maybe just adjusted alert definitions.

Whatever content you create in vRealize Operations, you should treat it like every other software development project.

Ideally you have a development, test and production vROps instances. If this footprint is just too big for your environment, you should at least have a single node test/dev for content development and testing before you import that content into your production instance.

Managing content in vROps, exporting dashboards, views, alert definitions etc. and importing the corresponding files into another vROps instance may be very cumbersome and error prone.

This is where vRealize Suite Lifecycle Manager comes into play.

vRSLCM offers all features to make the management of vRealize Operations (and vRA/vRO/vCenter) content an easy task.

In this post I will describe the basics of vROps content management using vRealize Suite Lifecycle Manager and GitLab.

Logical Design

The procedure described in this post is based on the following logical design of the vROps environment including vRSLCM and GitLab.

Figure 1: Logical design

vRSLCM Configuration Overview

In this post I am not going to describe how to configure vRealize Suite Lifecycle Manager, how to add content endpoints is described in detail here:

https://docs.vmware.com/en/VMware-vRealize-Suite-Lifecycle-Manager/8.0.1/com.vmware.vrsuite.lcm.8.0.1.doc/GUID-44C44ECA-6893-4F0D-BE00-54B0817DF5EE.html

For the walkthrough presented in this post I have configured following content endpoints in my vRSLCM.

Figure 2: vRSLCM content endpoints

I have a vRSLCM-deployed vROps instance, serving as my Dev/Test and a vROps-P1 which is the production instance.

Important configuration detail here is, that the production vROps, vROps-P1, is set to accept source controlled content only. If you have only one vROps checking in content into vRSLCM repository you probably won’t set that option. If you do, you will need a source control endpoint, like GitLab. I have set that option to showcase the usage of GitLab and how changes to the content source in GitLab itself can be handled.

Walkthrough – Overview

The steps in my walkthrough are:

  1. Have a content in Dev/Test vROps you would like to deploy to Prod vROps.
  2. Capture content from Dev/Test into vRSLCM repo and GitLab (including Git merge).
  3. Try to deploy content to Prod vROps from vRSLCM repo directly.
  4. Capture and deploy content from GitLab to Prod vROps.
  5. Modify content in GitLab.
  6. Re-capture from GitLab and deploy to all vROps endpoints.

Step 1 – vROps Content

For the demo I am using a simple dashboard as shown in the following picture.

Figure 3: vROps dashboard – first version

The goal is to deploy this dashboard into the production vROps environment.

Step 2 – Capture Content

We start the capture process using the “Add Content” feature.

Figure 4: “Add Content” vRSLCM feature

Obviously we select vRealize Operations as the content endpoint type.

Figure 5: Content capture – endpoint type

As we want to capture the content into the internal vRSLCM repository and into the source controlled repo – GitLab in one step, we are selecting both respective options.

Figure 6: Capture and check in

We select the source endpoint and the dashboard itself. I have also set the option to import all dependencies. In this case there are no dependencies like for e.g. views used as widgets, in other scenarios, vRSLCM will resolve the dependencies and import all needed content parts. I have also selected the “mark content as production ready” option to allow that content to be deployed to my production vROps.

Figure 7: Content capture settings

As we are checking in the content into GitLab, we need to specify the endpoint, repo and branch.

Figure 8: Checking in content into GitLab

After few seconds the content pipelines complete.

Figure 9: Content pipelines

Now we see the merge request in GitLab and after merging the request, the dashboard is available in GitLab repo and treated as any other code.

Figure 10: GitLab merge request
Figure 11: Dashboard as code in GitLab

Step 3 – Deploy Content – First Attempt

At this point we have our dashboard as content in vRSLCM repo and in GitLab.

Figure 12: Content in vRSLCM repo

If we now open the tkopton-Dashjboard-01 we will see the details of the first version and the option to deploy the content to another vROps endpoints.

Figure 13: Content details and deployment – first attempt

In the next picture we can see that our vROps-P1 is not listed as an available endpoint. This is because I have configured that endpoint to accept source controlled content only. This version is not source controlled, it has been captured from Dev/Test vROps into vRSLCM repo, not from the GitLab.

That means, we need to capture the content from GitLab first to be able to deploy it into the production vROps.

Step 4 – Capture from GitLab and Deploy Content – Second Attempt

We start another capture and deploy (in one step) process and this time we select our GitLab as the source.

Figure 14: Capture and deploy content from GitLab
Figure 15: Capture and deploy in one step

We use the same settings as during the first attempt, the capture endpoint is different.

Figure 16: GitLab as capture endpoint

As we are doing capture and deploy in one step, we need to specify the deployment target and options.

Figure 17: Deployment target settings

And now we can see in the Figure 17 that our production vROps-P1 is available in the list of destination endpoints.

Now the same dashboard is available in the production vROps and in vRSLCM repo we see the second version of the dashboard wich is source controlled.

Figure 18: Source controlled content

Step 5 – Edit Content in GitLab

Let us change the name of one of our widgets. And let us do it in GitLab instead of editing the dashboard in vROps. The dashboard is just another source code from the content repository perspective.

Figure 19: Editing the content source in GitLab

Step 6 – Re-Capture and Re-Deploy Content

After re-capturing the content from GitLab following the same procedure as in step 4 but this time without deploying the content, we see another version in the vRSLCM repo.

Figure 20: GitLab updated version of the dashboard in vRSLCM

After deploying the updated content to our vROps endpoints, we see the dashboard having a new caption for the first widget.

Figure 21: Updated dashboard in vROps

Conclusion

With vRealize Suite Lifecycle Manager and GitLab you have a perfect foundation to create your own CD pipeline for vRealize Operations content.

In the next part I will describe how to extend the pipelines with custom workflows provided by e.g. vRealize Orchestrator.

Stay safe.

Thomas – https://twitter.com/ThomasKopton

Self-Healing with vRealize Operations and vRealize Orchestrator

The vRealize Operations Management Pack for vRealize Orchestrator provides the ability to execute vRO workflows as part of the alerting and remediation process in vROps.

The vRO workflows can be executed manually or automatically.

With this solution it is easy to implement sophisticated self-healing workflows for your vROps managed environment.

In this blog post I will show you step by step how to get from a use case to auto-remediation with vRealize Operations and vRealize Orchestrator Management Pack.

Infrastructure Components

To start with your own self-healing capabilities, you will need:

  • vRealize Orchestrator instance. You can use a stand alone vRealize Orchestrator or the vRO instance deployed as part of the vRealize Automation deployment. For this post I am using the vRA internal vRO 8.1.
  • vRealize Operations, for this post I am using vROps 8.1.1
  • vRealize Operations Management Pack for vRealize Orchestrator installed and configured. I am using the latest version 3.1.1 which can be downloaded from the VMware Solution Exchange for free:

https://marketplace.vmware.com/vsx/solutions/management-pack-for-vrealize-orchestrator

In this post I am not describing the actual installation and initial configuration of the MP. The process is straight forward and described in the official documentation:

https://docs.vmware.com/en/Management-Packs-for-vRealize-Operations-Manager/3.1.1/vrealize-orchestrator/GUID-0096BB63-D347-4777-AAC2-CE0119A53B95.html

Use case

The story begins with a use case. Since I am focusing on the actual generic procedure my use case is very simple and there are for sure already other ways to remediate the issue.

My use case is:

“If a VM (the OS) crashes I will reset that VM in vCenter”

As “seems to be crashed” or the exact description how to determine if a VM really crashed is not object of this post. We assume we have appropriate symptom and alert definitions in place.

Generic Recipe

The procedure from use case to auto-remediation is always the same:

  1. Create a vRO workflow for your use case
  2. Create or modify a vRO package
  3. Discover or re-discover vRO package and included workflows in vROps
  4. Optional – Configure workflow in vROps – in our case it is mandatory
  5. Create or edit vROps recommendation
  6. Add vROps recommendation to an alert definition
  7. Optional – Manual remediation
  8. Optional – Enable automatic remediation

Create Workflow

I am not going to describe the content of the workflow itself or how to code in vRO in this post.

The focus is how to integrate any given workflow in vROps and let it execute manually and automatically as part of the alert remediation.

For our use case the vRO workflow needs at least one input parameter to pass the vCenter VM object reference from vROps to vRO. In the following picture you see a second input string parameter, vrops_alert_id. If this parameter is available, vROps will pass the internal alert ID to vRO. This ID can be used for callbacks to retrieve more information from vROps.

Figure 1: vRO workflow and its input parameters

In this case the inputs are:

  • vm as VC:<Datatype> to be populated with the object which triggered the alert
  • vrops_alert_id as String – to be populated with the actual vROps alert ID for further callbacks

Create or Modify vRO Package

Workflows you would like to use in vROps need to be added to a new or existing vRO package. Keep in mind that all workflows in the package which we will import in the next step will be visible in vROps.

I tend to create a distinct package only for workflows I need in vROps.

In the next picture you see my package with its content.

Figure 2: vRO package content

Since we are not using the package to export the workflows and import it in another vRO instance, you do not have to include the dependencies, like actions used in the workflow.

Discover or Re-discover vRO Package in vROps

To make vROps aware of the available workflows we need to discover the package we created or modified in the previous step.

The procedure in vROps is simple. “Environment” –> “VMware vRealize Orchestrator” –> “vRO Workflows” is the path you need to follow as shown in the following picture.

Figure 3: vRO package discovery process

In the next step you select your vRO instance, in my case “vRA-vRO” and run the “Configure Package Discovery” from the “Actions” menu.

Figure 4: Configure package discovery in vROps

To start the discovery, you just add your package to the list of packages to inspect. In my case it is com.vmware.tkopton.vrops.actions. “Begin Action” starts the process.

Figure 5: Running the package discovery

After few minutes you should see your package and the included workflows in the list of available packages. If it does not show up, reload the page in your browser. If it still does not show up, you will need to check the recent tasks in vROps via the “Administration” for any errors.

The next picture shows my package and the including workflows after the successful completion of the discovery process.

Figure 6: Discovered workflows

Configure Workflow in vROps (may be optional)

As for my use case we want the workflow to be executed on a specific vCenter object, a VM, we need to configure the workflow in vROps properly.

We need to let vROps know on what resource types in alert definitions and on what target resource type in vRO a workflow can be executed. The process is to run “Create/Modify Workflow Action on vCenter Resources” on the specific workflow from the “Actions” menu as depicted in the next figure.

Figure 7: Configuring the workflow

As my alert will be triggered on VM resource type and will be executed on a VM resource in vCenter, we specify “Virtual Machine” in the highlighted parameters. “Operation” is “add”, as we are initially configuring the action.

Figure 8: Action parameters configuration

The VMware online documentation explains the properties:

https://docs.vmware.com/en/Management-Packs-for-vRealize-Operations-Manager/3.1.1/vrealize-orchestrator/GUID-7E4B6D42-2A5C-440B-A8B6-3B31AD9AEBEB.html

Figure 9: Action configuration – properties overview

If the action completed successfully, you should see the available resource type and action target type as shown in the next picture if you re-run the configuration process.

Figure 10: Configured action

Create or Edit vROps Recommendation

vROps recommendations are the (optional) parts of an alert definition responsible for the availability of manual or automated actions.

To have my workflow available for alert definitions, we create a new or edit an existing recommendation. As show in the next two figures I am creating a new recommendation and specify my vRO workflow as the action.

Figure 11: Creating new vROps recommendation – step 1
Figure 12: Creating new vROps recommendation – step 2

Add vROps Recommendation to an Alert Definition

As I am not focusing on symptom and alert definitions itself, I assume we have an appropriate alert definition in place.

Now we need to wire that alert definition and our new recommendation.

This is pretty easy in vRealize Operations 8.1, as shown in the following pictures.

Figure 13: Editing alert definition

We simply edit the alert definition and add the recommendation per drag and drop.

Figure 14: Adding recommendation to an alert definition

An alert definition may have multiple recommendation. In auto-remediation scenarios we should be careful with multiple actions here.

Figure 15: Alert definition with configured recommendation

Optional – Manual Remediation

Now we wait for the alert to be triggered.

Figure 16: Triggered alert

Once we see the active alert, we can open it and start the workflow manually.

Figure 17: Available action in the triggered alert

In the next picture you can see, that the vm parameter has been populated by vROps.

The vrops_alert_id is obviously not being populated when the workflow is being started manually.

Figure 18: Action parameters

After starting the action, we can see the corresponding task in vCenter.

Figure 19: Task executed in vCenter

Optional – Enable automatic remediation

Now, as we see that the workflow is working correctly, we are ready to enable automatic action and let vRealize Operations remediate issues without manual involvement.

To enable automatic actions, we need to modify the settings of the alert definition in the policy applied to the object(s) in scope.

In vROps 8.1 with its new alert definition workflow it is just one click.

Figure 20: Enabling automated action

The next triggered alert will start the action (vRO workflow) automatically and we can see the execution in the “Recent Tasks”.

Figure 21: Recent tasks overview in vROps

This time, vRO also receives the vROps alert ID as depicted in the next figure.

Figure 22: Workflow output in vRO

Conclusion

With vRealize Operations Management Pack for vRealize Orchestrator we have almost unlimited possibilities to extend vROps actions and implement real self-healing operations.

Stay safe.

Thomas – https://twitter.com/ThomasKopton

vRealize Operations and Logging via CFAPI and Syslog

Without any doubt configuring vRealize Operations to send log messages to a vRealize Log Insight instance is the best way to collect, parse and display structured and structured log information.

In this post I will explain the major differences between CFAPI and Syslog as the protocol used to forward log messages to a log server like vRealize Log Insight.

The configuration of the log forwarding in vRealize Operations is straight forward. Under “Administration” –> “Management” –> “Log Forwarding” you will find all options to quickly configure vRLI as target for the selected log files.

The following figure shows how to configure vRealize Operations to send all log messages to vRealize Log Insight using the CFAPI protocol via HTTP.

Figure 1: Log Forwarding configuration

The CFAPI protocol, over HTTP or HTTPS, used by the vRealize Log Insight agent provides additional information used by the vROps Content Pack. The extracted information flows into the various dashboards and alert definitions delivered through the Content Pack. Following picture shows one of the available dashboards populated with available data when using CFAPI and vRLI.

Figure 02: vROps Content Pack

In case you (for whatever strange reason) cannot use CFAPI, you can configure vROps to use Syslog. It is as simple as selecting Syslog as the protocol option in the configuration page shown in the following picture.

Figure 03: Syslog as configured protocol

The drawback of using Syslog here is that the additional information parsed by the agent and used by the content pack will no longer be available and you will need to create your own extracted fields in vRLI to parse data from the log messages.

In the next both pictures you can see the empty dashboards and log messages without any vROps specific fields in the interactive analytics .

Figure 04: Empty dashboards when using Syslog
Figure 05: Missing vROps specific fields when using Syslog

It is important to know that vROps is using Syslog over TCP when configured via UI as shown in figure 03.

But what if you are forced to use Syslog over UDP?

There is no such option in the UI but since vROps is using the regular vRLI agent, there has to be a way to configure it to use UDP instead of TCP.

The vRLI config file explains how to set the according option:

Figure 06: liagent.ini config file

You can just replace

proto = syslog

with

proto = syslog_udp

restart the agent

service liagentd restart

and your vROps nodes starts to forward log messages to your log server using UDP.

I have setup a fake log server listening on 514 UDP using netcat:

Figure 07: Syslog over UDP in NC

If you configure the vRLI agent in vROps directly via the config file, please keep in mind:

  • that you are using a function which is not officially supported by VMware
  • you will need to make such manual changes on every node
  • you will need to monitor any changes to that file which can be triggered via the UI or vROps updates

Stay safe.

Thomas – https://twitter.com/ThomasKopton

ESXi Cluster (non-HCI) Rightsizing using vRealize Operations

vRealize Operations with its four main pillars:

  • Optimize Performance
  • Optimize Capacity
  • Troubleshoot
  • Manage Configuration

provides a perfect solution to manage complex SDDC environments.

The “Optimize Performance” part of vRealize Operations provides a wide range of features like workload optimization to ensure consistent performance in your datacenters or VM rightsizing to reduce bottlenecks and ensure best possible performance of your workloads.

The vROps capability to identify over- and undersized VMs and conduct the required operations to adjust the configuration of VMs is one of the well-known features, accessible directly form the UI.

Figure 1: VM Rightsizing

But what if you would like to rightsize your ESXi Clusters? What information and features is vRealize Operations providing in this area?

What-If Analysis for Clusters

The What-If Analysis feature in the “Optimize Capacity” area is a quick and simple way to check the impact additional workloads or removing of workloads will have in the capacity of an ESXi traditional or HCI cluster.

You can also run infrastructure centric scenarios, like removing or adding hosts from/to clusters.

Figure 2: What-If Scenarios

These are all great features supporting proper capacity and performance management.

But how can you determine if your clusters are configured correctly from the available capacity point of view? What if you have a significant number of clusters? You probably do not want to run the scenarios for every and each cluster over and over again to get updated information.

vRealize Operations is providing all needed information to have a quick and up-to-date insight into your environment allowing you take all necessary actions to adjust the sizing of your ESXi clusters and optimize your SDDC.

Recommended CPU, Memory and Disk Space Metrics

vRealize Operations is constantly calculating recommended values for CPU, Memory and Disk Space based on the configured capacity models, Demand and Allocation if activated. The recommended capacity calculation takes into account vROps Buffers, allocation ratios and Admission Control settings giving you a fairly reliable indication on how to size your clusters.

Figure 3: Recommended Size Metrics

These metrics can be used to calculate the actual number of ESXi host which could be safely removed from the cluster or how many hosts need to be added to cope with the projected demand.

Cluster Rightsizing Dashboard

The Dashboard and all required components can be downloaded from VMware Code page:

https://code.vmware.com/samples?id=7407#

My simple dashboard will give you detailed insights into the utilization and capacity of your clusters.

It will also provide recommendations regarding the optimal size of the cluster, which will help improve the efficiency of your environment.

This first version of the dashboard is limited to traditional clusters (non-HCI like vSAN clusters).

Even if it shows all clusters (a filter will be added in the next version), please do not shrink vSAN clusters using information provided by this dashboard.

Only CPU and Memory Demand metrics are processed to conduct the rightsizing.

Before removing ESXi host from a cluster I highly recommend putting them into maintenance mode for some period of time and assess performance of the workloads. Additional What-If analysis based on the numbers provided by the dashboard helps get confidence in uncertain situations.

In addition to the metrics provided out-of-the-box we need few Super Metrics to calculate the actual number of hosts to add/remove. It is important to note that the calculation is working properly for uniform clusters. That means same sizing of ESXi host within a cluster, same CPU speed and number of cores, same memory configuration.

Figure 4: Super Metrics

The list view used in the dashboard displays all clusters in the selected vSphere Datacenter.

In the last column you will see the number of ESXi host you either should add to the cluster to ensure sufficient capacity or you could potentially remove from the cluster.

Figure 5: Simple Cluster-Rightsizing Dashboard

Before you start removing hosts from clusters, you can also run a What-If scenario to check the remaining capacity and the capacity projection.

In my example the dashboard is indicating that I could remove one host from the wdcc02 cluster.

Figure 6: What-If scenario settings

If we run the scenario, we see that from the demand perspective the cluster is still providing sufficient capacity to run the current workloads.

Figure 7: Scenario results

Happy rightsizing and stay safe.

Thomas – https://twitter.com/ThomasKopton