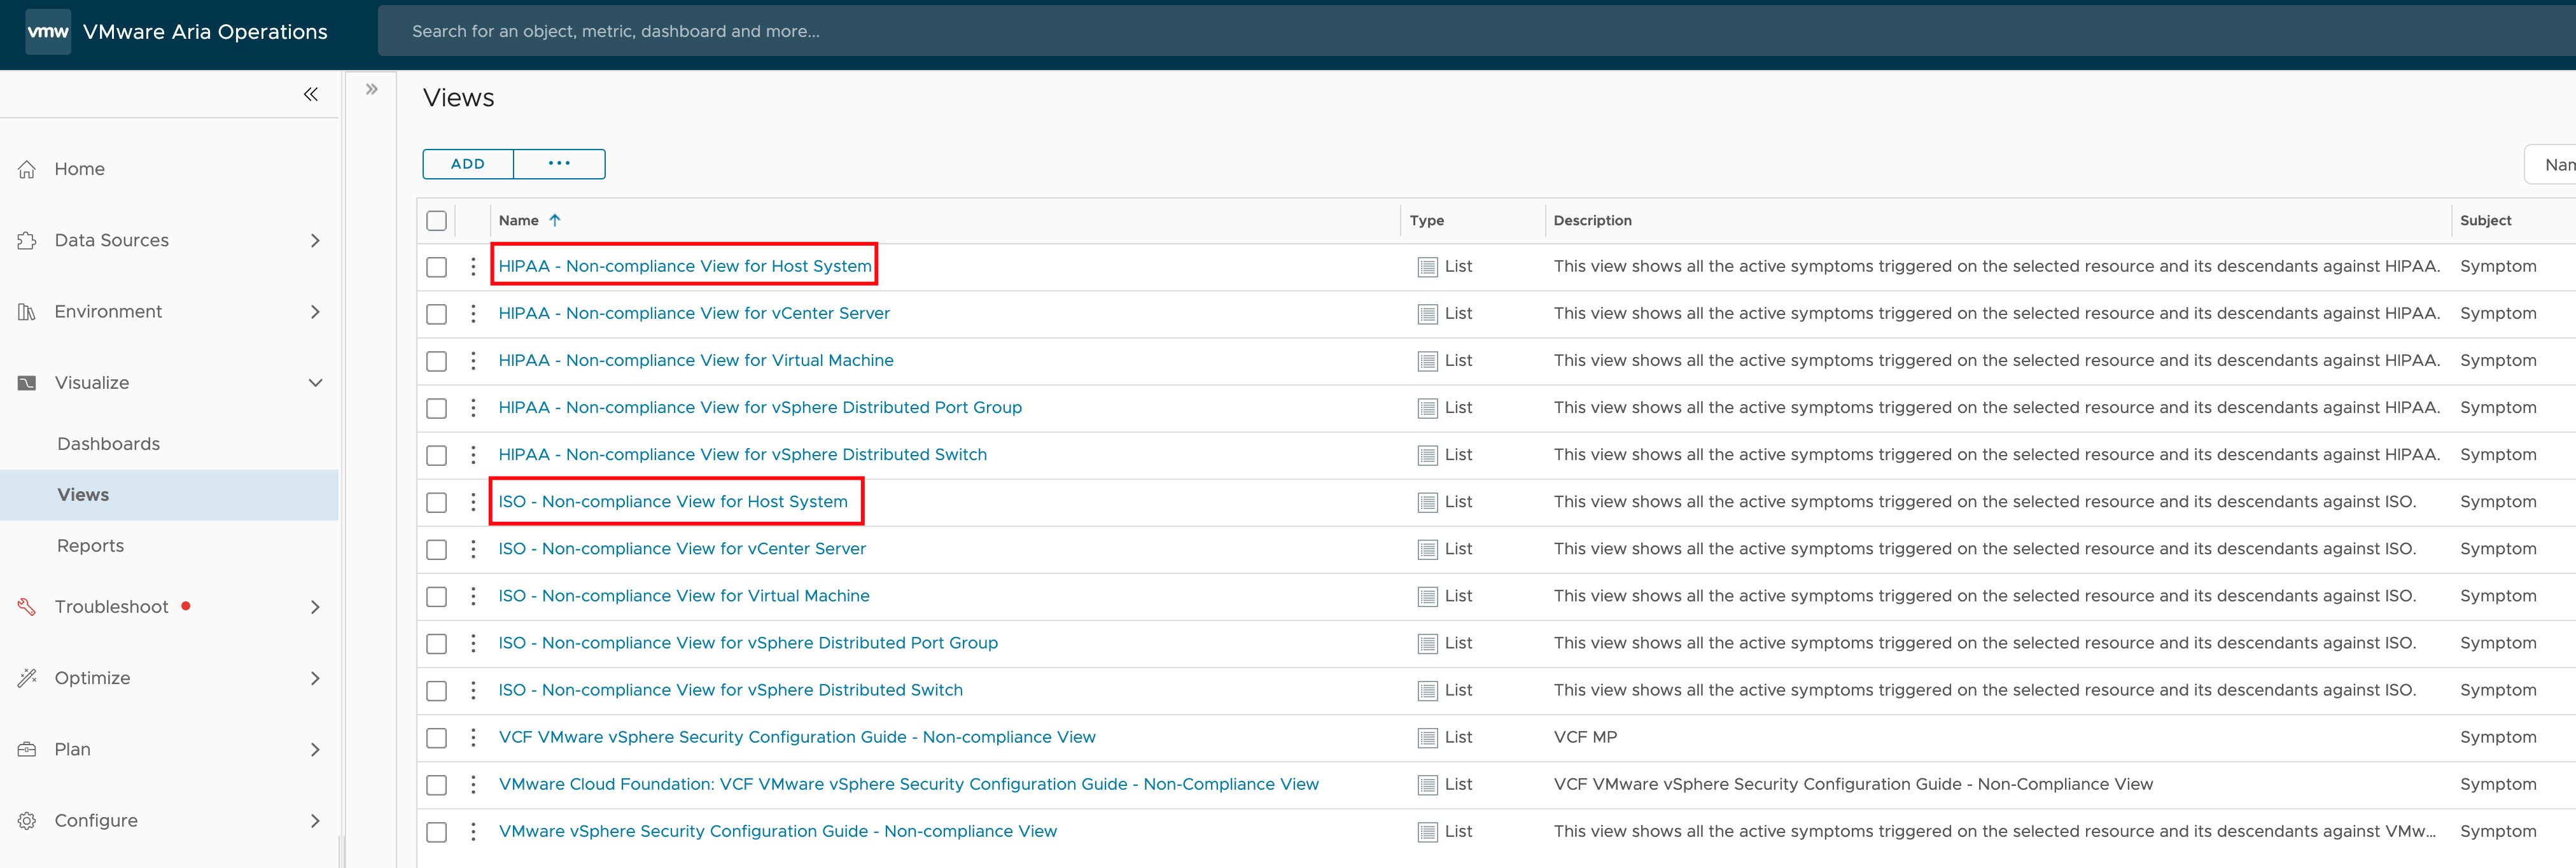
Effortless Energy Savings – Air Conditioning Control with VMware Aria Operations

In a series of recent blog posts, I’ve delved into the fascinating realm of VMware Aria Operations, uncovering its remarkable capabilities in analyzing energy consumption, energy costs, and carbon emissions attributed to diverse elements within a Software Defined Data Center (SDDC). Beyond just elucidating these features, I’ve also spotlighted the seamless integration of Aria Operations within SDDC automation, showcasing its user-friendly nature and its pivotal role in streamlining operational processes.

In this blog post, I’ll break down the basics of using VMware Aria Operations to control air conditioning in a closed-loop manner. We’ll explore how VMware Aria Operations handles this process step by step, making it easy to understand and implement. Let’s dive in and demystify the world of air conditioning control with VMware Aria Operations.

NOTE: In this blog post, I want to clarify that what I’m presenting is a Proof of Concept (PoC), not an exhaustive guide on controlling a particular AC device. Plus, since I don’t have an AC device in my basement, I’ll be illustrating the process using a fan. However, keep in mind that the principles discussed here can be applied to any HVAC (Heating, Ventilation, and Air Conditioning) device.

Problem Statement

While advancements in data center design and cooling technologies have undoubtedly contributed to enhanced energy efficiency, it remains prudent to conduct a thorough assessment of cooling systems to identify potential areas for optimization.

A key aspect of enhancing energy efficiency in cooling systems involves consistently fine-tuning the cooling process to accurately match demand, thereby preventing both overheating and excessive cooling. Put simply, excessive cooling leads to energy wastage.

While I won’t delve into the intricate workings of control loops or elaborate on the specifics of PI or PD controllers, it is crucial to emphasize the necessity of a closed control loop, as illustrated in the subsequent diagram.

Figure 01: Closed control loop.

Following components are the single parts of the loop:

  • VMware Aria Operations as the error detector to determine the deviation from the desired state or the threshold and the current stats as well as the controller adjusting the cooling device
  • A controllable fan as the cooling device
  • Server rack as the entity we need to cool
  • Temperature sensor as I have described one of my previous blog posts
Solution

Let’s start with the easy part, the rack. It just a rack with servers and switches, that’s it. One may say that it is not important to measure the temperature within the rack, important is to measure the temperature inside the servers itself, and this is correct. In the end the the question where we measure the temperature is part of the sophisticated logic, but the answer does not change the concept, thus I will stick to the temperature in the rack.

The sensor itself is described here and I have used the VMware Aria Operations Management Pack Builder to create a very simple solution to monitor the temperature and humidity provided by the sensor. The next picture shows the metrics in my Aria Operations instance.

Figure 02: Temperature and humidity monitoring.

My cooling device is a fan attached to a smart plug also described here. Same as for the sensor, these devices provide a REST API and I have created a Management Pack to monitor them, as shown in the next picture.

Figure 03: Smart plug management.

VMware Aria Operations forms the heart or the brain of the solution, it is the error or drift detector and the controller that tries to remediate the drift. Within Aria Operations there are two constructs implementing the detector and the controller respectively:

  • Symptoms and Alerts responsible for the drift detection between the desired and the current state
  • Notifications and Webhooks playing the role of the controller which sends the control signals towards the cooling device

The next picture shows the two Aria Operations Symptom Definitions with my thresholds for the high and low temperature. As you can see, I have decided to use 3 Wait/Cancel Cycles to avoid a too aggressive control pattern.

Figure 04: Symptom definitions.

Both symptoms are used in their respective Aria Operations Alert Definitions as shown in the following picture. Please not that I do not have changed the Wait/Cancel Cycles here, as the three cycles (15 minutes) in the symptoms are sufficient for this PoC.

Figure 05: Alert definitions.

As the temperature in the rack has breached the defined threshold (desired state), Aria Operations has triggered an alert.

Figure 06: Triggered temperature alert.

The last part of the control loop is signaling the cooling device. In this simple proof of concept signaling means switching the fan on and off.

Aria Operations Notifications and Webhooks combined together are implementing this part of the setup. The webhook itself consists of two elements, an Outbound Instance and the Payload Template.

The outbound instance refers to the endpoint we aim to connect with for transmitting the control signal. Following picture shows the configuration of my outbound instance, which is the REST API of the smart plug.

Figure 07: Outbound instance configuration.

The payload template represents the functional signal, encompassing distinct functions: activating the fan and subsequently deactivating it upon the temperature reaching a preconfigured threshold (our desired state), as established within the symptom parameters. The following illustration shows the straightforward configuration of such payload templates within the Aria Operations platform.

Figure 08: Payload templates configuration.

Aria Operations Notifications serve as the cohesive element that integrates all the previously introduced components, thus establishing the control loop. The Define Criteria describe when the notification should be triggered, the Outbound Method is what we control, the endpoint, and the Payload Template specifies what we do.

Figure 09: Notification configuration – the final assembly.

Ultimately, our established closed control loop is operational. Aria Operations continually monitors the temperature, identifies deviations from the target state, and initiates automated measures to remediate any deviations. This approach effectively saves energy, reduces expenses, and minimizes carbon emissions.

Figure 10: Enhancing efficiency – intelligent cooling for energy savings.

As previously indicated, the current post serves as a basic proof of concept. In authentic data center scenarios, Aria Operations would be seamlessly integrated with environmental monitoring and management systems, employing identical principles to achieve sustainability objectives.

Stay safe.

Thomas – https://twitter.com/ThomasKopton

Quick Tip – Programmatically Update vRealize Log Insight Webhook Token

The Webhook feature in vRealize Log Insight is a great way to execute automation tasks, push elements in a RabbitMQ message queue or start any other REST operation.

Many endpoints providing such REST methods require a token-based authentication, like the well-known Bearer Token. vRealize Automation is one example of such endpoints.

It is pretty easy to specify that kind of authentication in vRealize Loginsight Webhook, the only thing you need to do is to add the Authorization header and set its value to Bearer xyz... .

Figure 01: Authorization header in vRLI webhook.

The problem with such tokens is their expiration. Usually, such tokens are valid only for a certain time period and need to be refreshed.

How to get a new token from vRealize Automation is not the subject of this post, we assume we have a new token, let’s say it is abcd1234. Now we need to update that value in vRLI.

We use the vRealize Log Insight REST API to update the Webhook configuration which contains the headers.

Before we can do that, we need the Bearer Token for the vRealize Log Insight REST API. This is the curl command to retrieve the token:

curl --location --request POST 'https://$VRLI-FQDN/api/v2/sessions' --header 'Accept-Encoding: application/json' --header 'Content-Type: application/json' --data-raw '{ "username": "admin", "password": "secret", "provider": "Local"}'

The response contains the token we use for any other subsequent REST API call (I have changed the token for better visibility):

{
    "userId": "2338ddb2-xxx-yyy",
    "sessionId": "123456789assdfg",
    "ttl": 1800
}

Now we have everything we need to update the Webhook configuration to include a new vRealize Automation token, abcd1234. This is a two-step process.

First, we need the ID of our Webhook. This is the REST call to retrieve all webhooks:

curl --location --request GET 'https://$VRLI-FQDN/api/v2/notification/webhook' \
--header 'Accept-Encoding: application/json' \
--header 'Content-Type: application/json' \
--header 'Authorization: Bearer 123456789assdfg' \

From the (truncated) response we extract the ID of the Webhook we would like to modify. Please be aware that the output JSON will contain separate sections for every Webhook in your vRealize Log Insight:

{ "id": "96211daa-4391-42bd-b972-52689b7eb540", "URLs": [ "https://$VRLI-FQDN/codestream/api/pipelines/db1259ea-e4ea-4a91-89fc-70a3b5a2004b/executions" ], "destinationApp": "custom", "contentType": "JSON",

Second, we can now use a PUT REST call to update the webhook with the new Bearer Token for vRealize Automation.

curl --location --request PUT 'https://$VRLI-FQDN/api/v2/notification/webhook/432be7da-9876-4c9f-a11a-bb1fe131b2c4'--header 'Accept-Encoding: application/json' --header 'Content-Type: application/json' --header 'Authorization: Bearer 123456789assdfg' --data-raw '{ $BODY_FROM_PREVIOUS_RESPONSE_FOR_THE_CORRESPONDING_WEBHOOK_ID }'

The REST body is basically the content corresponding Webkook ID of the JSON output we retrieved in the Step 1 response. We just need to replace the token here:

{ "id": "432be7da-9876-4c9f-a11a-bb1fe131b2c4", "URLs": [ "https://{ "id": "96211daa-4391-42bd-b972-52689b7eb540", "URLs": [ "https://$VRLI-FQDN/codestream/api/pipelines/db1259ea-e4ea-4a91-89fc-70a3b5a2004b/executions" ], "destinationApp": "custom", "contentType": "JSON",/codestream/api/pipelines/b12c7cbd-6d83-4bef-8b31-7bb653ee01aa/executions" ], "destinationApp": "custom", "contentType": "JSON", "payload": "{\n \"comments\": \"Starting pipeline using REST - from vRLI\",\n \"input\": {\n \"messages\": \"${messages}\",\n \"TriggeredAt\": \"${TriggeredAt}\",\n \"my_systemID\": \"${ vmw_vr_ops_id}\",\n \"SourceInfo\": \"${SourceInfo}\",\n \"HitOperator\": \"${HitOperator}\",\n \"Info\": \"${Info}\"\n}\n}", "name": "tkopton-CS-Pipeline-Test", "headers": "{\"Content-Type\":\"application/json\",\"Action\":\"POST\",\"Authorization-User\":\"undefined\",\"Authorization-Password\":\"undefined\",\"Authorization\":\"Bearer abcd1234\"}", "acceptCert": false, "creatorEmail": "xxxxxxx"}

Replacing the token in the vRealize Log Insight is that simple.

Stay safe.

Thomas – https://twitter.com/ThomasKopton

vRealize Operations AMQP Integration using Webhooks

With the version 8.4 vRealize Operations introduced the Webhook Outbound Plugin feature. This new Webhook outbound plugin works without any additional software, the Webhook Shim server becomes obsolet.

In this post, I will explain how to integrate vRealize Operations with an AMQP system. For this exercise, I have deployed a RabbitMQ server but the concept should be the same for any AMQP implementation.

AMQP Basic Concept

Without going into details of AMQP the very basic concept is to provide a queue for producers and consumers. The producers can put items into the queue and consumers can pick up these items and do whatever they are supposed to do with those items.

Items may be e.g. messages, therefore Advanced Message Queuing Protocol or AMQP. One of the most known implementations of AMQP is RabbitMQ.

Figure 1: Basic AMQP concept

In the context of vRealize Operations, we could consider vROps the producer and triggered alerts the items we could put into a queue to let consumers retrieve the items and do some work.

RabbitMQ Exchange and Queue

As first step I have configured my RabbitMQ instance with three queues:

  • vrli.alert.open – for vRealize Log Insight alerts
  • vrops.alert.open – for new vROps alerts
  • vrops.alert.close -for canceled vROps alerts

As shown in the next picture all three queues are using the amq.direct exchange.

Figure 2: RabbitMQ queue and exchange concept

The actual binding between exchange and queue is based on a routing key, as shown in the next picture for the vrops.alert.open queue.

Figure 3: Exchange-queue binding example

This routing key will be used later on in the payload to route the message to the right queue.

Webhook Outbound Plugin

The new Webhook Outbound Plugin provides a generic way to integrate (almost) any REST API endpoint without the need for a webhook shim server.

The configuration, as with any outbound plugin, requires the creation of an instance. The config of the instance for RaabbitMQ integration is displayed in the following picture. If you are using other exchanges, hosts, etc. in your RAbbitMQ instance you will need to adjust the URL accordingly.

Figure 4: Webhook Outbound Plugin instance configuration for RabbitMQ

NOTE: The test will fail as the test routine does not provide the payload as expected by the publish REST API method. You still need to provide working credentials, ignore the test error message and save the instance.

Payload Template

Payload Templates are the next building block in the concept. Using the new Payload Templates, you can configure the desired outbound payload granularly down to a single metric level. The following picture shows an example of the payload configuration used for the message reflecting a new open alert in vRealize Operations.

Figure 5: Payload template for vROps open alert

Important are especially the “routing key” and the “payload” parts. The first one ensures that the message will be published to the right queue and the payload is what the consumer is expecting. In my use case, it is just an example containing only a portion of available data.

Both payload template examples, one for new (open) alerts and one for canceled (close) alerts are available on the VMware Code page:

VMware Code – Sample Exchange

Notification

The last step is to create appropriate vRealize Operations Alert Notifications which will be triggered as soon as specified criteria are met and configure the outbound instance and the payload for RabbitMQ as shown in the next picture.

Figure 6: Notification settings

And this is the result, messages published to all three queues.

Figure 7: Queues with messages

An example message looks like this one.

Figure 8: vROps open alert message

The missing part now is the consumers. It could be a vRealize Orchestrator workflow subscribed to a queue or any other consumer processing AMQP messages. Maybe something for a next blog post?

Stay safe.

Thomas – https://twitter.com/ThomasKopton

Quick Tip – vROps REST API requests using RegEx expressions

The vRealize Operations REST API allows using RegEx expressions in various GET methods.

Sometimes it is not clear how to use the expressions. Here a very simple example of using RegEx to retrieve vROps Virtual Machine objects, which have VM names starting with certain strings.

Encoded URL – example:

https://vrops-test.comp01.local/suite-api/api/resources?resourceKind=VirtualMachine&adapterKind=VMWARE&regex=s030v.*%7Cs030e.*%7CS030E.*

Example in Postman (of course, you need to replace the toke with a valid one):

https://vrops-test.comp01.local/suite-api/api/resources resourceKind=VirtualMachine&adapterKind=VMWARE&regex=s030v.*|s030e.*|S030E.*|S030V.*

And in Curl (of course, you need to replace the toke with a valid one):

curl -X GET \
 'https://vrops-test.comp01.local/suite-api/api/resources?resourceKind=VirtualMachine&adapterKind=VMWARE&regex=s030v.*%7Cs030e.*%7CS030E.*%7CS030V.*' \
 -H 'accept: application/json' \
 -H 'authorization: Basic xxxxxxxxxx \
 -H 'cache-control: no-cache' \
 -H 'content-type: application/json' \
 -H 'postman-token: yyyyyyyyyyyy'

it works perfectly and it is case sensitive.

Maintenance Mode for vRealize Operations Objects, Part 1

In this and following posts I will show you few different ways of putting vROps objects into maintenance.

Objects in vROps – short intro

The method used to mark an object as being in the maintenances state depends on the actual use case. As usually, the use case itself is being defined by:

  • Requirements – what does “maintenance” mean from technical perspective, what exactly needs to be achieved?
  • Constraints – is there any automation in place, which team is involved, what and how many objects are involved?
  • Assumptions – can we assume that especially the number and kind of objects will stay the same or what is the expected growth?
  • Risks – what are the risks of using a certain method?

Let us assume our first use case is:

“In case of ESXi host maintenance mode I will to stop collecting any data for this host and disable all alerts.”

As always, before we start any design and implementation, we did a proper assessment and collected further information:

  • There are only few ESXi hosts in maintenance at the same time
  • The team doing the maintenance in vCenter can also access and use the vROps UI
  • Automation could be used but is not mandatory
  • All implications from stopping metrics and property collection for a given object, like ESXi host are known and accepted

Let us first look at one specific vROps object, in that case a Host System (ESXi host), using the vROps inventory option:

Host System object in vROps Inventory – “Show Detail” option

We see that the object is properly collecting metrics and properties according to both indicators. The details of the selected object can be checked by clicking the “Show Detail” button. This redirects you to the Summary page of the object. The currently collected metrics and properties can be checked by activating the “Show collecting metrics” option:

Collected metrics for the selected object

Activating the maintenance mode – the UI-way

The easiest way to put an object into maintenance mode is to use the “Start Maintenance” button in the Inventory overview:

Enabling Maintenance Mode in vROps UI

In the following dialog you can specify how long the object should be put into maintenance:

Specifying the Maintenance duration

After starting the Maintenance, you can again check the new status of the object in the Inventory view:


Object status during vROps Maintenance

Now, if you use the same “Show collecting metrics” option in the metrics tab of the object you can see that there are no metrics or properties collecting data. The object stopped the data collection entirely:

No collected metrics and/or properties during vROps Maintenance for an object

At this point you need to know that from the monitoring perspective this object is still in the inventory but the is no single data point being collected, stored and calculated in any way. Any calculations relying on data points coming in for that particular object will not provide new data or calculate nor entirely correct data. What “correct” means, depends on the actual metric, dashboard, view etc.

Deactivating the maintenance mode – the UI-way

As easy as we started the maintenance as easy it can be stopped again using the UI:

Disabling Maintenance Mode in vROps UI

After clicking on the “End Maintenance” button, vROps will start collecting all data for the object again.

Activating the maintenance mode – the REST-API-way

Starting and ending the Maintenance Mode using the UI is easy and convenient if you have to deal with a small number of objects and there are no other constraints like complying with e.g. change management process which may require automation.

If you need to deal with a large number of objects or if the vROps Maintenance Mode should be part of an automated process, leveraging the vROps API is the best way to implement it.

As always when using the REST API, the first step is to obtain the Access Token. To acquire the token, following POST method needs to be used:

POST /api/auth/token/acquire
aquireToken REST API call

Once we have a valid token, we can call the Maintenance Mode related operations. Following REST operation starts the Maintenance Mode for a given object:

REST API method to start the maintenance mode

As you can see, you will need to determine the vROps Object ID of the object(s) you need to put into maintenance before you can call the actual Maintenance Mode calls.

Once you have the ID(s) the method can be used:

REST API Call – Start Maintenance Mode

Deactivating the maintenance mode – the REST-API-way

To end the maintenance following REST API method has to be used:

REST API Call – End Maintenance Mode

Again, you will need the vROps Object ID to call this method.

Part 2 – Outlook

In the upcoming Part 2 of this post, I will describe other methods which may be used in cases when the requirements differ from the use case described in this post.

Adding custom objects to vRealize Operations with the REST API and vRealize Orchestrator workflows

In a recent blog post “Adding Custom Metrics and Properties to vRealize Operations Objects with the REST API” I have described how to add additional metrics and properties to existing objects in vRealize Operations using the REST API and Postman.

But what if you would like to use the outstanding vRealize Operations engine to manage and visualize objects which cannot be collected using the rich Management Pack ecosystem?

Let’s imagine you have a cool Smart Home system and you would like to get it integrated into your vRealize Operations. You would like to have all the various elements as objects in vRealize Operations to push metrics and properties to those objects.

In this post I will show you how to create your own custom environments in vRealize Operations using REST and vRealize Orchestrator.

Of course, this is just an example and the environment, and the corresponding inputs are “virtual”. The used vRealize Orchestrator workflows are examples and there are different ways to achieve the same outcome.

The vRealize Orchestrator workflows, actions etc. related to this post can be found here:

https://code.vmware.com/samples?id=5457

The REST API call

There are several REST API calls available to create new objects in vRealize Operations. In this example we will use the method “createResourceUsingAdapterKind”:

POST /api/resources/adapterkinds/{adapterKindKey}

A sample URL body of the call can be as complex as in the official documentation or as easy as this one:

https://VROPS-FQDN/suite-api/api/resources/adapterkinds/MySmartHome
{
    "description": "My new entry",
    "creationTime": null,
    "resourceKey": {
        "name": "Living Room",
        "adapterKindKey": "MyHouse",
        "resourceKindKey": "Lightning"
    },
    "resourceStatusStates": [],
    "dtEnabled": true,
    "monitoringInterval": 5
}

This Entry will initially create our OPENAPI adapter instance for the new custom environment using the REST API. This environment will reflect a Smart Home installation containing various devices. This call will create a lightning device located in the living room. How to execute that call using vRealize Orchestrator will be described later on.

Input data

If we are going to use automation to create our objects it would be not very sophisticated to enter every value manually. Therefor as first step we design and create a JSON file describing the model of our Smart Home. This is an example how a very simple model may look like. The included properties and metrics will play a role in some subsequent blog posts.

{"SmartHome": {
    "Climate": [
      {"Name": "Living Room", "Properties": [
        { "Manufacturer" : "CompanyA", "FWVersion" : "2.01" }
        ], "Metrics": [
          { "Temperatur" : "21", "Humidity" : "40", "BateryStatus" : "94%"}
          ]},
      {"Name": "Kitchen", "Properties": [
        { "Manufacturer" : "CompanyA", "FWVersion" : "1.90" }
        ], "Metrics": [
          { "Temperatur" : "13", "Humidity" : "87", "BateryStatus" : "10%"}
          ]},
      {"Name": "Bedroom", "Properties": [
        { "Manufacturer" : "CompanyA", "FWVersion" : "2.1" }
        ], "Metrics": [
          { "Temperatur" : "16", "Humidity" : "35", "BateryStatus" : "74%"}
          ]}
    ],
    "Door": [
        {"Name": "Front", "Properties": [
          { "Manufacturer" : "CompanyA", "FWVersion" : "1.95" }
          ], "Metrics": [
            { "Status" : "OPEN"}
            ]},
        {"Name": "Garden", "Properties": [
          { "Manufacturer" : "CompanyA", "FWVersion" : "2.1" }
          ], "Metrics": [
            { "Status" : "CLOSED"}
            ]}
      ],
      "Lightning": [
        {"Name": "Living Room", "Properties": [
          { "Manufacturer" : "CompanyB", "FWVersion" : "0.91" }
          ], "Metrics": [
            { "Status" : "ON", "Level (%)" : "100%", "BateryStatus" : "76%"}
            ]},
        {"Name": "Kitchen", "Properties": [
          { "Manufacturer" : "CompanyC", "FWVersion" : "1.00" }
          ], "Metrics": [
            { "Status" : "ON", "Level (%)" : "75%", "BateryStatus" : "45%"}
            ]},
        {"Name": "Bedroom", "Properties": [
          { "Manufacturer" : "CompanyA", "FWVersion" : "2.90" }
          ], "Metrics": [
            { "Status" : "OFF", "Level (%)" : "0%", "BateryStatus" : "14%"}
            ]}
      ]
  }
}

Code 1: SmartHome Data as JSON

In this JSON example our Smart Home consists of three types of devices: Climate, Door and Lightning.

The instances of those devices can be located in different rooms and have various properties and metrics.

vRealize Orchestrator Preparation – Resource Element

To consume our JSON file in a vRealize Orchestrator workflow we need to import that file as “Resource Element”.

JSON file as vRealize Orchestrator Resource Element

After importing the JSON file into vRealize Orchestrator it can be used as an attribute in any vRealize Orchestrator workflow.

vRealize Orchestrator Preparation – Configuration Element

Acquiring a valid vRealize Operations authentication token is one part of our workflow. To make the process as automated as possible, we will store frequently used values in a vRealize Orchestrator “Configuration Element”. Such values are for example user credentials and token related information.

vRealize Orchestrator Configuration Element

A vRealize Orchestrator configuration element is a kind of dictionary data structure storing key:value pairs for ease of use in vRealize Orchestrator workflows.

vRealize Orchestrator Preparation – REST Endpoint and Operations

The last pre-requisite is a working REST endpoint including REST operations configured in our vRealize Orchestrator instance. vRealize Orchestrator provides appropriate workflows in the out-of-the-box library to add new REST hosts and operations offered by those hosts. The following figure shows the location of the workflows which can be used to configure a REST API provider.

vRealize Orchestrator Out-of-the-Box REST Configuration Workflows

Basically, we will use following REST calls:

POST /api/auth/token/acquire

POST /api/resources/adapterkinds/{adapterKindKey}

For details, please check the vRealize Operations REST API documentation provided by your vRealize Operations instance at:

https://$VROPSFQDN/suite-api/docs/rest/index.html

Authenticating to vRealize Operations using vRealize Orchestrator

As described in my post “Adding Custom Metrics and Properties to vRealize Operations Objects with the REST API” we will use the token based authentication in this example, too. This is how the AquireToken workflow looks like:

AquireToken Workflow

In the first step we are creating the JSON body:

jsonBody = {
  "username": "",
  "authSource": "",
  "password": "",
  "others": [],
  "otherAttributes": {}
};

var userName = vropsConfig.getAttributeWithKey("userName");
var userPassword = vropsConfig.getAttributeWithKey("userPassword");
var authSource = vropsConfig.getAttributeWithKey("authSource");
jsonBody.username = userName.value;
jsonBody.password = userPassword.value;
jsonBody.authSource = authSource.value;

Code 2: createJsonBody Snippet

The next scripting element, callREST, executes the REST call:

  
requestBody = JSON.stringify(jsonBody);
request = aquireToken.createRequest(null, requestBody);
request.contentType = "application/json";
request.setHeader("accept", "application/json");
response = request.execute();
jsonObject = JSON.parse(response.contentAsString);
vropsToken = jsonObject.token;
vropsTokenValidity = jsonObject.validity;

Code 3: callREST Snippet

Third element saves the received token, including the expiration information, in the configuration element:

vropsConfig.setAttributeWithKey("token",vropsToken); vropsConfig.setAttributeWithKey("tokenValidity",vropsTokenValidity);

Code 4: saveToken Snippet

Creating Custom Objects

The actual job is being done in the CreateCustomObjects workflow:

CreateCustomObjects Workflow

After some URL-encoding for inputs containing e.g. white spaces, we collect information about the new objects using the JSON file (newObjecstInfo), the code snippet here has been shortened and includes only one object category. All workflows can be .

template = newObjectsJSONFile.getContentAsMimeAttachment();
jsonObject = JSON.parse(template.content);
var objects1 = jsonObject.SmartHome["Climate"];……
newResources1 = new Array();
for (object1 in objects1) {
  newResources1.push(objects1[object1].Name);
}
numberResource1 = newResources1.length;

Code 5: newObjectsinfo Snippet

What we are doing here is basically creating an array of strings containing the names of our new custom objects. At this point the code needs to be adopted to the model defined in the JSON file to parse the data correctly.

The next steps are fairly simple, we check the validity of the token which we saved in a configuration element and acquire a new token in case our token is valid for less than 10 minutes:

var vropsTokenValidity = vropsConfig.getAttributeWithKey("tokenValidity");
if (vropsTokenValidity.value != null) {
  var dateNow = new Date();
  var diff = vropsTokenValidity.value - dateNow.getTime();
  tokenRemainigVaidity = diff / 1000 / 60;
} else {
  tokenRemainigVaidity = 0;
}

Code 6: checkToken Snippet

The following scripting elements take care of looping through the arrays of strings to create all object one by one.

The main part related to creating new vR Ops objects consists of creating the JSON body:

jsonBody = {
  "description": "New SmartHome entry",
  "creationTime": null,
  "resourceKey": {
    "name": "",
    "adapterKindKey": "",
    "resourceKindKey": ""
  },
  "resourceStatusStates": [],
  "dtEnabled": true,
  "monitoringInterval": 5
};
if (creatingResource1) {
  jsonBody.resourceKey.name = newResources1[numberResource1 - 1];
  jsonBody.resourceKey.adapterKindKey = adapterKindKey;
  jsonBody.resourceKey.resourceKindKey = resourceKind1;
  numberResource1--;
}

Code 7: createJSONBody Snippet

The very last step is to execute the REST API call to create a custom object:

var params = [encodedAdapterKind];
var token = vropsConfig.getAttributeWithKey("token").value;
var request = createResourceCall.createRequest(params, JSON.stringify(jsonBody));

request.contentType = "application/json";
request.setHeader("accept", "application/json");
request.setHeader("Authorization", "vRealizeOpsToken " + token);
var response = request.execute();

if (response.statusCode >= 400) {
  System.log(response.contentAsString);
  throw "HTTPError: status code: " + response.statusCode;
}

Code 8: callREST Snippet

If everything worked out as expected, we will see our new object types and instances of those types in vRealize Operations.

After importing the vRealize Orchestrator package you will need to configure the REST operation according to your environment:

Workflow Attributes – REST Operation

Our Smart Home in vRealize Operations

The Environment view in vRealize Operations 7.0 including our custom objects:

vRealize Operations Environment View

In some subsequent posts I am going to explain how to push metrics and properties to such custom objects.

Some other interesting object types which may become relevant in the future, where vRealize Operations instances will be found even on space ships use the following JSON as input:

{
  "StarFleet": {
      "Ships": [
          {
              "Name": "Enterprise",
              "Properties": [
                  {
                      "Class": "Galaxy",
                      "Registry": "NCC-1701-D",
                      "Captain": "Picard"
                  }
              ],
              "Metrics": [
                  {
                      "CurrentSpeed": "9",
                      "ShieldStatus": "100"
                  }
              ]
          },
          {
              "Name": "Voyager",
              "Properties": [
                  {
                      "Class": "Intrepid",
                      "Registry": "NCC-74656",
                      "Captain": "Janeway"
                  }
              ],
              "Metrics": [
                  {
                      "CurrentSpeed": "9",
                      "ShieldStatus": "90"
                  }
              ]
          },
          {
              "Name": "Defiant",
              "Properties": [
                  {
                      "Class": "Defiant",
                      "Registry": "NX-74205",
                      "Captain": "Worf"
                  }
              ],
              "Metrics": [
                  {
                      "CurrentSpeed": "7",
                      "ShieldStatus": "80"
                  }
              ]
          }
      ],
      "Planets": [
          {
              "Name": "United Earth",
              "Properties": [
                  {
                      "Capital": "San Francisco, Paris",
                      "Founded": "2150",
                      "MajorSpecies": "Humans"
                  }
              ],
              "Metrics": [
                  {
                      "Population": "0"
                  }
              ]
          },
          {
              "Name": "Vulcan",
              "Properties": [
                  {
                      "Capital": "ShiKahr",
                      "Founded": "400",
                      "MajorSpecies": "Vulcanians"
                  }
              ],
              "Metrics": [
                  {
                      "Population": "0"
                  }
              ]
          },
          {
              "Name": "Andorian Empire",
              "Properties": [
                  {
                      "Capital": "Andor",
                      "Founded": "0000",
                      "MajorSpecies": "Andorians"
                  }
              ],
              "Metrics": [
                  {
                      "Population": "0"
                  }
              ]
          },
          {
              "Name": "Tellar",
              "Properties": [
                  {
                      "Capital": "Tellar Prime",
                      "Founded": "0000",
                      "MajorSpecies": "Tellarites"
                  }
              ],
              "Metrics": [
                  {
                      "Population": "0"
                  }
              ]
          }
      ]
  }
}

With some modifications to the newObjectsInfo scripting element:

template = newObjectsJSONFile.getContentAsMimeAttachment();
jsonObject = JSON.parse(template.content);

var objects1 = jsonObject.StarFleet["Ships"];
var objects2 = jsonObject.StarFleet["Planets"];
var properties;
var metrics;

newResources1 = new Array();
newResources2 = new Array();

for (object1 in objects1)
{
	System.log(objects1[object1].Name);
	
	newResources1.push(objects1[object1].Name);
	
	properties = objects1[object1].Properties;
	metrics = objects1[object1].Metrics;
	
	for (property in properties)
	{
		System.log(objects1[object1].Properties[property].Class);
		System.log(objects1[object1].Properties[property].Registry);
		System.log(objects1[object1].Properties[property].Captain);
	}
	
	for (metric in metrics)
	{
		System.log(objects1[object1].Metrics[metric].CurrentSpeed);
		System.log(objects1[object1].Metrics[metric].ShieldStatus);
	}
}

for (object2 in objects2)
{
	System.log(objects2[object2].Name);
	
	newResources2.push(objects2[object2].Name);
	
	properties = objects2[object2].Properties;
	metrics = objects2[object2].Metrics;
	
	for (property in properties)
	{
		System.log(objects2[object2].Properties[property].Capital);
		System.log(objects2[object2].Properties[property].Founded);
		System.log(objects2[object2].Properties[property].MajorSpecies);
	}
	
	for (metric in metrics)
	{
		System.log(objects2[object2].Metrics[metric].Population);
	}
}

numberResource1 = newResources1.length;
numberResource2 = newResources2.length;

Run the adjusted workflow:

And vR Ops ready to help to boldly go where no one has gone before…

Happy coding…

Thomas