In a recent blog post “Adding Custom Metrics and Properties to vRealize Operations Objects with the REST API” I have described how to add additional metrics and properties to existing objects in vRealize Operations using the REST API and Postman.
But what if you would like to use the outstanding vRealize Operations engine to manage and visualize objects which cannot be collected using the rich Management Pack ecosystem?
Let’s imagine you have a cool Smart Home system and you would like to get it integrated into your vRealize Operations. You would like to have all the various elements as objects in vRealize Operations to push metrics and properties to those objects.
In this post I will show you how to create your own custom environments in vRealize Operations using REST and vRealize Orchestrator.
Of course, this is just an example and the environment, and the corresponding inputs are “virtual”. The used vRealize Orchestrator workflows are examples and there are different ways to achieve the same outcome.
The vRealize Orchestrator workflows, actions etc. related to this post can be found here:
https://code.vmware.com/samples?id=5457
The REST API call
There are several REST API calls available to create new objects in vRealize Operations. In this example we will use the method “createResourceUsingAdapterKind”:
POST /api/resources/adapterkinds/{adapterKindKey}A sample URL body of the call can be as complex as in the official documentation or as easy as this one:
https://VROPS-FQDN/suite-api/api/resources/adapterkinds/MySmartHome
{
    "description": "My new entry",
    "creationTime": null,
    "resourceKey": {
        "name": "Living Room",
        "adapterKindKey": "MyHouse",
        "resourceKindKey": "Lightning"
    },
    "resourceStatusStates": [],
    "dtEnabled": true,
    "monitoringInterval": 5
}
This Entry will initially create our OPENAPI adapter instance for the new custom environment using the REST API. This environment will reflect a Smart Home installation containing various devices. This call will create a lightning device located in the living room. How to execute that call using vRealize Orchestrator will be described later on.
Input data
If we are going to use automation to create our objects it would be not very sophisticated to enter every value manually. Therefor as first step we design and create a JSON file describing the model of our Smart Home. This is an example how a very simple model may look like. The included properties and metrics will play a role in some subsequent blog posts.
{"SmartHome": {
    "Climate": [
      {"Name": "Living Room", "Properties": [
        { "Manufacturer" : "CompanyA", "FWVersion" : "2.01" }
        ], "Metrics": [
          { "Temperatur" : "21", "Humidity" : "40", "BateryStatus" : "94%"}
          ]},
      {"Name": "Kitchen", "Properties": [
        { "Manufacturer" : "CompanyA", "FWVersion" : "1.90" }
        ], "Metrics": [
          { "Temperatur" : "13", "Humidity" : "87", "BateryStatus" : "10%"}
          ]},
      {"Name": "Bedroom", "Properties": [
        { "Manufacturer" : "CompanyA", "FWVersion" : "2.1" }
        ], "Metrics": [
          { "Temperatur" : "16", "Humidity" : "35", "BateryStatus" : "74%"}
          ]}
    ],
    "Door": [
        {"Name": "Front", "Properties": [
          { "Manufacturer" : "CompanyA", "FWVersion" : "1.95" }
          ], "Metrics": [
            { "Status" : "OPEN"}
            ]},
        {"Name": "Garden", "Properties": [
          { "Manufacturer" : "CompanyA", "FWVersion" : "2.1" }
          ], "Metrics": [
            { "Status" : "CLOSED"}
            ]}
      ],
      "Lightning": [
        {"Name": "Living Room", "Properties": [
          { "Manufacturer" : "CompanyB", "FWVersion" : "0.91" }
          ], "Metrics": [
            { "Status" : "ON", "Level (%)" : "100%", "BateryStatus" : "76%"}
            ]},
        {"Name": "Kitchen", "Properties": [
          { "Manufacturer" : "CompanyC", "FWVersion" : "1.00" }
          ], "Metrics": [
            { "Status" : "ON", "Level (%)" : "75%", "BateryStatus" : "45%"}
            ]},
        {"Name": "Bedroom", "Properties": [
          { "Manufacturer" : "CompanyA", "FWVersion" : "2.90" }
          ], "Metrics": [
            { "Status" : "OFF", "Level (%)" : "0%", "BateryStatus" : "14%"}
            ]}
      ]
  }
}
Code 1: SmartHome Data as JSON
In this JSON example our Smart Home consists of three types of devices: Climate, Door and Lightning.
The instances of those devices can be located in different rooms and have various properties and metrics.
vRealize Orchestrator Preparation – Resource Element
To consume our JSON file in a vRealize Orchestrator workflow we need to import that file as “Resource Element”.
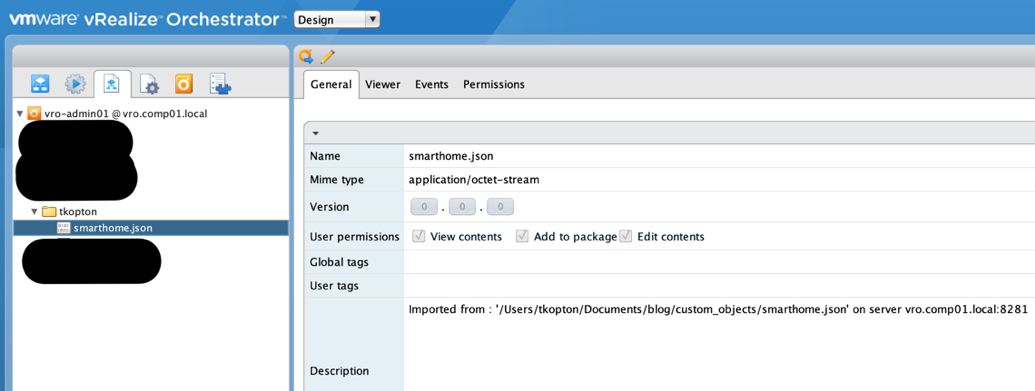
After importing the JSON file into vRealize Orchestrator it can be used as an attribute in any vRealize Orchestrator workflow.
vRealize Orchestrator Preparation – Configuration Element
Acquiring a valid vRealize Operations authentication token is one part of our workflow. To make the process as automated as possible, we will store frequently used values in a vRealize Orchestrator “Configuration Element”. Such values are for example user credentials and token related information.
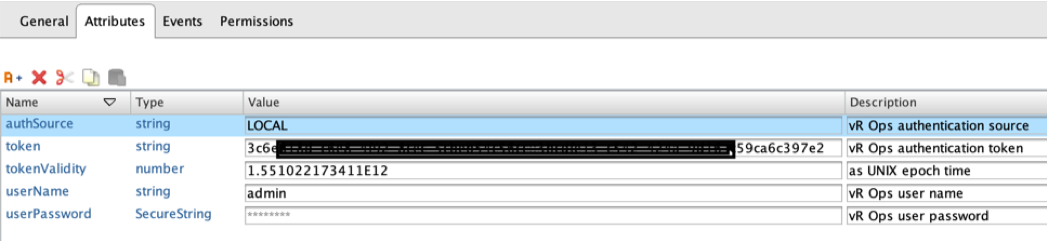
A vRealize Orchestrator configuration element is a kind of dictionary data structure storing key:value pairs for ease of use in vRealize Orchestrator workflows.
vRealize Orchestrator Preparation – REST Endpoint and Operations
The last pre-requisite is a working REST endpoint including REST operations configured in our vRealize Orchestrator instance. vRealize Orchestrator provides appropriate workflows in the out-of-the-box library to add new REST hosts and operations offered by those hosts. The following figure shows the location of the workflows which can be used to configure a REST API provider.

Basically, we will use following REST calls:
POST /api/auth/token/acquire

POST /api/resources/adapterkinds/{adapterKindKey}
For details, please check the vRealize Operations REST API documentation provided by your vRealize Operations instance at:
https://$VROPSFQDN/suite-api/docs/rest/index.html
Authenticating to vRealize Operations using vRealize Orchestrator
As described in my post “Adding Custom Metrics and Properties to vRealize Operations Objects with the REST API” we will use the token based authentication in this example, too. This is how the AquireToken workflow looks like:

In the first step we are creating the JSON body:
jsonBody = {
  "username": "",
  "authSource": "",
  "password": "",
  "others": [],
  "otherAttributes": {}
};

var userName = vropsConfig.getAttributeWithKey("userName");
var userPassword = vropsConfig.getAttributeWithKey("userPassword");
var authSource = vropsConfig.getAttributeWithKey("authSource");
jsonBody.username = userName.value;
jsonBody.password = userPassword.value;
jsonBody.authSource = authSource.value;
Code 2: createJsonBody Snippet
The next scripting element, callREST, executes the REST call:
requestBody = JSON.stringify(jsonBody);
request = aquireToken.createRequest(null, requestBody);
request.contentType = "application/json";
request.setHeader("accept", "application/json");
response = request.execute();
jsonObject = JSON.parse(response.contentAsString);
vropsToken = jsonObject.token;
vropsTokenValidity = jsonObject.validity;
Code 3: callREST Snippet
Third element saves the received token, including the expiration information, in the configuration element:
vropsConfig.setAttributeWithKey("token",vropsToken); vropsConfig.setAttributeWithKey("tokenValidity",vropsTokenValidity);Code 4: saveToken Snippet
Creating Custom Objects
The actual job is being done in the CreateCustomObjects workflow:

After some URL-encoding for inputs containing e.g. white spaces, we collect information about the new objects using the JSON file (newObjecstInfo), the code snippet here has been shortened and includes only one object category. All workflows can be .
template = newObjectsJSONFile.getContentAsMimeAttachment();
jsonObject = JSON.parse(template.content);
var objects1 = jsonObject.SmartHome["Climate"];……
newResources1 = new Array();
for (object1 in objects1) {
  newResources1.push(objects1[object1].Name);
}
numberResource1 = newResources1.length;
Code 5: newObjectsinfo Snippet
What we are doing here is basically creating an array of strings containing the names of our new custom objects. At this point the code needs to be adopted to the model defined in the JSON file to parse the data correctly.
The next steps are fairly simple, we check the validity of the token which we saved in a configuration element and acquire a new token in case our token is valid for less than 10 minutes:
var vropsTokenValidity = vropsConfig.getAttributeWithKey("tokenValidity");
if (vropsTokenValidity.value != null) {
  var dateNow = new Date();
  var diff = vropsTokenValidity.value - dateNow.getTime();
  tokenRemainigVaidity = diff / 1000 / 60;
} else {
  tokenRemainigVaidity = 0;
}
Code 6: checkToken Snippet
The following scripting elements take care of looping through the arrays of strings to create all object one by one.
The main part related to creating new vR Ops objects consists of creating the JSON body:
jsonBody = {
  "description": "New SmartHome entry",
  "creationTime": null,
  "resourceKey": {
    "name": "",
    "adapterKindKey": "",
    "resourceKindKey": ""
  },
  "resourceStatusStates": [],
  "dtEnabled": true,
  "monitoringInterval": 5
};
if (creatingResource1) {
  jsonBody.resourceKey.name = newResources1[numberResource1 - 1];
  jsonBody.resourceKey.adapterKindKey = adapterKindKey;
  jsonBody.resourceKey.resourceKindKey = resourceKind1;
  numberResource1--;
}
Code 7: createJSONBody Snippet
The very last step is to execute the REST API call to create a custom object:
var params = [encodedAdapterKind];
var token = vropsConfig.getAttributeWithKey("token").value;
var request = createResourceCall.createRequest(params, JSON.stringify(jsonBody));

request.contentType = "application/json";
request.setHeader("accept", "application/json");
request.setHeader("Authorization", "vRealizeOpsToken " + token);
var response = request.execute();

if (response.statusCode >= 400) {
  System.log(response.contentAsString);
  throw "HTTPError: status code: " + response.statusCode;
}
Code 8: callREST Snippet
If everything worked out as expected, we will see our new object types and instances of those types in vRealize Operations.
After importing the vRealize Orchestrator package you will need to configure the REST operation according to your environment:

Our Smart Home in vRealize Operations
The Environment view in vRealize Operations 7.0 including our custom objects:
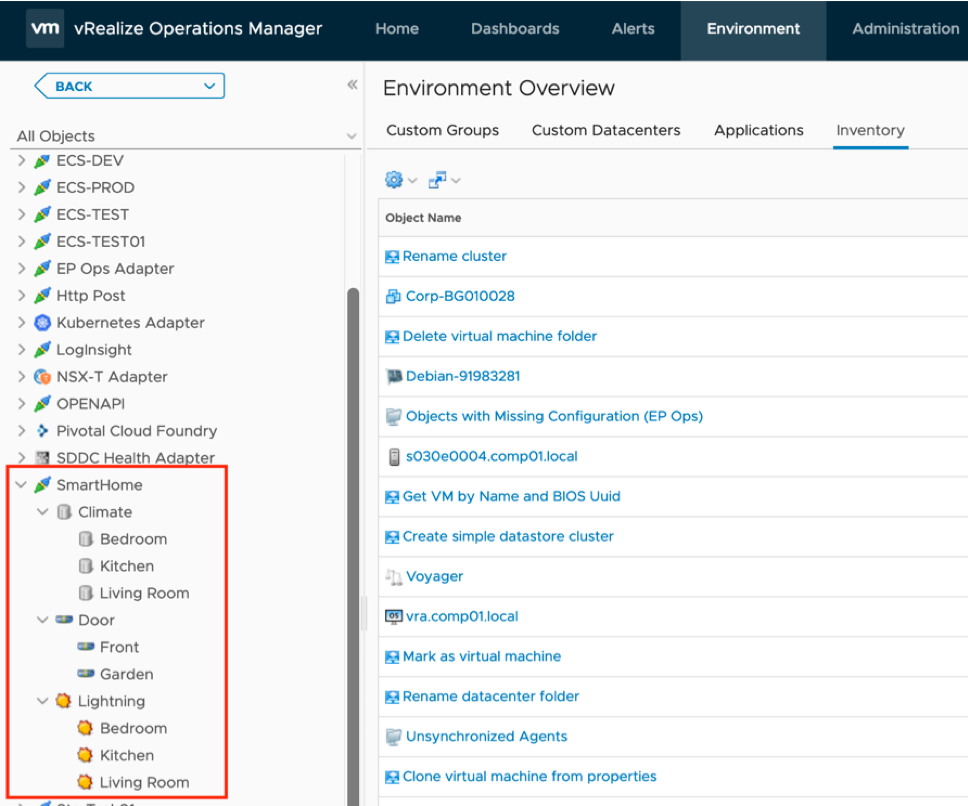
In some subsequent posts I am going to explain how to push metrics and properties to such custom objects.
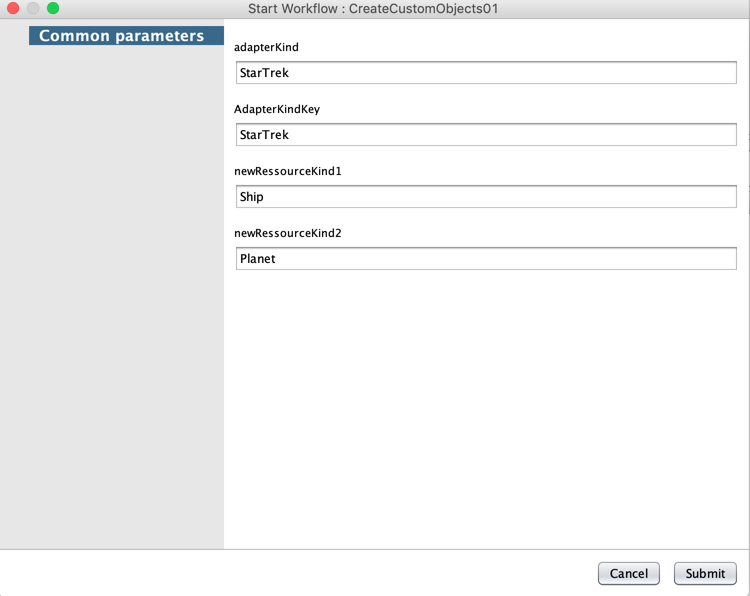
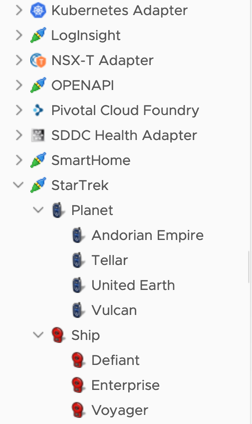
Some other interesting object types which may become relevant in the future, where vRealize Operations instances will be found even on space ships use the following JSON as input:
{
  "StarFleet": {
      "Ships": [
          {
              "Name": "Enterprise",
              "Properties": [
                  {
                      "Class": "Galaxy",
                      "Registry": "NCC-1701-D",
                      "Captain": "Picard"
                  }
              ],
              "Metrics": [
                  {
                      "CurrentSpeed": "9",
                      "ShieldStatus": "100"
                  }
              ]
          },
          {
              "Name": "Voyager",
              "Properties": [
                  {
                      "Class": "Intrepid",
                      "Registry": "NCC-74656",
                      "Captain": "Janeway"
                  }
              ],
              "Metrics": [
                  {
                      "CurrentSpeed": "9",
                      "ShieldStatus": "90"
                  }
              ]
          },
          {
              "Name": "Defiant",
              "Properties": [
                  {
                      "Class": "Defiant",
                      "Registry": "NX-74205",
                      "Captain": "Worf"
                  }
              ],
              "Metrics": [
                  {
                      "CurrentSpeed": "7",
                      "ShieldStatus": "80"
                  }
              ]
          }
      ],
      "Planets": [
          {
              "Name": "United Earth",
              "Properties": [
                  {
                      "Capital": "San Francisco, Paris",
                      "Founded": "2150",
                      "MajorSpecies": "Humans"
                  }
              ],
              "Metrics": [
                  {
                      "Population": "0"
                  }
              ]
          },
          {
              "Name": "Vulcan",
              "Properties": [
                  {
                      "Capital": "ShiKahr",
                      "Founded": "400",
                      "MajorSpecies": "Vulcanians"
                  }
              ],
              "Metrics": [
                  {
                      "Population": "0"
                  }
              ]
          },
          {
              "Name": "Andorian Empire",
              "Properties": [
                  {
                      "Capital": "Andor",
                      "Founded": "0000",
                      "MajorSpecies": "Andorians"
                  }
              ],
              "Metrics": [
                  {
                      "Population": "0"
                  }
              ]
          },
          {
              "Name": "Tellar",
              "Properties": [
                  {
                      "Capital": "Tellar Prime",
                      "Founded": "0000",
                      "MajorSpecies": "Tellarites"
                  }
              ],
              "Metrics": [
                  {
                      "Population": "0"
                  }
              ]
          }
      ]
  }
}
With some modifications to the newObjectsInfo scripting element:
template = newObjectsJSONFile.getContentAsMimeAttachment();
jsonObject = JSON.parse(template.content);

var objects1 = jsonObject.StarFleet["Ships"];
var objects2 = jsonObject.StarFleet["Planets"];
var properties;
var metrics;

newResources1 = new Array();
newResources2 = new Array();

for (object1 in objects1)
{
	System.log(objects1[object1].Name);

	newResources1.push(objects1[object1].Name);

	properties = objects1[object1].Properties;
	metrics = objects1[object1].Metrics;

	for (property in properties)
	{
		System.log(objects1[object1].Properties[property].Class);
		System.log(objects1[object1].Properties[property].Registry);
		System.log(objects1[object1].Properties[property].Captain);
	}

	for (metric in metrics)
	{
		System.log(objects1[object1].Metrics[metric].CurrentSpeed);
		System.log(objects1[object1].Metrics[metric].ShieldStatus);
	}
}

for (object2 in objects2)
{
	System.log(objects2[object2].Name);

	newResources2.push(objects2[object2].Name);

	properties = objects2[object2].Properties;
	metrics = objects2[object2].Metrics;

	for (property in properties)
	{
		System.log(objects2[object2].Properties[property].Capital);
		System.log(objects2[object2].Properties[property].Founded);
		System.log(objects2[object2].Properties[property].MajorSpecies);
	}

	for (metric in metrics)
	{
		System.log(objects2[object2].Metrics[metric].Population);
	}
}

numberResource1 = newResources1.length;
numberResource2 = newResources2.length;
Run the adjusted workflow:
And vR Ops ready to help to boldly go where no one has gone before…
Happy coding…
Thomas
New Link to broadcom developer-portal:
https://community.broadcom.com/developer-portal/viewdocument/adding-custom-objects-to-vrealize-o?CommunityKey=d743a854-b7b6-437f-9698-4dd8983b11cf&tab=librarydocuments?scrollString=%22custom%20objects%22